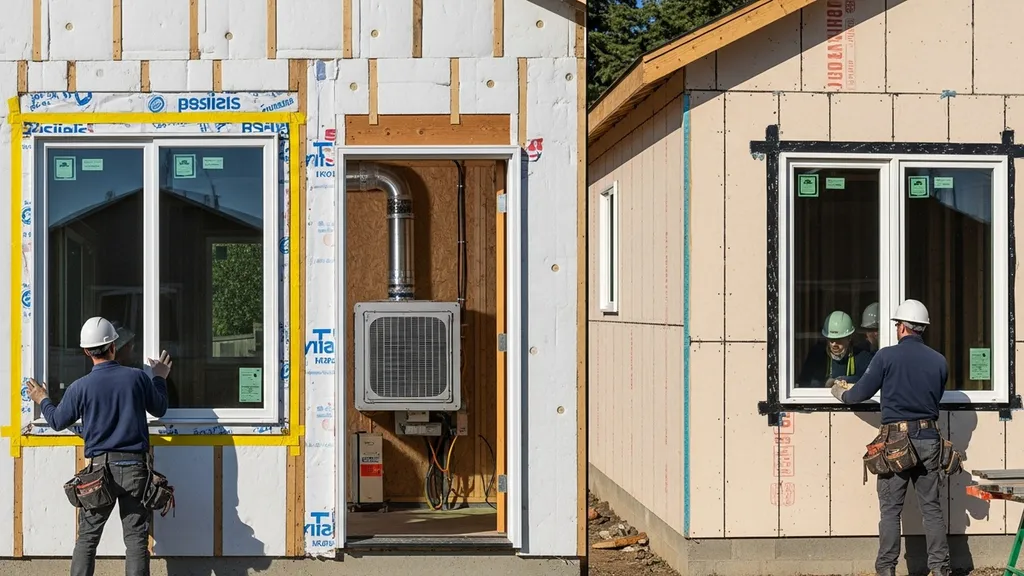
Compare passive house and traditional construction across 10 practical differences—energy, airtightness, windows, costs, and retrofit options for DIY builders.
Passive House vs Traditional Construction: 10 Key Differences
Choosing between passive house vs traditional construction is a common crossroads for first-time self-builders and DIY eco-home enthusiasts. This article compares both approaches across ten practical differences—energy use, airtightness, windows, mechanical systems, costs, retrofit paths and more—so readers can match project goals (comfort, bills, carbon, budget) to a realistic building path. Expect clear trade-offs, specific performance targets, and actionable next steps for both new builds and retrofits.
TL;DR:
- Passive houses aim for airtightness ≤ 0.6 ACH50 and very low heating demand, typically cutting heating energy by 70–90% versus code-built homes.
- Start with airtightness and continuous insulation first for the biggest comfort and savings; prioritize window upgrades and MVHR when budget allows.
- For limited budgets, use a staged path: targeted retrofit of insulation + airtightness, then add high-performance windows and MVHR; for long-term owners, full passive approach makes most sense.
Quick Overview: What This Comparison Covers and Why It Matters
TL;DR Summary
This guide compares passive house design—a performance standard built around very high insulation, continuous air barriers, and mechanical ventilation with heat recovery (MVHR)—to conventional, code-minimum construction with typical central heating and standard windows. It highlights ten concrete differences you’ll face on a DIY or small-contract build: envelope strategy, airtightness, glazing, thermal bridging, mechanical systems, energy use, design process, materials and embodied carbon, construction tolerances, and cost structure. Readers will get scenario-based recommendations: when to retrofit, when to pursue full passive, and which hybrid choices give the best return.
Who This Guide is For
This is for budget-conscious DIY homebuilders, aspiring self-builders, tiny-house planners, and small contractors who want clear, practical guidance on whether to pursue a passive-house approach or stick with conventional construction. It assumes basic familiarity with insulation and framing but explains performance targets and testing methods so readers can plan next steps like getting a blower-door test or a PHPP model.
For a brief official primer on passive-house principles and its goals, see the Australian government’s overview: the passive house design standard explained.
Comparison Table — Passive House vs Traditional Construction (TL;DR)
| Feature | Passive House | Traditional construction |
|---|---|---|
| Insulation (typical) | Very high, continuous CI, low U-values | Code-minimum cavity batts, higher U-values |
| Airtightness (ACH50) | ≤ 0.6 ACH50 (target) | Often 5–10+ ACH50 in practice |
| Windows | Triple glazing, thermally broken frames | Double glazing, standard frames |
| Mechanical ventilation | MVHR (balanced, heat recovery) | Central furnace/AC with intermittent exhaust |
| Thermal bridging | Minimized with CI and details | Common at studs, balconies, slab edges |
| Predicted energy use | Very low heating demand (large % reduction) | Higher heating/cooling loads |
| Upfront cost | Higher (materials, design, testing) | Lower initial cost |
| Maintenance | MVHR filters, occasional commissioning | HVAC maintenance, more frequent replacements |
| Retrofit complexity | High but feasible with deep retrofit plan | Easier to do incremental improvements |
| Occupant comfort | Very stable temps, minimal drafts | More temperature swings, drafts possible |
Interpretation: Passive-house builds require more upfront design, tighter execution, and higher-quality windows and envelope work, but deliver much lower operational energy and higher comfort. Traditional builds are cheaper up front and more familiar to trades, but will usually use more energy and need HVAC-oriented maintenance. For standards context on general ISO processes and standards development, see ISO standards overview.
Passive House: Overview, Strengths, Weaknesses, Best For
Overview of Passive-house Principles
Passive house is a performance standard (originally Passivhaus) focused on achieving thermal comfort with minimal active heating and cooling through four pillars: very high insulation, continuous airtightness, optimized glazing and solar gains, and balanced mechanical ventilation with heat recovery (MVHR). Designs are typically modeled with PHPP or similar tools to predict annual energy demand and validate performance goals.
This short video illustrates airtight membrane taping, a blower-door test, MVHR layout, and triple-glazed window installation—useful visuals for builders who want to see the detailing.
Strengths
- Improved comfort: near-uniform indoor temps and reduced drafts.
- Lower heating and cooling bills: major reductions in annual energy use when compared to code-built homes.
- Predictable performance: modeling with PHPP produces reliable energy projections when construction follows the design.
- Air quality: balanced ventilation reduces indoor pollutants when MVHR is well maintained. For U.S./international ventilation and accessibility considerations, consult the Access Board guidance linked in this section: ADA accessibility standards and building guidance.
Weaknesses
- Higher upfront costs for insulation, triple glazing, design and testing.
- Requires precise detailing and skilled trades for airtightness and thermal-bridge control.
- Less tolerance for on-site design changes; late changes can undermine performance.
Best For
- Owner-occupiers planning to stay long-term and willing to invest up front for low bills and comfort.
- New builds on a site where orientation and compact form can be designed intentionally.
- Small projects where early design investment and quality control are feasible.
Link for window selection and installation details: see our guide to passive house window selection.
Traditional Construction: Overview, Strengths, Weaknesses, Best For
Overview of Conventional Code-built Approaches
Traditional construction follows local building codes (IECC, national/regional codes) with typical cavity insulation, housewrap, standard double-glazed windows, and a central HVAC sized for peak loads. Quality varies by contractor and oversight; airtightness and thermal-bridge control are often secondary to schedule and budget.
For a comparative discussion of passive vs conventional builds, see this practical blog overview: passive house vs traditional house: practical comparison.
Strengths
- Lower initial cost and faster build cycles for common assemblies.
- Familiarity for local trades and plentiful supply chains.
- Easier to add conventional HVAC upgrades or add-ons without redesigning the whole envelope.
Weaknesses
- Higher operational energy in most climates unless higher-efficiency systems are specified.
- Drafts and uneven temperatures are common if airtightness and insulation details are inconsistent.
- Retrofit to high-performance levels often requires invasive upgrades.
Best For
- Projects with strict upfront budget limits or short ownership horizons.
- Standard builds where rapid construction and trade familiarity are priorities.
- Owners who prefer to invest incrementally in energy upgrades later.
Option: Passive House Retrofit — Bridging the Two Approaches
What a Passive Retrofit Looks Like
A passive house retrofit (or deep-energy retrofit) upgrades an existing home toward passive performance by adding continuous insulation externally or internally, sealing the envelope to achieve much lower infiltration, replacing or upgrading windows, and installing an MVHR system sized to the reduced ventilation needs. Steps typically follow an audit, air-sealing plan, targeted insulation, window replacement, and MVHR installation.
Case studies and stepwise methods show substantial savings but require careful staging and moisture management. See our step-by-step resource: DIY passive house retrofit. For additional, deeper retrofit strategies, consult the deep energy retrofit guide and this recent analysis of retrofit costs and benefits: Passive House Building Guide 2026: costs, standards & benefits.
Strengths and Limitations
Strengths: Large energy savings without full demolition, improved comfort, and the ability to phase work to match budgets. Limitations: cost and complexity of achieving continuous external insulation on an occupied home, potential need to move out during major work, and the challenge of reaching full passive targets in some building forms.
Best For
- Owners wanting large savings on an existing home but who cannot or will not rebuild.
- Sites where improving the envelope is feasible (room for added cladding or wall thickness).
- Owners who want to stagger upgrades over years: start with airtightness and insulation, add MVHR later.
Difference 1 — Thermal Envelope: Insulation Levels and Strategy (passive House vs Traditional Construction)
Typical Insulation Targets
Passive-house projects push for much higher insulation and continuous insulation (CI) to reduce thermal bridging and lower U-values. Traditional construction usually meets code minimums (which vary by region and code cycle). Research and field guidance highlight that continuous exterior insulation and thicker assemblies outperform cavity-only approaches for reducing heat loss and preventing interstitial condensation; see Building Science Institute’s comparison of Passivhaus and other standards for background: Passivhaus standard comparison.
Where Insulation Goes — Continuous vs Cavity
- Passive route: CI on exterior sheathing, insulated roof assemblies (often with exterior roof insulation options to protect rafters), insulated slab edges, and careful detailing at junctions. For exterior roof strategies, see our exterior roof insulation options.
- Traditional route: cavity batt insulation in walls and ceilings, with sheathing and housewrap as a weather barrier. Thermal bridging at studs and plate connections is common.
Practical DIY Tips to Reach Higher R-values
- Use advanced wall framing to increase cavity depth and reduce studs; see advanced wall framing steps.
- Favor exterior continuous insulation (rigid foam, mineral wool boards) when possible to limit studs as thermal bridges.
- Insulate slab edges and under-slab where feasible to reduce heat loss.
- Account for moisture control: adding CI changes vapor profiles—review assemblies or consult a building scientist for cold climates.
Difference 2 — Airtightness and Infiltration Control (passive House vs Traditional Construction)
Airtightness Goals and What ACH50 Means
Airtightness quantifies uncontrolled air leakage. The blower-door test measures air changes per hour at 50 pascals (ACH50). Passive-house projects target around ≤ 0.6 ACH50; typical conventional homes often test significantly higher (commonly 2–10+ ACH50 depending on quality and region).
Common Leakage Paths and How Each Approach Addresses Them
Typical leaks occur at service penetrations, window/door jambs, top plates, and mechanical penetrations. Passive-house builds plan a continuous air barrier layer and use taped membranes, gaskets, and careful window flashings to control these paths. Traditional builds may rely on housewrap and local sealing, which is less systematic.
Testing and DIY-friendly Airtightness Improvements
- Start with a blower-door test early to find major leaks.
- Seal top plates, sill plates, and service penetrations with gaskets and canned foam.
- Tape membrane seams and use airtight electrical boxes or gaskets.
- Use the construction drawings to identify the air barrier plane—learn to read plans in our reading blueprints basics.
Difference 3 — Windows and Glazing Performance (passive House vs Traditional Construction)
Typical Window Specifications
Passive-house windows are usually triple-glazed with low-e coatings, warm edge spacers, and thermally broken frames. U-values are much lower than typical double-glazed units. Traditional builds often use double glazing with standard frames and higher U-values.
Placement and Orientation Strategies
Passive designs optimize solar gains: larger south-facing glazing in northern-hemisphere builds with shading for summer, limited east/west glazing to reduce morning/evening overheating, and compact forms to reduce envelope area. Traditional builds may not optimize orientation strictly and instead size HVAC systems to compensate.
Installation Details That Affect Performance
Correct installation—respecting the air barrier plane, installing insulated window sills, and meticulous flashing—affects condensation and comfort. For detailed selection and installation guidance, see passive house window selection. Pair window strategy with photovoltaic orientation advice in how to choose solar panels that match your roof when aiming to offset operational loads.
Difference 4 — Thermal Bridging and Detailing (passive House vs Traditional Construction)
What Thermal Bridges Are and Why They Matter
Thermal bridges are locations where heat bypasses insulation—studs, slab edges, balconies—and they reduce whole-wall performance and can cause condensation risk. Passive-house detailing targets continuous insulation and special connectors to interrupt heat flow.
Design and Construction Details That Eliminate Bridges
- Use continuous exterior insulation.
- Specify insulated balcony brackets or use thermal breaks.
- Isolate slab edges with rigid insulation.
- Use a rainscreen cladding to protect CI and drainage; practical cladding and drainage details are covered in our rain-screen wall details.
Cost-effective Detailing for DIY Builders
- Apply exterior rigid insulation in 2–3 layers to stagger joints.
- Use structural sheathing and furring strips rather than thick studs for walls that need more insulation depth.
- Detail small bridges at penetrations with local CI patches and tape.
Difference 5 — Mechanical Systems: MVHR vs Conventional HVAC (passive House vs Traditional Construction)
How MVHR Works and its Role in Passive Designs
MVHR provides balanced ventilation, extracting stale air and supplying fresh air while transferring heat between airstreams. In a low-load passive house, MVHR often handles the small remaining heating need and preserves indoor air quality.
Conventional HVAC Sizing and Typical Inefficiencies
Traditional HVAC systems are sized for peak heating and cooling and often run at lower part-load efficiency. Distribution losses in ductwork and uncontrolled infiltration raise operating costs.
Maintenance, Costs, and What Diyers Should Know
- MVHR maintenance: filter changes roughly every 3–12 months, periodic heat-exchanger cleaning, and annual performance checks.
- Duct design and commissioning are critical—poor design nullifies MVHR benefits.
- For small or off-grid projects, see practical ventilation tips in ventilation for off-grid cabins.
Difference 6 — Energy Use and Operational Costs (passive House vs Traditional Construction)
Expected Energy Savings and How to Think About Them
Passive houses commonly reduce heating energy by 70–90% compared to typical code-built homes, depending on climate and baseline. Savings depend on fuel prices, occupant behavior, and system efficiency. Use an energy-cost model or our passive house cost calculator to compare upfront vs operating costs across scenarios.
Simple Payback and Lifecycle Cost Considerations
Higher initial costs can be offset by lower energy bills over 10–30 years depending on energy prices and discount rates. Lifecycle thinking should include maintenance and replacement cycles for windows and mechanical systems.
Monitoring and Measuring Performance
Post-build monitoring with energy loggers and periodic blower-door tests helps verify performance and catch envelope or MVHR issues. For tracking tactics, see monitor energy performance.
Difference 7 — Design Approach and Planning Process (passive House vs Traditional Construction)
Integrated Design vs Sequential Trades
Passive projects require integrated design—early modeling (PHPP), coordinated details, and strict tolerance control. Traditional builds often proceed sequentially: framing, rough-in, finishes, with more flexibility for on-site decisions.
Role of Performance Modeling and Early Decisions
Early modeling defines insulation targets, window sizes, and MVHR capacity. Changing form or major assemblies late is costly. For guidance on scaling passive strategies, consult apply passive house principles.
Impact on Timeline and Changes During Construction
Expect longer design lead times for passive projects and more rigorous quality control during construction. But once sealed and insulated, passive builds can finish HVAC commissioning faster because loads are minimal.
Difference 8 — Materials, Embodied Carbon, and Sustainability Trade-offs (passive House vs Traditional Construction)
Trade-offs Between Operational Savings and Embodied Carbon
Passive houses use more insulation and higher-spec windows, increasing embodied carbon up front, but operational savings reduce lifecycle emissions. There’s debate about the breakpoint where additional insulation yields diminishing returns—choose materials with low embodied carbon where possible.
Material Choices Typical to Each Approach
Traditional builds use standard lumber and cavity insulation. Passive builds may specify thicker insulation, insulated sheathing, high-performance glazing, and specialized fasteners. For low-carbon alternatives and material guidance, see the ultimate guide to sustainable building materials and products for home build.
Practical Low-embodied-carbon Options for DIY Builders
- Use reclaimed or low-GWP insulation where suitable.
- Favor locally sourced timber and low-carbon fenestration options.
- Consider mass timber or rammed earth for walls or floors in specific designs; see our rammed earth homes guide.
Difference 9 — Construction Tolerances, Quality Control, and Trade Skills (passive House vs Traditional Construction)
Skills and QA Steps That Matter Most
Key skills: airtight membrane detailing, high-quality window installation, accurate MVHR ductwork, and careful continuous insulation application. QA steps include regular blower-door testing during construction and visual inspections of taped seams.
Checklist for On-site Quality Control
- Verify continuous air barrier continuity at rough-in.
- Tape and seal all air-barrier seams before insulation closure.
- Inspect window flashings and sill insulation.
- Commission MVHR and verify flow rates and heat-exchanger performance.
For hands-on skill guides: see roofing installation basics and advanced wall framing steps.
When to Hire Specialists vs DIY
Hire certified airtightness crews for blower-door testing and major taping if inexperienced. Consider a passive-house consultant for PHPP modeling and commissioning if pursuing certification.
Difference 10 — Cost Structure, Financing, and Long-term Value (passive House vs Traditional Construction)
Upfront vs Operational Costs and Common Financing Approaches
Passive projects have higher initial costs for materials, modeling, and testing. Financing options include mortgages, green loans, or energy-efficiency incentives. Accurate local incentive listings are location-specific—check government portals for available grants or rebates. For a breakdown of common cost items, see our cost breakdown for passive builds.
Incentives, Rebates, and Resale Value Considerations
Some jurisdictions offer rebates for high-efficiency windows, insulation, or MVHR. Resale value may improve with documented energy performance, but markets vary by region.
Budgeting Tips for DIY and Partial Passive Upgrades
- Prioritize airtightness and continuous insulation first for best cost-to-benefit.
- Stage window upgrades and MVHR installation when funds allow.
- Factor in contingency and permit costs, and read hidden DIY building costs to avoid surprises.
Which Should You Choose? Scenario-based Recommendations for DIY Builders
Low Budget, Incremental Upgrade Path
If funds are tight, begin with an energy audit, then focus on sealing major leaks (blower-door-guided), add attic and slab insulation, and replace worn windows with higher-efficiency double glazing. This path improves comfort and reduces bills with smaller upfront cost.
New Build on a Tight Budget but High Comfort Goals
Use targeted passive principles: compact form, south glazing, continuous insulation on key walls, extra attention to airtightness, and high-quality windows in priority locations. Skip full certification and phase MVHR later if needed.
Full Passive-house Build for Long-term Owners
If staying long-term and prioritizing low bills and comfort, invest in full passive design with PHPP modeling, certified windows, and MVHR commissioning. Plan for higher upfront cost but predictable low operating expenses.
Retrofit Options for Existing Homes
For existing homes, consider a staged deep retrofit: envelope sealing and attic insulation first, add CI and window upgrades next, and finish with MVHR. Our practical retrofit steps are in the DIY passive house retrofit and the deep energy retrofit guide. For owners aiming at net-zero, combine envelope work with solar and storage—see our net-zero home guidance.
The Bottom Line
For most DIY builders the decision between passive house vs traditional construction comes down to time horizon and budget: choose passive principles if you want the lowest lifetime energy use and highest comfort and can commit to higher upfront design and execution standards; choose a conventional approach with staged upgrades if upfront capital or trade availability is limited. Start with airtightness and continuous insulation for the best early returns.
Video: Construction Studies: Passive House Tutorial Question
For a visual walkthrough of these concepts, check out this helpful video:
Frequently Asked Questions
Can I achieve passive-house comfort without full certification?
Yes. Many builders apply passive-house principles—very high insulation, strict airtightness, optimized glazing, and MVHR—without pursuing formal certification. Certification requires PHPP modelling, documentation, and independent testing; skipping certification can save fees but still yields most comfort and energy benefits if the design and construction follow the same performance targets.
For practical next steps, commission an energy audit, set an airtightness target (work toward ≤ 1.0 ACH50 as a meaningful interim goal), and prioritize continuous insulation and high-performance windows.
How much more does a passive house typically cost upfront?
Costs vary widely by region, design, and material choices. Passive builds often have higher upfront costs for insulation, windows, and design/testing, but the premium can be offset by simpler heating systems and lower operating costs. Use a local cost estimate and tools like the passive house cost calculator to compare scenarios for your site and ownership horizon.
Is mvhr necessary in all climates?
MVHR is central to passive design because it provides balanced fresh air while recovering heat, which preserves comfort and indoor air quality in airtight buildings. In some hot, humid climates, ventilative cooling strategies or enthalpy recovery ventilators may be preferable. Climate and humidity control requirements should guide MVHR selection; consult local ventilation guidance and HVAC specialists.
Can I retrofit an older home to passive-house levels?
Deep retrofits can bring many homes close to passive performance, but achieving full passive targets is often complex and costly. External continuous insulation, window replacement, and airtightness upgrades are typical steps. Use a staged plan: start with air-sealing and attic insulation, then address walls, windows, and ventilation as budget allows. See our DIY passive house retrofit for a phased approach.
Will airtight homes have poor indoor air quality?
No—when airtight homes are paired with balanced mechanical ventilation (MVHR or equivalent), indoor air quality typically improves because fresh air is supplied and stale air removed in a controlled way. The key is correct MVHR sizing, good filtration, and regular maintenance, including scheduled filter changes and periodic cleaning.