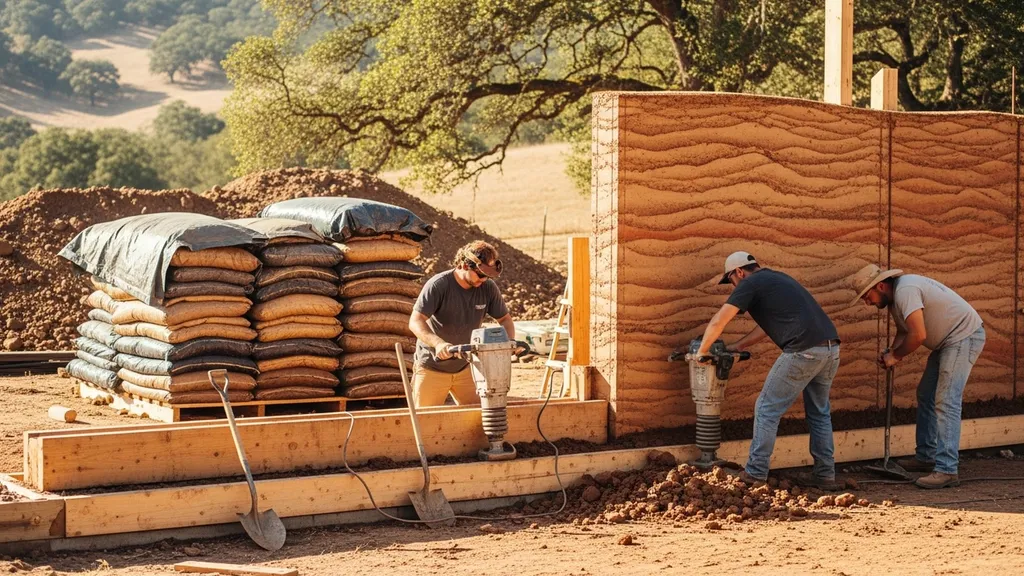
Practical guide to building rammed earth homes: materials, step-by-step construction, cost breakdown, and maintenance tips for DIY self-builders.
Rammed Earth Homes: Construction Guide and Costs
Rammed earth is a building method that compacts mixtures of local soil, gravel, and sometimes stabilizers into temporary formwork to make thick, monolithic walls. For budget-conscious DIY self-builders, rammed earth offers low embodied carbon, excellent thermal mass, and a distinctive finish that often needs minimal cladding or paint. This guide explains how rammed earth walls work, what materials and tests are required, a practical step-by-step build sequence, realistic cost ranges, and maintenance advice so you can decide whether this method fits your site, budget, and skillset.
TL;DR:
- Rammed earth walls typically are 300–600 mm thick and can cost roughly $60–$250 per ft² depending on stabilization and labor; expect higher costs where formwork or engineered designs are complex.
- Key early actions: get particle-size and Proctor compaction tests (3–5 samples), check drainage and frost depth, and decide on cement stabilization (3–10% by weight is common) before permitting.
- For DIY builds: do manual ramming for small walls or rent a pneumatic rammer for house-scale work; hire an engineer for structural design, especially in seismic or frost-prone areas.
What is Rammed Earth and How Does It Work?
Definition and Core Principles
Rammed earth refers to walls formed by placing a damp earth mix into rigid formwork and compacting it in successive horizontal lifts (layers) until the full wall reaches the intended height. The process produces a dense, monolithic wall with high thermal mass — the ability to absorb, store, and slowly release heat. Typical wall thickness for load-bearing rammed earth ranges from 300 mm to 600 mm (12–24 in). Density often falls between 1,800 and 2,200 kg/m³, and compressive strength for unstabilized mixes varies widely (often 2–6 MPa), while stabilized mixes (with cement or lime) can exceed 8–12 MPa depending on dosage and curing.
Glossary:
- Stabilizer: An additive (cement, lime, bitumen) that increases strength and water resistance.
- Formwork: Temporary panels holding the earth while each lift is compacted.
- Lift: One horizontal layer of the wall, usually 75–150 mm thick before compaction.
- Compaction: The process of densifying the mix, done manually with rammers or mechanically with pneumatic rammers.
For guidance on standards and code-based practice, see the rammed earth structures code and practice guide, which maps seismic risk and regional considerations: rammed earth structures code and practice guide.
Types of Rammed Earth (traditional, Stabilized, Prefabricated Blocks)
- Traditional (unstabilized) rammed earth: Uses local soils with suitable proportions of gravel, sand, silt, and clay. Works best in dry, temperate climates with good detailing to avoid moisture exposure.
- Stabilized rammed earth: Adds cement (commonly 3–10% by weight as an initial range) or lime to increase early strength and weather resistance. Stabilization raises embodied carbon but improves reliability for many permitting authorities.
- Prefabricated rammed earth blocks/panels: Factory-made panels or blocks offer quality control and faster onsite assembly, though transport and crane costs can be significant.
Rammed earth is also known by regional names such as pisé or pisé de terre and is one of several earthen approaches within broader earth building methods.
Advantages and Limitations for DIY Self-builders
Why Diyers Choose Rammed Earth (cost, Sustainability, Thermal Mass)
- Low embodied carbon when using onsite soils instead of concrete; using local earth can reduce transport and manufacturing emissions compared with poured concrete.
- High thermal mass smooths indoor temperature swings. Paired with proper insulation and passive solar design, rammed earth can lower seasonal heating and cooling loads.
- Distinctive finish: well-compacted walls often require only a breathable lime or earthen plaster for weatherproofing.
- Longevity: properly detailed and maintained rammed earth structures can last decades or centuries.
For a concise overview of rammed earth properties and history, see this technical summary: overview of rammed earth properties.
Common Limitations and Risks (weather Sensitivity, Labor Intensity, Permitting)
- Labor intensity: ramming is physically demanding. Manual ramming suits small-scale walls; larger homes usually require a pneumatic rammer and a crew.
- Moisture vulnerability: without proper foundation, capillary breaks, and roof overhangs, walls can erode. Moisture protection is non-negotiable.
- Soil dependence: unsuitable soils cause shrinkage, cracking, or weak walls. Soil testing is essential.
- Permits and engineering: many jurisdictions require engineered designs and test results for compressive strength before issuing building permits.
- Learning curve: compacting lifts uniformly and achieving tight tolerances takes practice.
Short use-cases: small cabins, garden and retaining walls, and fully rammed-earth family homes are all feasible. For readers weighing alternatives, see the cob building guide and the earthbag building method for comparisons within natural building methods.
Planning: Site Selection, Soil Testing, Permits, and Building Codes
How to Evaluate a Site for Rammed Earth
- Slope and drainage: Choose sites with good drainage, or re-grade to divert surface water. Keep the house above the 100-year flood level if relevant.
- Proximity to water sources: Avoid building too close to streams or high groundwater. For rain management and foundation protection, link to rainwater strategies in the planning stage: rainwater collection basics and a step-by-step rainwater system guide: build a rainwater system.
- Frost depth and soils: Foundations must extend below frost lines in cold climates; shallow footings risk frost heave.
- Solar access and wind exposure: Combine thermal mass with passive solar glazing for best results.
Required Soil Tests and What They Mean
Essential lab tests:
- Particle-size analysis (sieve analysis): Determines gravel/sand/silt/clay percentages. Target mixes often require good gravel and sand content with enough clay to bind — typical target ranges might be 20–30% gravel, 40–60% sand, 10–20% silt, and 5–15% clay, but these vary by source and stabilizer.
- Atterberg limits: Measure plasticity and shrink-swell behavior. Acceptable plasticity index (PI) values depend on local practice; too high PI indicates excess clay.
- Proctor compaction test: Finds optimal moisture content and compaction energy for maximum density.
- Compressive strength tests (cubes or cylinders): Required when using stabilizers or for structural approval; test samples taken at different ages (e.g., 7 and 28 days) help verify design values.
Collect 3–5 representative samples across the site and submit to a geotechnical lab. The Peace Corps handbook includes practical guidance on sample preparation and moisture control: Peace Corps handbook for building earth homes. For structural designs or in seismic regions, working with a geotechnical engineer is typically required.
Permitting, Engineering, and Code Acceptance
Most municipalities accept rammed earth if engineered drawings and test reports show required strength and detailing for moisture protection. Typical permit path:
- Preliminary soil testing and geotechnical report
- Structural drawings specifying wall thickness, reinforcement, lintels, and foundation details
- Compressive strength test results (certified)
- Details on water proofing, DPC (damp-proof course), and connections to roof and openings
Expect back-and-forth with building departments. Where codes lack specific rammed earth clauses, provide equivalency to concrete or masonry strength and cite published guides or standards when available.
Materials, Mixes, and Stabilization Options
Soil Composition and Selecting the Right Earth
- Target texture: A balanced mix of gravel, sand, and fine fraction. Gravel improves strength and reduces shrinkage; sand aids workability; fine silt/clay provides cohesion.
- Typical percent ranges: As a starting example (verify locally): gravel 15–30%, sand 45–60%, silt 5–20%, clay 5–15%. These are illustrative; lab tests provide precise recommendations.
- Always trial-mix small batches, compact them into sample blocks, and perform simple field tests (drop hammer or small compressive tests) before committing.
Stabilizers: Cement, Lime, Bitumen, and Alternatives
- Cement: Widely used; common dosages range from 3% to 10% by dry soil weight. Lower doses reduce embodied carbon but yield lower water resistance and early strength. Cement improves frost resistance and compressive strength.
- Lime: Improves workability and long-term strength in some soils; slower-setting than cement.
- Bitumen or silicate sealers: Used as surface treatments for water resistance rather than full stabilization.
- Natural alternatives: Pozzolans, volcanic ash, or small percentages of hydraulic lime may be options in specific regions, but acceptance varies.
For practical design guidance on material choices, see the YourHome technical overview: YourHome rammed earth material guidance. Also consider using recycled aggregate concrete for footings to lower the carbon footprint: recycled concrete guide.
Additives and Reinforcement (fibers, Mesh, Thermal Insulation Inserts)
- Fibers: Natural or synthetic fibers can reduce shrinkage cracking but don't replace structural reinforcement.
- Mesh and bars: Steel lintels, embedded plates, and vertical bars are common at openings and wall junctions.
- Insulation inserts: For cold climates, incorporate continuous insulation either internally or externally. Options include rigid foam panels or building a hybrid wall with an insulated cavity. For guidance on insulation trade-offs, see the insulation comparison and exterior insulation methods.
- Moisture protection: Include a capillary break and DPC between foundations and rammed earth, and detail roof overhangs or rainscreens for exposed walls.
Mini comparison table of stabilizers:
| Stabilizer | Typical dosage | Pros | Cons |
|---|---|---|---|
| Cement | 3–10% by weight | Rapid strength gain, improves durability | Raises embodied carbon, can make walls less breathable |
| Lime | 5–8% (varies) | Improves workability, lower carbon than cement than certain mixes | Slower cure, may require longer protection |
| Bitumen (surface) | N/A (coating) | Water shedding surface, easy application | Not breathable, alters finish |
Step-by-step Rammed Earth Construction Process
Foundations and Base Details
Start with a durable foundation: strip footings or a raft slab sized for local loads and frost depth. Ensure a continuous damp-proof course (DPC) and a coarse gravel capillary break above the footing. Foundations are commonly poured concrete; where low-carbon is a priority, explore recycled aggregate options for footings (recycled concrete guide). Allow the foundation to cure fully before building the rammed-earth base.
Key checks:
- Foundation level within ±10 mm across bearing surfaces
- Correct DPC placement and overlap details
- Provision for starter plates or reveal channels that hold formwork and lateral loads
Formwork, Lifts, and Compaction Techniques
- Build rigid formwork from plywood and timber or steel panels with braces. Forms must resist lateral pressures during compaction.
- Place the prepared, slightly moist earth mix into the form in lifts of 75–150 mm (pre-compaction). Compact each lift thoroughly. Uniform lift height improves bond and avoids weak planes.
- Compaction methods: manual hand rammers for small projects or pneumatic rammers for faster, more consistent results on house-scale walls. Typical compaction target is near Proctor maximum dry density at the specified moisture content.
- Bonding between lifts is critical; slightly roughen the top of each lift or apply a light mist of water to improve interlayer adhesion.
Watch this step-by-step guide on building a rammed earth wall: sustainable & strong!:
.Openings, Lintels, and Integration of Utilities
- Set window and door frames into the forms as you build, or install steel lintels embedded in the wall above openings. Lintels must be detailed by a structural engineer.
- Plan utility penetrations (electrical, plumbing) before casting. Use sleeves or chase channels placed in the formwork; running services through the wall after compaction is difficult.
- Seal around frames with compressible flashing and maintain a continuous air barrier detail; see the air-barrier installation guide for airtightness strategies: air-barrier installation.
Curing, Finishing, and Detailing for Moisture Protection
- After removing forms, protect fresh walls from rapid drying, rain, and frost for the first few weeks. Curing accelerates strength gain for stabilized mixes.
- Finish options: breathable lime plaster, earthen plaster, or mineral silicate paints. Avoid impermeable finishes that trap moisture.
- Provide roof overhangs, raised thresholds, and a drainage plane to keep splash and runoff away from the base.
- Conduct sample testing of cubes or cores at 7 and 28 days if stabilization was used; pause construction until results show compliance with engineered specifications.
For technical details on construction tolerances and in situ practices, the Design Guide for Rammed Earth provides layout and quality-control guidance: Design guide for rammed earth.
Cost Breakdown, Financing, and Cost-saving Strategies
Typical Cost Components (materials, Labor, Equipment, Testing)
Major line items:
- Site preparation and foundations: Excavation, footings, DPC — often the largest single cost.
- Formwork: Timber, plywood, or steel panels; reusable systems amortize over larger projects.
- Soil processing and stabilizer materials: Cement or lime purchases and mixing equipment.
- Labor: DIY labor reduces cash cost but increases schedule; contractor labor varies widely by region.
- Equipment: Pneumatic rammer rental or purchase, mixers, scaffolding.
- Testing and engineering: Soil tests, structural engineering, compressive testing for permit approval.
- Finishes and flashings: Plasters, lintels, window frames, and waterproofing details.
Estimated Cost Ranges and What Drives Price
Conservative estimated cost range: $60–$250 per ft² for completed rammed earth walls (this range varies by region, wall thickness, and degree of stabilization). Major drivers:
- Formwork complexity: Curved walls, tight tolerances, and many openings raise formwork time and cost.
- Labor rates: Skilled crews command higher rates; DIY reduces cash outlay but adds time.
- Stabilizer content: Higher cement content increases material costs.
- Equipment choices: Renting a pneumatic rammer speeds work but adds daily cost.
For additional context on industry pricing and practical case examples, consult technical information from specialist builders: Rammed earth technical information.
Financing Options and Ways to Reduce Cost
- Financing: Construction loans for owner-builders are available; review owner-builder loan basics when planning finances: owner-builder loan guide.
- Cost-saving tactics:
- Use onsite soil to cut material costs.
- Simplify openings and standardize sizes to reduce lintel variations.
- Rent rather than buy heavy equipment for short projects.
- Phase construction to spread cash flow and allow owner labor.
- Consider prefabricated panels for faster assembly if transport is affordable.
Key points:
- Use local materials: Reduce hauling and aggregate costs by validating on-site soils early.
- Plan openings carefully: Every window or door adds formwork and lintel costs.
- Rent equipment: A pneumatic rammer rental for the active ramming phase is often cheaper than purchase for a single house.
- Invest in testing early: Avoid costly rework by confirming mix performance before full-scale walls.
Comparison/specs table: rammed earth vs alternatives
| Method | Typical cost | Thermal mass | Durability | Skill level |
|---|---|---|---|---|
| Rammed earth | $60–$250/ft² | High | High with moisture control | Intermediate–Advanced |
| Cob | Low–Medium | Medium | Good with protection | Beginner–Intermediate |
| Earthbag | Low | Medium | Good if protected | Beginner–Intermediate |
Compare more on cob in the cob building guide and earthbag in the earthbag building method. If you plan on low-energy systems alongside the build, use a solar cost calculator and review hybrid energy planning: hybrid energy systems guide.
Performance, Finishes, Maintenance, and Common Repairs
Thermal Performance and Passive-house Considerations
Rammed earth's thermal mass smooths diurnal swings: walls absorb heat during the day and release it at night, reducing peak HVAC loads in temperate climates. In cold climates, thermal mass must be paired with insulation to avoid heat loss through heavy walls. Typical strategies:
- External continuous insulation (recommended for cold climates): Keeps the thermal mass inside the insulated envelope; see exterior insulation methods.
- Internal insulation with thermal breaks: Possible, but risk of condensation at cooler wall cores needs careful detailing.
- Pairing with efficient systems: Use an air-source heat pump with a well-sealed envelope for low running costs; see air-source heat pump guide.
Passive-house teams often recommend keeping thermal mass within the conditioned envelope and designing around the local climate.
External and Internal Finishes (plaster, Limewash, Cladding)
- Breathable finishes: Lime plaster or earthen plaster maintains moisture balance and aesthetic quality.
- Rainscreens and cladding: In wet climates, a rainscreen or non-structural cladding with an air gap can protect rammed earth walls while avoiding trapped moisture.
- Floor integration: Pair earthen floors with rammed earth walls for cohesive thermal and moisture behavior. For maintenance of such floors, see earthen floor maintenance.
Routine Maintenance and Long-term Durability
Maintenance checklist:
- Inspect base and DPC annually for splashback and erosion.
- Check external plaster every 3–5 years for hairline cracks; repair with compatible earthen or lime-based materials.
- Maintain roof gutters and downspouts to prevent concentrated runoff at the foundation.
- Repoint or repair thresholds where foot traffic concentrates moisture.
Service life: well-built and detailed rammed earth structures can last many decades. Conditions that accelerate wear include poor drainage, constant splash, freeze-thaw cycles without adequate stabilization, and mechanical damage.
The Bottom Line
Rammed earth is a strong option for DIYers with suitable soils, time for a labor-intensive build phase, and a willingness to invest in testing and detailing for moisture control. Expect moderate to high initial labor, variable costs ($60–$250/ft²), and long-term energy benefits when combined with insulation and efficient heating. Next steps: order soil tests, get engineering quotes for foundations and lintels, and watch a build video to confirm whether manual or mechanical ramming suits your project.
Frequently Asked Questions
How much does rammed earth cost per square foot?
Typical completed wall costs range roughly from $60 to $250 per ft², depending on region, wall thickness, stabilizer use, and whether you hire contractors or use owner labor. Major cost drivers include complex formwork, the need for pneumatic ramming equipment, and structural or seismic reinforcement requirements. For budgeting, separate line items for foundations, formwork, stabilizers, labor, and testing.
Can I build a rammed earth house myself?
Yes, but practicality depends on scale and your willingness to learn physical skills. Small walls or garden structures are achievable for beginners using manual rammers. Full homes typically require a crew and a pneumatic rammer for reasonable schedules. Plan to hire a geotechnical engineer for soil testing and a structural engineer for permits and lintel design.
Do rammed earth walls need insulation?
It depends on climate. In temperate zones, thermal mass alone can moderate temperatures. In cold climates, add continuous exterior insulation so the thermal mass stays inside the conditioned envelope. Internal insulation is possible but requires careful condensation management. See the exterior insulation guide for detailed options: exterior insulation methods.
How long do rammed earth houses last?
With proper detailing, water protection, and periodic maintenance, rammed earth buildings can last decades to centuries. Durability hinges on foundation design, roof overhangs, and how well the base resists splash and groundwater. Repairs to external plaster and thresholds are typical maintenance tasks every few years.
Is rammed earth suitable for wet climates?
Rammed earth can work in wetter climates if designers incorporate stabilization, robust DPCs, raised foundations, ample roof overhangs, and rainscreens. Using higher stabilizer dosages or external cladding increases weather resistance but also raises embodied carbon. In very wet or coastal regions, consider hybrid walls or alternative earthen methods with proven local track records.