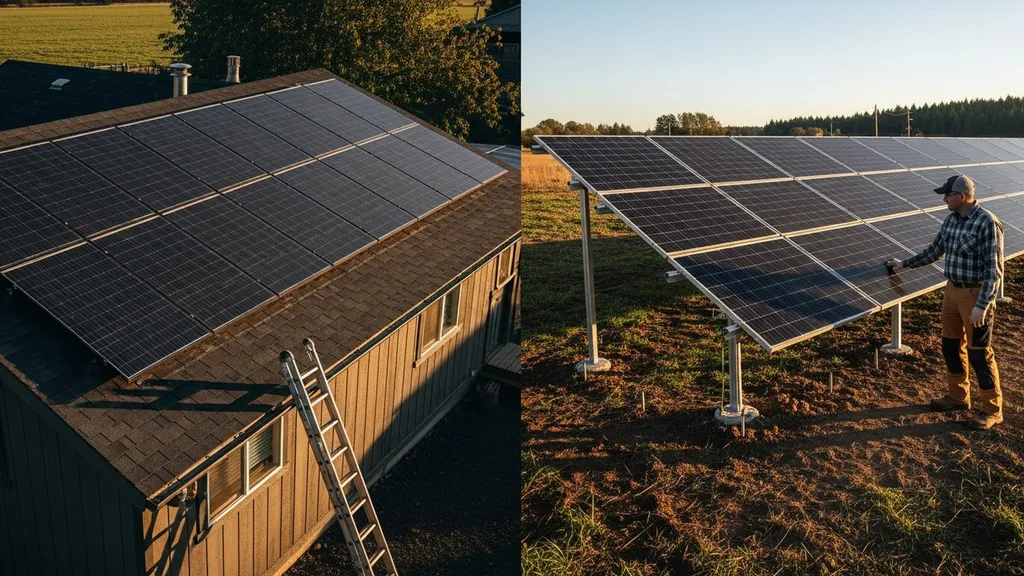
Compare roof-mounted and ground-mounted solar: costs, energy yield, permits, pros/cons, and which option fits common DIY and off-grid projects.
Solar Panel Mounting: Roof vs Ground Options
Choosing the right solar panel mounting affects system cost, annual energy yield, maintenance access, permitting, and future expansion. This article compares roof-mounted and ground-mounted solar panel mounting so budget-conscious DIYers and small self-builders can match a mounting strategy to a specific site: a small cabin with limited roof area, a tiny house with rented land, or a rural homestead with open field. Readers will get clear pros and cons, cost and yield estimates, installation checklists, and scenario-based recommendations.
TL;DR:
- Roof mounts are usually the lowest installed cost per kW and work well when roof orientation and age are suitable; expect lower racking costs but limited tilt control.
- Ground mounts give 5–25% better annual yield per kW (fixed tilt) and much easier access for maintenance; budget more for foundations and fencing.
- Trackers or pole mounts can boost output 15–50% in some locations but add mechanical complexity, higher foundation costs, and more maintenance — usually not ideal for first-time DIY installs.
Quick Overview: What This Comparison Covers and Why It Matters
Solar panel mounting choices change the project budget, performance, and how easy the system is to maintain or expand. For example, a 3 kW tiny-house system with a small, pitched roof might fit best with roof-mounted panels, while a 10 kW homestead system with open land will often be cheaper per watt and produce more if ground-mounted with optimal tilt. This guide explains the common mounting types, the main tradeoffs (cost, yield, permitting, access), and practical checks you can run before committing.
Research shows trackers can significantly raise production during shoulder hours — studies report morning gains of 29–33% and evening increases as high as 113% under certain conditions, which matters if you pay time-of-use rates or want more evening power (study on tracking gains).
Quick Comparison Table — Roof vs Ground (include Costs, Yield, Permits, Accessibility)
| Mount type | Typical installed cost per kW (range) | Typical annual yield per kW (relative) | Installation complexity (DIY difficulty) | Permits & zoning | Maintenance & access | Typical lifespan | Best for |
|---|---|---|---|---|---|---|---|
| Roof-mounted | $1,500–$3,500 / kW | Medium (baseline) | Medium | Building + electrical; structural check | Harder roof access, seasonal cleaning | 20–30 years | Retrofit homes, limited land |
| Ground-mounted (fixed tilt) | $2,000–$4,500 / kW | Medium–High (+5–25%) | Medium–High | More likely to need zoning/SE review | Easy access, simple cleaning | 20–30 years | Homesteads, arrays >6 kW |
| Pole mount / single-axis tracker | $3,000–$6,000 / kW | High (+15–50% vs fixed) | High | Structural and electrical permits; wind review | Higher maintenance, moving parts | 15–25 years | Large open sites, commercial-like projects |
| Carport / canopy | $3,000–$7,000 / kW | Medium–High | High | Multiple permits, structural review | Good access under canopy | 25+ years | Parking, shade + power needs |
| BIPV / integrated roof | $4,000–$10,000 / kW | Medium (aesthetic tradeoffs) | High | Complex building permits | Access depends on integration | 20–30 years | New builds seeking integrated look |
Notes: Cost ranges are influenced by racking type, labor, foundations (concrete piers vs driven piles), and site prep. Yield differences reflect tilt/orientation optimization and reduced shading on ground mounts. For project-specific budgeting, use solar cost tools to convert ranges into a realistic estimate: solar cost tools.
Roof-mounted Solar Panel Mounting: Overview, Pros, Cons, and Best Use Cases
Overview and Common Roof Mount Types
Roof-mounted solar panel mounting includes flush mounts, rail-based systems, tile roof adapters, and clamp systems for standing-seam metal roofs. Flush mounts keep panels close to the roof deck; rail-based racking provides flexibility for panel spacing; tile adapters use flashing designed for clay/concrete tiles; standing-seam clamps attach without roof penetrations where seams exist.
Strengths (cost, Roof Space Use, Grid Tie Simplicity)
- Lower upfront racking material and foundation costs because the roof is the structure bearing loads.
- Shorter electrical runs to attic-mounted inverters or interior combiner boxes reduce wiring cost.
- Less visible land use, which helps on small lots or in areas with strict land-use rules.
- Good option when roof orientation and tilt are favorable for your location.
Weaknesses (roof Condition, Access, Tilt Limits)
- Roof age matters: replacing or repairing a roof after panels are installed is costly. Refer to the roof replacement checklist before installing panels.
- Tilt and orientation are constrained by the roof pitch; typically panels sit at the roof angle, which can reduce seasonal performance compared with an optimized ground tilt.
- Shading from nearby trees or chimneys is harder to mitigate.
- Roof penetrations require proper flashing and structural attachment to avoid leaks.
Best for — Short, Medium, Long Term Scenarios
- Short term (rented or temporary): Scaled portable panels or minimal roof attachments.
- Medium term (owner-occupied with sound roof): Roof mounts are the usual choice for grid-tied systems up to ~6 kW.
- Long term (new builds or planned roof replacement): Consider integrating mounts or BIPV for aesthetics and long-term durability.
DIY Difficulty, Typical Costs, and Quick Checklist
Roof mounting difficulty is medium. Typical cost savings come from lower racking and foundation needs, but labor for safe roof work can increase price. Quick checklist:
- Roof age and condition: Replace roof if less than 5–7 years of expected life remain.
- Roof material compatibility: Confirm flashing and mounting type for asphalt, tile, or metal.
- Structural load: Get an engineer sign-off if your rafter spacing or roof structure is unconventional.
- Safety plan: Use fall protection and stable ladders.
For guidance on matching panels to roof types, see the guide to choose panels for your roof. For how roof surface choices affect performance, review our article on cool roof considerations. Industry market analysis on mounting structures provides context about long-term product trends and adoption (market report on mounting structures).
Ground-mounted Solar Panel Mounting: Overview, Pros, Cons, and Best Use Cases
Overview and Common Ground Mount Systems
Ground-mounted systems use dedicated racks anchored into the earth by driven piles, helical anchors, or concrete footings. Options include fixed-tilt racks, elevated racks (to reduce shading or allow use beneath), and modular systems for expansions. Ballasted racks are also used on hard surfaces or temporary installations.
Strengths (optimal Tilt, Easier Maintenance, Expandability)
- Panels can be tilted to the optimal angle for your latitude, improving annual yield — commonly delivering 5–25% more energy than roof-mounted installations where tilt is constrained.
- Easier cleaning, inspection, and replacement without roof work.
- Expansion is straightforward: add more racks and panels without changing roof wiring.
- Snow-shedding and ventilation are typically better, which can improve panel efficiency in cold climates.
Weaknesses (land Use, Foundation Costs, Permitting)
- Uses acreage and may require fencing for livestock or security.
- Foundation costs and site grading can push up the installed cost per kW.
- Ground mounts often trigger additional zoning reviews, possible setback restrictions, and may require erosion control measures.
Best for — Short, Medium, Long Term Scenarios
- Short term: Not recommended if leasing land; temporary ballasted systems possible.
- Medium term: Ideal for planned homestead installations and arrays >5–6 kW.
- Long term: Best for homestead-scale systems that will expand over years.
DIY Difficulty, Typical Costs, and Site Checklist
Ground-mounted systems require more civil work and sometimes equipment rental for post driving or concrete. Checklist before starting:
- Run a size estimate: Use the run a size estimate tool to check land needed for your target kW.
- Soil type assessment: Rocky or unstable soils change foundation choice.
- Sunpath and shading: Conduct a site survey for seasonal shading.
- Permitting check: Verify setbacks, stormwater, and fence rules.
Market forecasts show ongoing growth for ground-mount and PV mounting markets, which has improved the availability of DIY-friendly rack kits and modular ballast systems (market forecast for PV mounting systems).
Pole Mounts and Single-axis Trackers: Higher Performance but More Complexity
What Pole Mounts and Trackers Are
Pole mounts elevate a single panel or a small array on a vertical post, often allowing seasonal tilt adjustments. Single-axis trackers rotate arrays on one axis to follow the sun east-to-west, increasing daily harvest. Both are forms of pole mount solar when mounted on engineered posts.
When the Extra Yield Pays Off
Trackers can increase annual energy yield substantially in some climates and latitude ranges — typical improvements range from 15–35% for single-axis trackers compared with fixed mounts, and can be higher in clear-sky, low-latitude locations. Research indicates particularly large gains during morning and evening hours for tracking arrays (tracking panel study).
Costs, Maintenance, and Reliability Tradeoffs
- Trackers add mechanical components, controllers, and motors that require regular inspection and occasional replacement.
- Foundations must be engineered for higher wind loads; this raises installed cost per kW considerably.
- For most DIYers and small systems, trackers are seldom the best first project. They become attractive when land is abundant, labor costs are high, or time-of-use rates favor shifting generation into peak hours.
For a broad buyer's guide to mounting choices, see this consumer-facing overview (solar panel mounts guide).
Carport, Canopy, and Building-integrated PV (BIPV) Mounting Options
Carport and Canopy Basics
Carport mounts produce shade and generation simultaneously. Because they are elevated, they require engineered supports, which increases cost but adds dual use: protected parking or covered outdoor space.
BIPV Overview and Roof-integrated Alternatives
BIPV replaces conventional roofing with PV modules (tiles or shingles). It integrates aesthetics and waterproofing but usually costs more per watt and often requires specialized components and installers.
Pros/cons and Use Cases (parking, Shading, Architectural Integration)
- Carports: Good for commercial or multi-car setups, farm equipment protection, or where shade adds value. Higher structural cost and permit complexity.
- BIPV: Best for new construction where architectural integration is a priority and budgets allow. Consider long-term value and warranty differences.
For a practical overview of mounting components and what to expect in cost, see this guide to mounting systems (solar panel mounting systems guide).
Permits, Zoning, and Site Factors That Influence Mounting Choice
Common Permitting Requirements and Who to Contact
Standard steps include building permits, electrical permits, structural reviews, and local inspector sign-offs. Start with your municipal building department and your utility’s interconnection team for grid-tied systems.
Setbacks, Height Limits, and Homeowners Associations (hoas)
Many jurisdictions have setbacks from property lines, height restrictions, and design review by HOAs. Some HOAs allow solar but require placement on the least-visible roof slope — check early to avoid costly redesigns. See common zoning pitfalls to watch: zoning pitfalls to watch.
Site Survey Checklist: Shade, Tilt, Roof Condition, Soil Type
- Shade analysis: Map trees, chimneys, and seasonal shade.
- Roof condition: Confirm expected remaining life; if under 5–7 years, plan replacement.
- Soil and drainage: For ground mounts, verify bearing capacity and drainage.
- Solar resource: Use NREL PVWatts or local solar resource maps to model expected yield.
For retrofit-specific permit sequencing and inverter placement guidance, consult our article on adding solar to an existing home.
Cost Comparison and Simple Budgeting Guide for Diyers
Where Money Goes: Panels, Inverters, Racking, Foundations, Labor
- Panels: 30–40% of total installed cost (varies by panel choice).
- Inverter/charger/electrical: 15–25%.
- Racking and mounting hardware: 10–20% for roof, 20–30% for ground (foundations add cost).
- Foundations/site prep: negligible for roofs, 10–25% for ground mounts depending on piles vs concrete.
- Labor: 15–35% depending on DIY vs contractor.
Sample Cost Scenarios (small Cabin, Tiny House, 5–10 Kw Home, Off-grid Cabin)
- Small cabin (1 kW): Roof-mounted, minimal racking; low labor if DIY; tie to battery or grid for small backup — see 1 kW cabin guide.
- Tiny house (3 kW): Roof mounts may fit; if roof area insufficient, small ground array or pole mount could be better — see tiny house 3kW sizing.
- 5–10 kW home: Ground mounts start to look better for expansion where land allows; compare costs in the 10 kW off-grid guide.
- Off-grid cabin: Prioritize reliable panels and off-grid panel options; consult our list of off-grid panel options.
How to Estimate Payback and Prioritize Spend
- Run system production estimates in PVWatts or your solar sizing tool, then compare electricity rates or diesel generator costs for off-grid scenarios.
- Prioritize a high-quality inverter and proper grounding; panel replacements are rare but inverter failure can be costly.
- For limited budgets, choose a slightly smaller array with space to expand later rather than overspending on expensive foundations now.
Installation Tips and DIY-friendly Practices for Safe Mounting
Roof Penetration Best Practices and Flashing Details
- Use manufacturer-supplied flashing kits for roof penetrations and mount into rafters or blocking rather than just sheathing.
- Seal with compatible roof sealant and check torque specifications on lag bolts to avoid roof damage.
Ground-mount Foundation Tips (driven Post vs Concrete Piers)
- Driven posts are faster and cheaper in many soils; concrete piers provide more reliable resistance to uplift in high-wind areas.
- Use a post-leveling technique to set racking rails true; measure twice before drilling or pouring concrete.
Electrical and Grounding Basics (when to Call an Electrician)
- Essential electrical work—utility interconnection, meter upgrades, and main-lug changes—typically requires a licensed electrician.
- Grounding, DC combiner safety, and rapid shutdown compliance with NEC 2017/2020 (where adopted) are specialized tasks; hire pros if you lack licensing.
Maintenance Schedule and Access Planning
- Annual visual inspections, cleaning as needed, and quick checks after storms.
- Plan panel spacing and walkway access during design to avoid awkward roof work later.
For pairing solar with batteries, see our battery enclosure plans. For diagnosing issues after installation, review our troubleshooting tips.
Which Should You Choose? Scenario-based Recommendations for Diyers
Decision Matrix: Small Cabin, Tiny House, Homestead, Shady Lot, Rental Property
- Small cabin (1 kW): If roof fits panels and is in good shape, roof-mounted solar is simplest; if roof is limited or shaded, a small ground or pole mount may be better. See the 1 kW cabin guide.
- Tiny house (3 kW): Use roof mounts if orientation works; otherwise a ground mount on a short lease or a pole mount for portability. Consult the tiny house 3kW sizing.
- Homestead (5–10 kW+): Ground-mounted fixed-tilt racks usually offer best long-term value and easy expansion; compare with the 10 kW off-grid guide.
- Shady lot: Prioritize site pruning, microinverters or optimizers, or relocate array to ground area with full sun.
- Rental or temporary sites: Portable or ballasted ground mounts avoid permanent alterations.
Checklist to Run Before Deciding
- Measure usable roof area and orientation.
- Run production model with NREL PVWatts or your sizing tool.
- Check roof age and structure.
- Confirm zoning and HOA rules.
- Estimate foundation costs for ground mounts.
Next Steps: Permits, Quotes, and Test Fit
- Obtain at least two local contractor quotes for labor and a DIY materials estimate.
- Do a physical test fit with plywood templates or string lines to verify array footprint on roof or ground.
- View a short homeowner-focused comparison video to see real-world setups and maintenance tradeoffs: For a visual demonstration, check out this video on which is better? solar panel roof mount or:
For choosing between grid-tied and off-grid systems, see our primer on grid vs off-grid basics. If you have a workshop or outbuilding, compare the small system options in the small system 1kW workshop.
The Bottom Line
Solar panel mounting is a site-driven choice: roof-mounted systems usually cost less up-front per kW and are efficient for roofs with good orientation, while ground-mounted solar offers higher yield per kW and easier access at the expense of foundation and permitting costs. Use a sizing tool, check roof condition, and run a simple cost-vs-yield comparison before finalizing your plan.
Frequently Asked Questions
Is a ground mount always better than a roof mount?
No. Ground mounts typically produce more energy per kW because you can choose an optimal tilt and avoid shading, but they cost more in foundations, site prep, and permits. For small systems or when roof space and orientation are adequate, roof-mounted solar often gives the best cost per watt and simpler installation.
How much more energy does a ground mount produce?
Fixed ground mounts usually yield about 5–25% more annual energy than roof mounts, depending on how suboptimal the roof tilt or shading is. If you add a single-axis tracker, annual gains can reach 15–50% in ideal conditions; see the tracking study for hourly gains in mornings and evenings (up to ~113% in some cases) at PMC.
What permits do I need for a ground mount?
Typical permits include building and electrical permits, and many jurisdictions require structural review for elevated arrays or trackers. Ground mounts may also trigger zoning reviews for setbacks and visual impact. Contact your local building department and utility early; consult our zoning checklist in zoning pitfalls to watch for common local restrictions.
Can I DIY a ground mount safely?
Yes, many DIYers successfully install fixed-tilt ground mounts using driven posts or concrete piers, but plan for site work, engineered foundations in poor soils, and safe electrical connections. If your system ties to the grid, a licensed electrician is often required for final interconnection. Use a sizing tool to verify layout and structural needs: run a size estimate.
How do I decide if I should replace my roof first?
If your roof has less than 5–7 years of remaining service life, replace it before installing solar to avoid costly rework. Check material compatibility (asphalt, tile, metal) and consult our roof replacement checklist for signals that a roof should be replaced prior to panel installation.