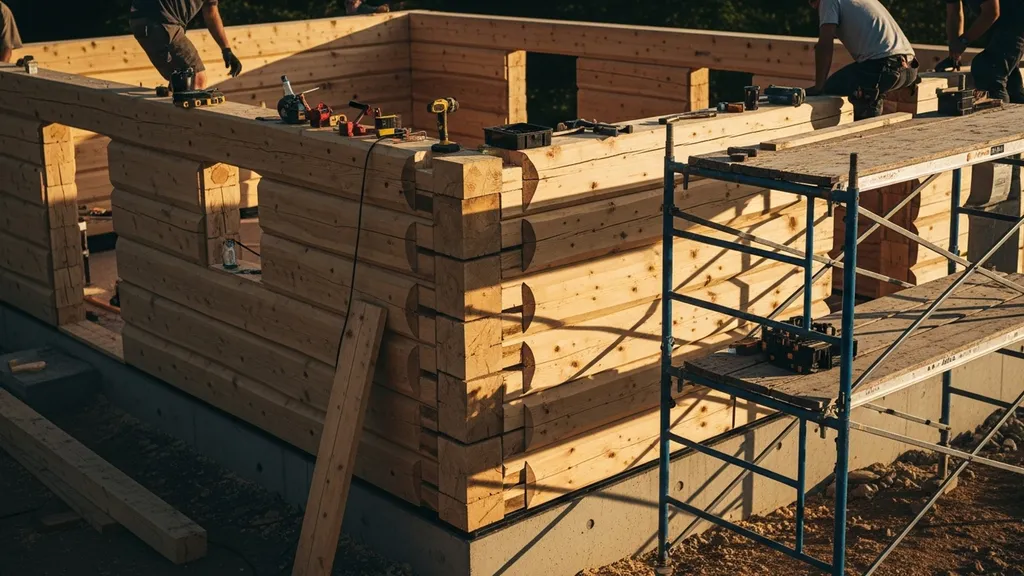
Practical, beginner-friendly guide to modern log cabin building—materials, foundations, airtightness, off-grid systems, costs, and build tips.
Log Cabin Building: Modern Techniques
Log cabin building can combine classic aesthetics with modern energy performance, off-grid independence, and cost-efficient DIY methods. This guide explains practical choices that shape performance and buildability—from siting and foundations to insulation, airtightness, moisture management, and off-grid systems—so a budget-conscious DIY builder can plan a durable, energy-efficient cabin. Readers will get material comparisons, foundation options, construction jigs and tools, sample energy budgets, and a realistic timeline and budget framework.
TL;DR:
- Choose the right system: solid-sawn logs for aesthetic thermal mass, or timber-frame/SIP hybrids for higher R-values and lower maintenance.
- Target airtightness and insulated roofs: aim for under 3 ACH50 (0.6 ACH50 if pursuing passive-house goals) and use high-R roof assemblies to cut heating loads by 30–50%.
- Plan off-grid basics: a 2–5 kWh/day cabin typically needs 500–1,200 W PV and 3–10 kWh battery capacity depending on winter sun and heating choice.
Planning & Design for Modern Log Cabins
Good planning reduces retrofit costs. Site selection and orientation directly affect heating loads, daylight, and access for materials. For passive solar gains in mid-latitudes, orient the long glazing axis within 15–30° of true south; roof overhangs sized to shade high summer sun but admit winter low-angle sun improve comfort and lower heating energy. See our window orientation guide for latitude-specific angles.
Checklist for site prep and logistics:
- Access and deliveries: Confirm truck and crane access; allow a 20–30 ft turning radius for larger deliveries.
- Septic and well setbacks: Check local setbacks; some zoning triggers additional permits for septic, especially near wetlands.
- Drainage: Retain a 5–10% slope away from the foundation and plan swales or gravel drains.
- Solar exposure: Map sun-path for winter and summer; avoid placing tall trees within 30–40 ft of the primary south façade.
Sample small-cabin footprints (typical DIY ranges):
- Studio: 400 sq ft — open plan, 8–10 ft eaves
- One-bedroom: 600 sq ft — small kitchen, bath, loft
- Two-bedroom/tiny: 800 sq ft — compact utilities and efficient mechanicals
Deliverable: Create a simple site plan showing building envelope, driveway, septic and well locations, and a 30–40 ft clearance area for deliveries.
Permits and regulations: Local building permit offices set the thresholds for full building permits, septic plans, and structural inspections. Research shows many rural cabins still require full permits; consult the DIY permit guide early in planning to avoid delays. For historical log techniques and guidance, the USDA's Building with logs booklet is a useful reference for traditional practices that inform modern detailing.
Materials and Systems: Choosing Modern Log Options
Selecting the right wall system balances thermal performance, aesthetics, maintenance, and assembly speed. Key options:
- Solid-sawn logs: Full-round or hand-peeled logs, traditionally 6–12" diameter. Provide thermal mass and authentic appearance but modest R-values and higher maintenance.
- Engineered (milled) logs: Tighter tolerances, interlocking profiles, and integrated gasket systems reduce air infiltration and speed assembly.
- Log veneer over framed wall: A framed, insulated wall (2x6 or 2x8) with a log-skin exterior or interior preserves appearance while achieving higher effective R-values.
- Timber-frame or post-and-beam with insulated infill (SIPs, dense-pack cellulose, or continuous exterior foam): Combines exposed timbers or log accents with high-performance enclosure.
Common wood species and sourcing:
- Pine and spruce: Widely available, cost-effective in many regions.
- Cedar: Naturally durable and rot-resistant; higher material cost.
- Locally sourced timber: Reduces transport costs and supports regional supply chains—verify kiln-drying to avoid excessive shrinkage.
When to consider mixes: Builders aiming for high energy performance and low maintenance often choose a timber-frame or SIP hybrid with a log veneer rather than full solid-sawn walls. If the foundation or wall-to-foundation junction is concrete, consider pairing with hempcrete vs ICF options for continuous insulation at the base.
Comparison/specs table: performance, cost, maintenance
| System | Effective R-value (typical) | Maintenance interval | Assembly speed | Typical cost band (materials only) |
|---|---|---|---|---|
| Solid-sawn logs (6–8") | R-8 to R-12 | Refinish every 5–10 years | Medium | Moderate–High |
| Engineered milled logs | R-10 to R-16 | Refinish / gasket check 5–10 years | Faster | Moderate–High |
| Log veneer over 2x6 framed wall | R-20 to R-28 | Lower (paint/stain 7–15 years) | Fast | Moderate |
| Timber-frame + SIP infill | R-24 to R-40 | Low (stain/repair as needed) | Fast (panelized) | High (materials) |
Notes: R-values are effective wall numbers — actual performance depends on detailing, thermal bridging, and airtightness. Material price trends for timber and engineered products can vary; see materials cost trends for market context.
External design guidance: The National Association of Home Builders offers practical layout and design advice in their How to design a cozy log cabin pages, useful for making the most of small footprints.
Foundations and Structural Options for Log Cabins
Select a foundation that matches soil, frost depth, slope, and intended cabin permanence.
Slab-on-grade and frost-protected options:
- Slab-on-grade is simple for level sites with good soils. For cold climates, a frost-protected shallow foundation (FPSF) with perimeter insulation can allow a shallower footing while reducing heat loss.
- Design note: For cabins, a 4–6" slab with 2"–4" rigid insulation under slab edges is typical for mild climates; consult local code for frost depths and minimum reinforcement.
Pier-and-beam or post-and-pad:
- For sloped or rock-strewn sites, pier foundations or post-and-pad systems minimize excavation and allow ventilation beneath the cabin. Use appropriately sized footings or concrete pads at each pier; load from log walls must transfer to concentrated points, so coordinate footing sizes with structural calculations.
- Typical use case: cabins on steep contours, floodplain locations, or where minimal site disturbance is desired.
ICF and Insulated Foundation Alternatives:
- Insulated Concrete Forms (ICF) provide continuous insulation and a durable below-grade wall. For thermal performance and reduced heat loss, ICF foundations pair well with log or hybrid walls. Compare ICF against conventional stick foundations in our ICF vs stick-frame resource.
- For very cold areas, consult cold-climate guidance such as building in climate zone 7 which outlines insulation depth and foundation alterations for extended freeze.
Load and footing sizing:
- Log walls concentrate loads: use continuous footings under log walls or adequately sized isolated footings under posts with load-bearing beams. Geotechnical investigation is recommended if soils are variable or bearing capacity is uncertain.
External reference: The NPS document on Finnish log methods offers historical techniques that illustrate corner joinery and load paths useful for structural detailing: Log cabins in america: the finnish experience.
Insulation, Airtightness, and Thermal Performance for Log Walls
Log walls rely on thermal mass; their raw R-value usually lags insulated framed walls. Strategies to reach modern energy targets include:
Supplemental insulation strategies:
- Insulated interior frame: Build an inner framed wall, insulate with dense-pack cellulose or mineral wool, and leave a log interior or install a log-veneer interior for aesthetics.
- Engineered insulated logs: Some milled log systems have integrated insulated cavities or foam inserts to lift R-values.
- Exterior continuous insulation: Apply rigid foam or mineral wool behind a log-veneer cladding to reduce thermal bridging and raise whole-wall R-values.
Airtightness detailing:
- Airtightness is more important than raw R when reducing heating loads. Passive-house airtightness goals target 0.6 ACH50; practical efficient cabins often aim for 1–3 ACH50.
- For log construction, common air-sealing methods include compressible gaskets, synthetic chinking with a sealing membrane, or a continuous air barrier behind a log veneer. The passive house airtightness guide outlines principles that can be adapted to log systems.
- Key junctions: sills, corners, window/door jambs, and roof-wall intersections. Use high-quality jamb flashings and continuous air barrier transitions.
Roof and Gable Insulation Upgrades:
- Since roofs can be >40% of heat loss, prioritize high-R roof assemblies: e.g., vaulted roof with 12–16" of cellulose or a SIP roof achieving R-40+. An insulated ceiling with attic ventilation and a well-sealed ceiling plane often outperforms under-insulated vaulted roofs.
- Use vapor-control strategies consistent with climate: in cold climates, place the majority of vapor control toward the warm side; in mixed climates, use smart vapor retarders.
Testing and inspection:
- Blower-door testing is recommended before finishing to locate leaks. Typical inspection points include log-to-foundation junction, penetrating plumbing/electrical, and mechanical vents.
- Research and case studies on log wall thermal performance can be found in university analyses such as the Rocky Mountain cabin study at Utah State: Log cabin technology and typology.
For practical steps on sealing and detailing, see the air-sealing techniques and vapor barrier installation guides.
Moisture Management and Long-term Durability
Moisture kills log walls if not managed. Good detailing extends lifespan and reduces maintenance.
Site drainage and flashing:
- Maintain minimum clearance from grade to bottom log of 6–12 inches depending on species and local recommendations; 8–12 inches is a common conservative rule.
- Use continuous drainage planes behind any veneer and install metal flashings at sills, window heads, and roof intersections. Design eaves and overhangs to keep most rain off the wall—6–24" overhangs are common based on climate and façade exposure.
Vapor control and sequencing:
- Sequence work to keep logs dry: store off the ground, cover stacks with breathable tarps, and avoid enclosing the structure before a temporary roof or protective sheathing is in place.
- Wall assembly sequencing example: foundation and sill plate flashing → install sill gasket and pressure-treated sill → set first course of logs → temporary roof/tarpaulin → install full roofing and eaves → apply final finishes and chinking/sealant.
- Use breathable finishes (penetrating stains, water-repellent preservatives) that allow moisture to escape, rather than impermeable paints that trap moisture.
Pest prevention and treatments:
- Choose rot- and insect-resistant species where termites or beetles are common (cedar, cypress). For other species, preservative treatments or borate applications can add protection.
- Establish a maintenance schedule: inspect chinking and finishes every 3–5 years; reapply sealants as manufacturer recommends (typically every 5–10 years). The InterNACHI log home basics resource describes scribe-fit and other joinery that affect longevity: Log home basics - internachi.
Common inspection points:
- Bottom logs and sill area for capillary moisture
- Roof-to-wall intersections and flashing integrity
- Window flashing and sill pans
- Gasket/chinking continuity at corners and penetrations
Modern Construction Techniques: Tools, Jigs, and Assembly
Practical, DIY-friendly methods speed the build and improve consistency.
Essential shop and site tools (prioritized):
- Chainsaw and bar (quality guide bar)
- Portable bandmill or access to milling service for custom logs
- Log scribe kit or contour gauge for fitting irregular logs
- Power planer and angle grinder for shaping and finishing
- Hydraulic jack or Come-Along for settling and lifting
- Temporary bracing and staging (scaffold, guardrails)
- Cranes or telehandlers for large timbers (rent as needed)
See our essential tools guide for a prioritized list and shop setup tips.
Notching, cutting, and fastening:
- Common joint types: saddle notch, dovetail, and square-notch (scribe-fit). Modern milled systems use interlocking profiles with synthetic gaskets for airtight joints.
- For repeatable cuts, build a jig: a simple angle guide clamped to a log bed allows consistent notch depth and profile. Jigs reduce errors and speed assembly.
- Mechanical fasteners: threaded rods, rebar pins, and timber screws can pin courses together and provide uplift resistance. Use stainless or hot-dipped galvanized hardware in exposed locations.
Raising the Shell:
- For small cabins (400–800 sq ft) with milled logs under 800 lb per section, a 3–4 person crew with jacks and staging can assemble the shell in days to weeks. For heavier logs or larger span elements, a crane or telehandler reduces risk and time.
- Typical workflows: layout and foundation checks → set sill isolation and anchor bolts → stack and align first courses → temporary bracing and corner checks → install roof framing.
Safety and crew size:
- PPE: hard hats, eye and ear protection, cut-resistant gloves, chaps for chainsaw use.
- Typical crew: 2–4 people for small builds; 4–8 for larger raises. Expect 2–7 days to raise the main shell for a small cabin, longer for finishing and detailing.
For a visual demonstration, check out this video on saddle notch demo; log cabin building.:
Off-grid Systems and Utilities for Log Cabins
Integrating off-grid systems from the start makes routing simpler and reduces retrofit costs.
Sizing solar and battery for cabins:
- Typical small-cabin loads: 2–5 kWh/day for a minimalist usage profile (LED lighting, small fridge, basic cooking with propane, electronics). Heating often dominates and may be wood-fired or propane rather than electric.
- Simple PV sizing rule-of-thumb: Required array (W) = daily kWh ÷ average peak sun hours. Example: 3 kWh/day ÷ 4 sun hours ≈ 750 W of PV.
- Battery storage: For autonomy and limited depth-of-discharge, plan 3–10 kWh usable capacity. Lithium-ion systems offer higher cycle life and usable depth compared with lead-acid; see comparisons in off-grid battery guides and lifecycle analyses.
- For detailed component selection, consult the off-grid solar design guide.
Water systems: rainwater harvesting and filtration:
- Rainwater basics: A 1,000 sq ft roof with 1" of rain yields ~600 gallons. Store in above-ground or buried tanks sized for seasonal needs; in dry climates, plan for 30–100 gallons per person per day depending on usage.
- Filtration: Use first-flush diverters, sediment filters, and a UV or ceramic filter for pathogen removal. See our rainwater collection guide for sizing and filtration sequences.
Heating Strategies:
- Wood stoves: Provide high heat output and align with off-grid fuel independence. Modern EPA-certified stoves burn cleaner and reduce creosote buildup.
- Mini-splits: Efficient electric heating and cooling with modest electrical demand; pair with PV for partial offset.
- Radiant: Hydronic radiant floors work well with wood boilers or electric backup but require more upfront plumbing.
Code considerations: Off-grid water and waste systems are often regulated; check local health department rules for rainwater use, and obtain septic permits early.
External reading: For off-grid design examples and sizing methods, the off-grid solar guide linked above is a good starting point.
Costing, Build Timeline, and Practical Tips
A realistic budget and timeline prevent surprises.
Budget framework (high-level categories):
- Site work and foundation: grading, footings, utilities
- Shell: logs or hybrid walls, roof structure, windows and doors
- Finishes: siding, interior finishes, cabinetry
- Mechanicals: plumbing, electrical, heating, PV and battery
- Permits and inspections
- Contingency: plan 10–20% depending on risk and DIY skill
Ten common hidden costs: See the detailed list in hidden costs, but watch for septic design, test pits, extended scaffolding rental, expedited freight, specialized hardware, and additional structural engineering for long spans.
Typical DIY timeline:
- Pre-construction and permitting: 4–12 weeks
- Foundation and utilities: 2–6 weeks (site dependent)
- Shell raise (400–800 sq ft): 1–4 weeks for small crews; faster with crane and larger crew
- Roofing and weatherproofing: 1–3 weeks
- Mechanical rough-in and insulation: 2–6 weeks
- Finishes and commissioning: 4–12+ weeks
Example: A 600 sq ft cabin with a two-person DIY crew might take 6–9 months from start to finish, assuming part-time work and no major permitting delays. A small contractor crew could shorten that to 3–4 months.
Contingency and procurement tips:
- Keep a 10–15% cash contingency for material price swings and shipping.
- Confirm lead times for milled logs, SIPs, or imported windows before committing.
- Stage material deliveries to reduce on-site clutter and weather exposure.
Quick Reference: Key Points for First-time Builders
- Plan drainage and access first.
- Prioritize roof and airtightness over decorative finishes.
- Choose a wall system that matches maintenance willingness: full logs require more upkeep than SIP hybrids.
- Size off-grid systems conservatively for winter; overspecing batteries often saves hassle.
- Test airtightness (blower-door) before finishing to catch leaks early.
For small-cabin layout and space-efficiency ideas, the tiny house build and small-cabin guide are useful companions.
The Bottom Line: is a Modern Log Cabin Right for You?
Log cabin building offers a distinct aesthetic and thermal mass benefits, but it brings trade-offs in insulation and maintenance. Choose solid logs if appearance and regional timber access matter most; choose hybrids or timber-frame with SIPs when energy performance and low maintenance are higher priorities. For a budget-conscious DIYer focused on efficiency and off-grid readiness, a timber-frame or framed wall with log veneer plus high-R roof and careful airtight detailing often hits the best balance.
Frequently Asked Questions
How much does it cost to build a basic log cabin?
Costs vary widely by system choice, location, and whether the owner does labor. Material-only ranges for shells commonly span moderate to high bands: solid-sawn or milled log shells generally sit above simple framed walls in materials cost, while timber-frame plus SIP infill tends to be higher still. Budget categories should include foundation, shell, finishes, mechanicals, permits, and a 10–20% contingency. For detailed hidden items that often raise budgets, see the hidden costs guide.
Can a DIY crew safely build a log cabin shell?
Yes, many DIY crews raise small log shells safely when they use appropriate jigs, lifting equipment, and PPE. For heavy logs or high raises, renting a crane or hiring a small crew for the raise improves safety and speed. Prioritize training on chainsaw safety, rigging, and temporary bracing. Consult the step-by-step procedures in the essential tools guide before starting.
What insulation approach gives the best energy performance?
The best energy performance typically comes from continuous insulation assemblies: SIPs, exterior rigid foam plus insulated framing, or deep-cavity walls with high-density insulating materials. For a log aesthetic, use a framed insulated backup wall or SIPs with a log veneer. Also prioritize airtightness and a well-insulated roof—those measures often deliver larger energy savings than upping wall R-value alone. See the passive house airtightness overview for airtight detailing strategies.
How do you prevent moisture and rot in log walls?
Control bulk water first: site drainage, adequate roof overhangs, flashing at sills and windows, and a 6–12" clearance from grade. Use breathable finishes and schedule periodic inspections and resealing (every 5–10 years depending on finish). Keep materials dry during construction—temporary roofing and off-ground storage minimize issues. The InterNACHI log home basics resource provides additional joinery and finish guidance: https://www.nachi.org/loghomebasics2006.htm.
Can modern log cabins be truly off-grid?
Yes. Modern log cabins can be off-grid with careful system sizing: a 2–5 kWh/day load often pairs with 500–1,200 W of PV and 3–10 kWh of battery storage depending on autonomy goals and winter sun. Combine efficient appliances, LED lighting, and non-electric heating (wood stove or propane) to keep electrical demand modest. For system design and component selection, consult the off-grid solar design and rainwater collection guides.