Practical guide to air sealing: DIY materials, airtight membranes, blower-door testing, and vapor-retarder strategies to cut heat loss and moisture.
How to Air Seal a House Like a Passive House Builder
Air sealing is a simple yet effective way to cut heating and cooling costs, reduce drafts, and improve indoor comfort. Did you know air leaks can account for 30% or more of your energy bills? By sealing gaps, cracks, and holes in your home’s envelope, you can slash energy waste and even prevent moisture damage. Here’s what you need to know:
Key Takeaways:
- DIY Fixes: Use caulk for small gaps, weatherstripping for doors/windows, and spray foam for larger areas.
- Common Leak Areas: Rim joists, attic hatches, electrical outlets, and plumbing penetrations are often missed.
- Materials Matter: Dense-packed cellulose is affordable and eco-friendly, while spray foam provides better air sealing.
- Blower Door Tests: Measure airtightness and locate hidden leaks to meet Passive House standards.
- Insulation Choices: Combine interior and exterior insulation for better performance, especially in cold climates.
- Vapor Control: Smart vapor retarders prevent moisture buildup while allowing walls to dry.
Investing in air sealing not only saves money but also protects your home from mold, rot, and structural damage. Start with simple solutions like caulking and work your way up to advanced techniques like installing airtight membranes. Whether you’re tackling this as a DIY project or hiring a pro, airtightness is the foundation of an energy-efficient home.
DIY Home Air Sealing: Best Tools & Materials to Use! #HomeComfort
DIY Air Sealing Materials and Techniques for Beginners
Starting your air-sealing journey doesn’t require a toolbox full of professional-grade equipment. In fact, many of the most effective materials are budget-friendly and easy to find at your local hardware store. Here’s a breakdown of some beginner-friendly materials and techniques to help you tackle air leaks with confidence.
Caulking and Weatherstripping Basics
Caulk and weatherstripping are go-to solutions for sealing air leaks, but they work best in different scenarios. Caulk is ideal for stationary areas like window frames, door frames, baseboards, and other fixed joints where two materials meet. It’s most effective on gaps smaller than 1/4 inch. On the other hand, weatherstripping is designed for movable components, such as the edges of doors or operable windows.
> "Caulking and weatherstripping are two simple and effective air-sealing techniques that offer quick returns on investment, often one year or less." - U.S. Department of Energy
For larger gaps - those exceeding 1/2 inch - insert a backer rod (a closed-cell foam rope) before applying caulk. This helps prevent cracking as materials expand and contract. Silicone or polyurethane caulks are better choices than acrylic versions since they shrink less after curing. Around doors, spring bronze weatherstripping is a durable option that adjusts well to the natural movement of wood, making it a reliable alternative to rubber or foam compression seals.
Mastering these basic sealing methods is a great first step toward eliminating drafts and improving energy efficiency.
Using Gaskets and Tapes for Sealing Penetrations
Small openings like electrical outlets and switch plates on exterior walls are often overlooked sources of drafts, but they’re easy to fix. Foam gaskets are pre-cut to fit behind outlet and switch cover plates, creating a simple barrier to stop air from sneaking through wall cavities. Installation is straightforward: remove the cover plate, place the gasket, and reattach the plate.
For seams in house wrap or airtight membrane joints, specialized sealing tapes can make a big difference - boosting overall performance by about 20%. These tapes create a continuous seal where materials overlap, effectively blocking any unnoticed gaps.
Liquid Flashings and Sealants for Airtightness
For irregular surfaces or hard-to-reach areas, liquid-applied flashings like R-Guard FastFlash are excellent for creating a seamless, flexible air seal around windows and doors. These products work like thick paint and are particularly useful where traditional tape might not stick well. Apply them to the interior edge of window and door units, leaving the exterior gap open to allow for moisture drainage and pressure equalization.
When sealing larger gaps around window frames, use non-expanding spray foam to avoid warping the frame or voiding warranties. Always wear gloves while working with spray foam.
It’s crucial to prioritize safety when working near heat sources like chimneys, recessed lights, or flues. Standard spray foam can ignite at temperatures as low as 240°F, so in these areas, opt for fire-resistant caulk like 3M CP 25WB Plus. This ensures both an effective seal and peace of mind.
Common Air Leakage Points Most Builders Miss
Air leaks are most commonly found where different materials meet, especially at the top and bottom of a building . These areas, often rushed during construction, are prone to gaps that quietly waste energy and money.
> "A few holes carelessly drilled in the wrong places can undo the work of many other people." - Journal of Light Construction
Beyond energy loss, these leaks can lead to moisture problems, mold, poor air quality, and even create entry points for pests. The good news? Once you know where to look, many of these issues are relatively simple to address. Let’s dive into the key areas where gaps are often overlooked.
Sealing Rim Joists and Sill Plates
The rim joist (also called a band joist) is located where the foundation wall meets the first floor. This junction - where the mudsill, subfloor, and wall sheathing come together - is a hotspot for air leaks . Builders often rely on fiberglass batts for insulation here, but these don’t stop airflow. Warm indoor air can pass through, hit the cold rim joist, and cause condensation, frost, or even wood decay .
To fix this, you need a proper air barrier. Expanding spray foam works well to seal gaps between the sill plate and rim joist, as well as where the rim joist meets the subfloor . For a DIY solution, cut rigid foam board to fit each rim joist bay snugly, then seal the edges with caulk or spray foam . Be sure to seal any penetrations for wiring, plumbing, or utilities . Before applying foam or caulk, clean the area thoroughly with a vacuum to ensure a proper bond .
Electrical Boxes and Wall Penetrations
Drafts often sneak in through electrical outlets and switch plates on exterior walls. Adding foam gaskets behind the cover plates can help. Plumbing and gas line penetrations are another common issue. Remove the decorative escutcheon plates around pipes to expose the gaps between the pipe and drywall. Then, seal these gaps with caulk or expanding spray foam before replacing the plates.
Bathtub drains are often overlooked. Large holes are typically cut during installation, but they’re rarely sealed afterward . Similarly, kitchen soffits are frequently left open to the attic or wall framing, allowing unconditioned air to circulate . For larger openings, use rigid materials like drywall scraps or sheet metal to cover the gaps, and seal the edges with foam or caulk.
Attic and Ceiling Transitions
The attic is a prime escape route for warm air. Even a tiny gap - like a 1/16-inch space along partition top plates - can let heated air leak out . Older recessed light fixtures that aren’t IC-rated act like chimneys, channeling warm air directly into the attic . Upgrading to ICAT-rated fixtures or installing LED retrofit kits can create a tighter seal against the ceiling.
Attic hatches and pull-down stairs are other problem areas. Add weatherstripping or foam gaskets around the edges where the access panel rests . For pull-down stairs, consider an insulated cover box. Knee walls in finished attics often lack proper blocking below the bottom plate, allowing air to flow into unconditioned spaces through floor joist cavities . Cantilevered floors, or sections of the home that overhang the foundation, are another common oversight. These areas are often left unsealed, leading to significant heat loss .
When sealing around chimneys and flues, maintain the required 1 to 2-inch clearance for fire safety. Use sheet metal and high-temperature caulk to bridge the gap while meeting fire codes .
How to Install an Airtight Membrane on Walls and Roofs
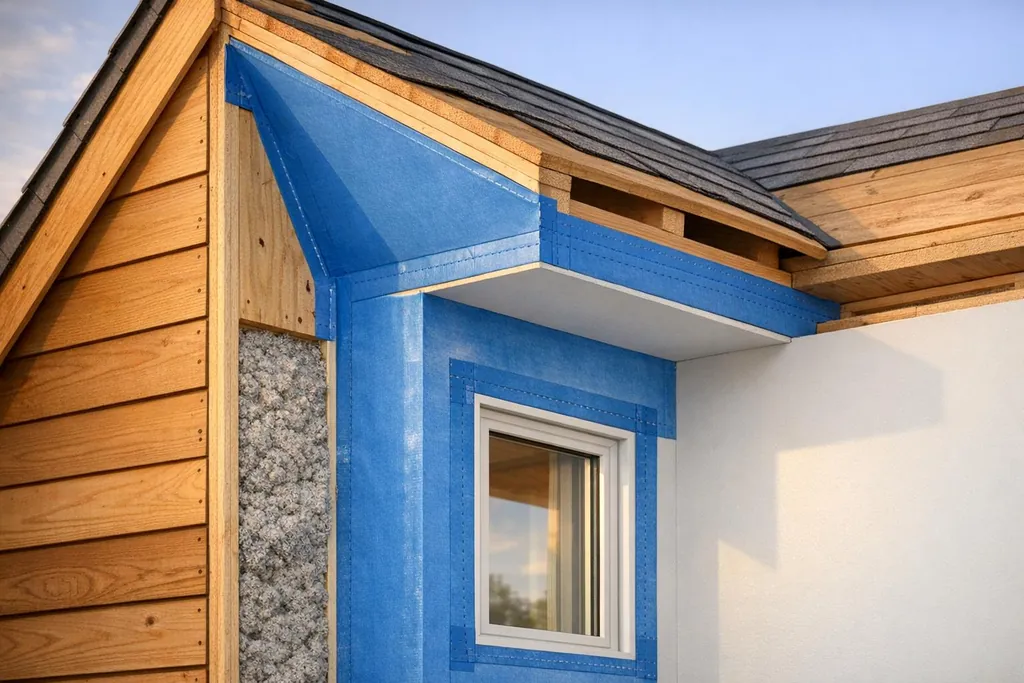
Once you've sealed the obvious air leaks, the next step to improving your home's energy efficiency is installing an airtight membrane. This membrane acts as a protective shield, working in tandem with materials like lumber, drywall, tapes, and caulks to create a continuous barrier against air leakage through walls and roofs. The key is choosing a membrane suited to your climate and applying it meticulously to cover every seam, edge, and penetration.
Choosing the Right Airtight Membrane
Pick a membrane that aligns with your climate's vapor requirements. For colder regions (Zones 3 to 8), the vapor properties of the membrane must complement your wall assembly. For example, Pro Clima DB+ provides variable vapor control, while standard housewrap, when properly sealed with tape, can serve as an exterior air barrier. If you're looking for an integrated solution, Huber ZipSystem pairs sheathing with a built-in air barrier, though it requires specialized tape for sealing seams.
It's also essential to ensure the membrane bonds well with sealant tapes. High-quality tapes are flexible and durable, accommodating wood shrinkage without cracking - unlike canned foam, which hardens and may fail as framing shifts. For projects aiming to meet Passive House standards (0.6 ACH50 or better), avoid relying on OSB for air sealing and opt for specialized membranes that ensure better performance.
Installing Membranes on Walls
Start by ensuring the wall sheathing is clean and dry. If you're using housewrap, secure it with cap fasteners rather than staples, which can tear the material. Staples should only be used at overlaps where seams will be taped. Overlap all seams by at least 6 inches, and seal them with high-quality tape designed for air barriers.
Pay close attention to window installations. Apply air seals at the interior edge of the window frame using impermeable tape or low-expansion foam. This placement ensures proper pressure equalization and allows water to drain effectively. Avoid stuffing fiberglass insulation into gaps around windows - it doesn't act as an air barrier and won't prevent leaks.
> "Air barriers must work together to provide a continuous and complete enclosure of the building envelope - floors, walls and roof." - Journal of Light Construction
For wall-to-ceiling transitions in new builds, bring the housewrap up and over a strip of plywood attached to the top plate. This creates a seamless connection to the ceiling's air barrier. Seal all penetrations - like those for electrical boxes, plumbing, and vents - at the membrane layer using building tape or caulk. Adding a service cavity (a small gap between the membrane and interior finish) gives you space to run wiring without compromising the air barrier.
Once the wall membranes are installed and sealed, it's time to focus on the roof.
Roof and Cathedral Ceiling Applications
For cathedral ceilings, your thermal and air barriers need to follow the roof's slope. A simple and effective method is to install rigid foam insulation beneath the rafters, sealing all seams and edges with tape or caulk. This approach creates a continuous barrier and aligns with Passive House principles by maintaining both thermal and air sealing.
If your design includes recessed lighting, construct airtight boxes using foil-faced rigid foam, secured with expanding foam. For chimneys, avoid standard membranes or plastic foams; instead, use sheet metal sealed with high-temperature caulk that meets ASTM 136 standards. Every penetration - whether for vents or other services - must be sealed at the membrane layer to ensure a consistent barrier across the entire roof assembly.
| Membrane Comparison | |||
|---|---|---|---|
| Material Type | Air Barrier Function | Vapor Barrier Function | Best Use Case |
| Housewrap | Yes (if taped) | Varies (usually permeable) | Exterior wall weather protection |
| Polyethylene Sheeting | Yes | Yes (Non-permeable) | Under concrete slabs or specific wall assemblies |
| Pro Clima DB+ | Yes | Smart/Variable | Specialized wall and roof assemblies |
| Huber ZipSystem | Yes (with tape) | Varies | Integrated sheathing and air barrier |
| Rigid Foam | Yes (if taped) | Varies | Continuous exterior insulation and air sealing |
Dense-Packed Cellulose vs Spray Foam: Which Is Better?
::: @figure 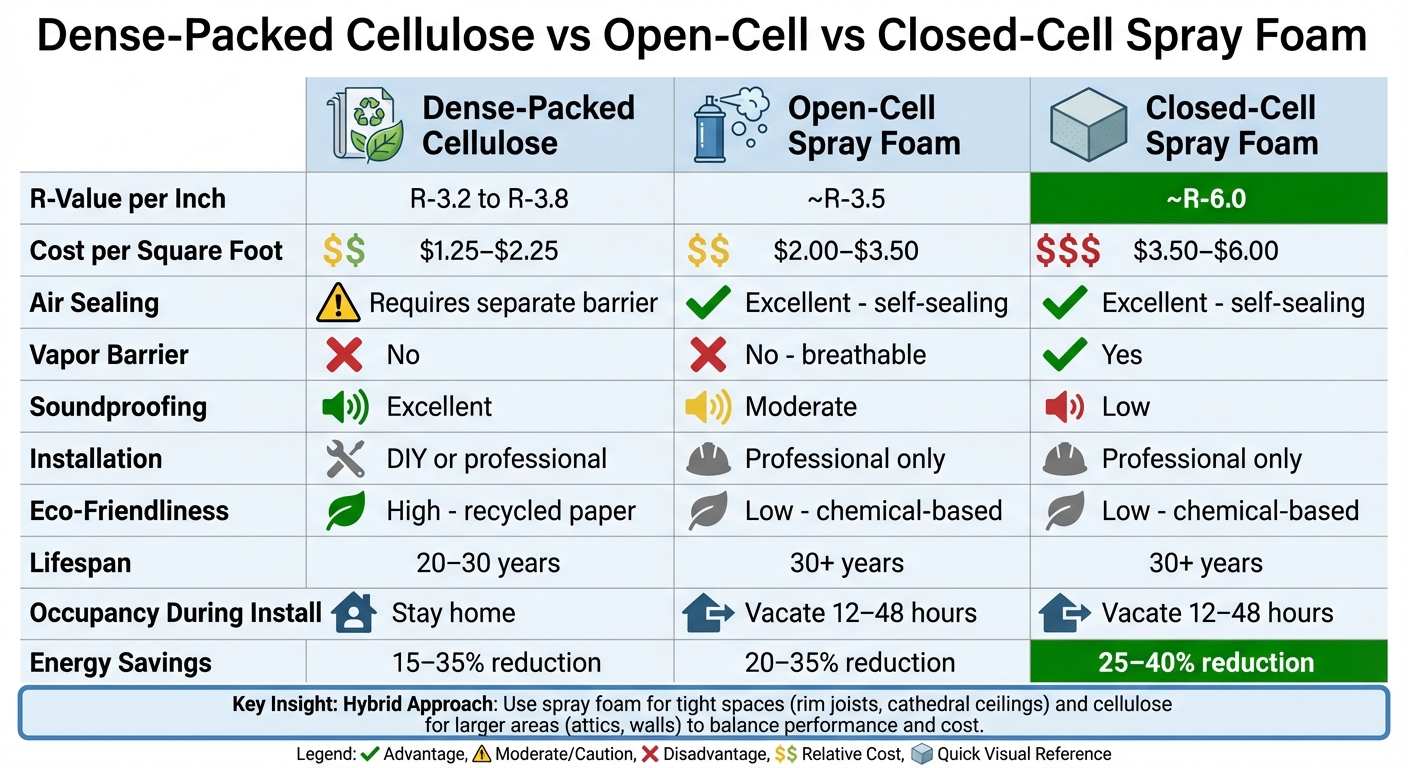 :::
:::
When deciding between dense-packed cellulose and spray foam, the best choice depends on your home's specific requirements. Spray foam serves as both insulation and an air seal in a single step, expanding to fill gaps and creating a continuous barrier. On the other hand, dense-packed cellulose restricts airflow but requires an additional air barrier, like tapes or membranes, to achieve complete airtightness . These key differences lay the groundwork for comparing their performance, costs, and installation methods.
For homes in colder climates, managing moisture is a top priority. Closed-cell spray foam doubles as a vapor barrier, making it an effective choice for moisture control. In contrast, cellulose does not block vapor, so proper ventilation or a separate vapor retarder is essential to prevent moisture-related issues . Beyond moisture concerns, other factors like soundproofing and ease of installation come into play. Cellulose stands out for soundproofing due to its dense, fibrous structure, which absorbs sound better than spray foam .
> "The real question is: what does your house need?" > > - Uri "Ori" Pearl, Owner, Nealon Insulation
For many DIY enthusiasts, a hybrid approach works well. Spray foam is ideal for tight spaces like rim joists, cathedral ceilings, and corners, while cellulose is great for filling larger areas like attics. This combination balances performance and cost effectively . The price difference is also notable: closed-cell spray foam ranges from $3.50–$6.00 per square foot, while cellulose costs $1.25–$2.25 per square foot .
Comparison Table: Dense-Packed Cellulose vs Spray Foam
| Feature | Dense-Packed Cellulose | Open-Cell Spray Foam | Closed-Cell Spray Foam |
|---|---|---|---|
| R-Value per Inch | R-3.2 to R-3.8 | ~R-3.5 | ~R-6.0 |
| Cost per Sq. Ft. | $1.25–$2.25 | $2.00–$3.50 | $3.50–$6.00 |
| Air Sealing | Requires separate barrier | Excellent (self-sealing) | Excellent (self-sealing) |
| Vapor Barrier | No | No (breathable) | Yes |
| Soundproofing | Excellent | Moderate | Low |
| Installation | DIY or professional | Professional only | Professional only |
| Eco-Friendliness | High (recycled paper) | Low (chemical-based) | Low (chemical-based) |
| Lifespan | 20–30 years | 30+ years | 30+ years |
| Occupancy During Install | Stay home | Vacate 12–48 hours | Vacate 12–48 hours |
While spray foam requires professional installation and necessitates vacating your home for 12–48 hours during curing and off-gassing, cellulose installation is far less disruptive - you can usually remain in your home during the process. Both materials offer considerable energy savings: cellulose can cut heating and cooling costs by 15–35%, while closed-cell spray foam can save 25–40% in older, drafty homes .
The Most Cost-Effective Insulation for Cold Climates
When it comes to making your home energy-efficient in cold climates, insulation plays a key role - especially if you're working with a tight budget. To get the most R-value for your dollar, focus on effective air sealing alongside cost-efficient insulation. A practical and affordable choice? Dense-packed cellulose or fiberglass in wall cavities, combined with a continuous air barrier like taped house wrap or ZIP sheathing. This method is far more economical than spray foam, which can cost nearly four times as much per R-value compared to cellulose . For homes in Zone 7, where achieving R-60 is recommended, cellulose is the go-to solution for high performance without breaking the bank .
Rigid foam boards are another excellent option, particularly for exterior applications. When installed on the outside of your home and properly taped at the seams, rigid foam creates a continuous thermal barrier that minimizes heat loss through studs. This makes it especially effective for foundations and exterior sheathing, where moisture resistance is a must . These cost-conscious strategies are essential for choosing the right insulation materials for your home.
Dense-Packed Cellulose Cost Breakdown
Dense-packed cellulose stands out as a budget-friendly insulation option, offering great value when compared to pricier alternatives like closed-cell spray foam. When paired with a reliable air barrier, cellulose not only provides excellent thermal resistance but also helps limit airflow through wall cavities. Simple air sealing techniques, such as caulking and weatherstripping, can further enhance efficiency and often pay for themselves within a year .
Before insulating, make sure to seal all air leaks. Focus on critical areas like the attic, basement (especially rim joists), and crawlspaces - these are the primary culprits for heat loss in cold climates . Once air sealing is complete, you can explore other insulation options to suit specific needs.
Rigid Foam and Fiberglass Alternatives
Fiberglass batts are an affordable choice, but they have a downside - they don't block air movement. Without a continuous air barrier, fiberglass insulation can allow air to pass through, leading to potential moisture issues and reduced thermal performance . Insulation batts alone won't provide the airtight seal needed for maximum energy efficiency .
Rigid foam boards, such as polyiso, shine in exterior applications. They not only offer insulation but also act as an air barrier when seams are properly taped. In fact, taping house wrap joints can improve air barrier performance by about 20% . For foundations and below-grade areas, rigid foam is a better choice than fibrous materials due to its moisture resistance and ability to create a continuous thermal break, which prevents heat loss through studs .
In extremely cold regions like Climate Zone 7, where indoor and outdoor temperature differences can surpass 120°F, the stack effect significantly increases air leakage . Combining affordable cavity insulation with a strong exterior air barrier is a smart, long-term investment that ensures better performance and energy savings.
Insulating Rim Joists: How to Prevent Major Heat Loss
Rim joists can be a sneaky culprit when it comes to heat loss in your home. This often-overlooked area - where the foundation wall, sill plate, rim joist, and subfloor meet - provides plenty of chances for air to leak. As warm air escapes through your attic, it can create a vacuum effect, pulling cold outdoor air inside through gaps in your basement or crawlspace. To combat this, start by sealing the base of your rim joist assembly to minimize these losses.
Skip fiberglass batts for this job - they don’t stop airflow and can lead to condensation and mold issues over time . Instead, choose materials that offer both insulation and a true air barrier.
Using Sill Seal and Acoustic Caulking
One of the first steps is to install a sill seal gasket between the foundation and mudsill. This creates a barrier to block air at the base . While construction adhesives like PL400 are great for bonding materials, they don’t stop airflow, so they’re not enough for air sealing .
For the area where the wall meets the floor, apply a thick bead of acoustic caulking before installing drywall or vapor retarders. This flexible sealant holds up over time, even as materials shift. For smaller cracks (under 1/4 inch), silicone or acrylic latex caulk works well - especially where the sill plate meets the foundation . For larger gaps (1/4 inch to 3 inches), expanding spray foam is your best bet.
> "The stack effect draws cold air into the home at the lower levels and exhausts warm air out at the higher levels... Sealing the bottom plate is critical." – Randy Williams, Energy Auditor
Don’t forget to seal utility penetrations, such as plumbing, gas, electrical, or exhaust vents, in the rim joist . For areas around furnace flues or chimneys, use high-temperature caulk that meets ASTM 136 standards to ensure safety . Once you’ve sealed the perimeter, it’s time to insulate the cavity itself.
Dense-Pack Filling Techniques
After securing a tight perimeter with sill seals and caulking, you’ll need to insulate the cavity for complete protection. Closed-cell spray foam is an excellent choice here. It acts as an air barrier, vapor retarder, and offers a high R-value all in one step, making it ideal for irregular gaps . Just make sure your wood framing has a moisture content below 18–19% before applying the foam to avoid decay .
If you’re looking for a more cost-effective solution, rigid foam board is a solid DIY option. Cut the foam to fit each joist bay and seal the edges with spray foam or caulk to ensure it’s airtight . Without proper edge sealing, rigid foam alone won’t be enough to stop air leakage.
For colder climates (Zones 5–8), any air-impermeable insulation must act as a Class II vapor retarder or be paired with one . While open-cell spray foam can work as an air barrier, it’s vapor-permeable and may require an additional vapor retarder in these zones to prevent condensation .
| Material | Air Sealing Capability | Vapor Control | Best For |
|---|---|---|---|
| Closed-Cell Spray Foam | Excellent; seamless bond | Built-in Class II vapor retarder | Cold climates (Zones 5–8) and irregular shapes |
| Rigid Foam Board | Good if edges are sealed | Varies by product type | DIY projects; requires precise cutting and sealing |
| Open-Cell Spray Foam | Good air barrier | Vapor permeable; needs extra retarder | Warmer climates or with added vapor barrier |
| Fiberglass Batts | Poor; air passes through | None | Supplemental insulation after air sealing |
Should You Use Interior or Exterior Insulation (or Both)?
Insulation plays a critical role in strengthening your home's thermal envelope, working hand-in-hand with air sealing techniques. Deciding between interior, exterior, or a combination of both depends on factors like climate, budget, and performance goals.
Interior insulation involves insulating accessible areas like wall cavities, attics, and basements while ensuring a continuous air barrier. It's a common choice for DIY projects since it doesn't require altering the home's exterior. On the other hand, exterior insulation uses materials such as rigid foam or house wrap, installed during construction, to block air movement before siding is applied. For those seeking the best of both worlds, a hybrid approach combines interior and exterior insulation, offering enhanced airtightness and thermal performance.
> "The projects I work on, I try to make it both - a belt-and-suspenders approach. I do like using the exterior as the main air control layer. To me, it's the easiest to detail." – Randy Williams, Energy Auditor and Builder
In colder climates, the hybrid method shines by addressing two key issues: condensation and energy efficiency. The exterior insulation layer keeps structural sheathing warm, staying above the dew point to reduce condensation risks, while the interior layer boosts R-value and includes a vapor retarder to prevent problems like "attic rain" - frost or condensation caused by warm, moist air hitting cold surfaces . This dual-layer system also provides redundancy; if one layer has minor imperfections, the other can maintain airtightness. While modern homes typically achieve 2.0 to 2.5 ACH50 (air changes per hour at 50 Pascals), hybrid systems can meet Passive House standards of 0.6 ACH50 .
Weighing the Pros and Cons
While hybrid systems deliver top-tier performance, they come with added complexity. Interior insulation is ideal for retrofits but demands meticulous sealing around penetrations like electrical boxes and plumbing to avoid moisture issues. Without a proper vapor barrier, moisture risks can escalate . Exterior insulation, while offering better continuity, requires exterior access and can complicate details like window flashing . Hybrid systems, though highly effective in cold climates, require careful coordination of materials and labor, leading to increased costs .
Comparison Table: Interior vs Exterior vs Hybrid Insulation
| Feature | Interior Only | Exterior Only | Hybrid (Both) |
|---|---|---|---|
| Installation Complexity | Moderate; manageable for DIY projects | High; involves siding and window flashing | High; requires coordinating two layers |
| Moisture Risk | Higher; prone to condensation at rim joists | Lower; keeps sheathing above dew point | Lowest; offers vapor control and redundancy |
| Cost ($/sq ft) | Lower; uses standard cavity insulation | Moderate to high; requires rigid foam | Highest; combines cavity and exterior layers |
| R-Value Potential | Moderate; limited by stud depth | Moderate to high; depends on foam thickness | Highest; combines cavity and continuous insulation |
| Cold Climate Suitability | Fair; demands flawless vapor barrier execution | Good; protects structure in extreme cold | Excellent; maximizes durability and R-value |
| Thermal Bridging | Significant; heat escapes through studs | Minimal; provides thermal break | Minimal; exterior layer breaks thermal bridges |
Each method has its strengths and trade-offs, so your choice will depend on your specific needs and priorities.
How to Test Your Airtightness with a Blower Door
Once you've sealed your home, it’s time to check how airtight it really is. A blower door test is a diagnostic tool that helps pinpoint air leaks and measures total air leakage with precision . This test evaluates your building's envelope - essentially, the insulation and air barrier - and identifies spots where drafts, moisture, or even pests could sneak in, potentially compromising your insulation efforts . It’s a critical step to ensure your sealing aligns with Passive House standards before moving on to the next phase.
Blower Door Test Procedure
Here’s how it works: a strong fan is mounted in an exterior door frame. This fan pulls air out of your home, creating negative pressure that draws outside air in through any cracks or leaks . Before starting the test, make sure to turn off combustion appliances and close all windows, doors, and dampers to seal the envelope properly .
During the test, you can use simple tools like an incense stick or even your moistened hand to detect leaks. For example, hold the incense stick near common problem areas - like electrical outlets, window frames, attic hatches, or rim joists - and watch for wavering smoke. Alternatively, a cool draft on your hand can reveal where air is sneaking in . For a more advanced approach, an infrared camera can highlight areas of air infiltration through your home’s framing while the blower door is running . These methods not only help you locate leaks but also set the stage for verifying improvements later. For the best results, consider working with a certified technician who can incorporate these findings into a comprehensive sealing strategy .
Achieving the Passive House Airtightness Standard
Meeting the Passive House standard requires an exceptionally airtight home - far tighter than what’s typical in most modern buildings. This level of performance demands careful attention to detail. Start by addressing large gaps in critical areas like the attic, crawlspace, and basement, as these are often major sources of air leakage . A helpful tip: look for "dirty spots" on insulation or ceiling paint. These discolorations are signs of air movement and can guide you to hidden leaks . Seal these areas using caulk for stationary components and weatherstripping for movable parts. Once you’ve completed the sealing, run another blower door test to confirm your progress . Only then should you move on to adding vapor retarders for even better performance.
The Role of Vapor Retarders in Air Sealing
Once your blower door test confirms airtightness, understanding vapor retarders becomes a key part of managing moisture effectively. While both vapor retarders and air barriers help with moisture control, they serve different roles. Air barriers prevent the physical flow of air through gaps and cracks, while vapor retarders slow down water vapor diffusion through materials. Simply put, air barriers tackle bulk moisture, while vapor retarders handle water vapor movement .
It’s important to note that air sealing plays a much bigger role in moisture control than vapor retarders. Air leaks can carry far more moisture into wall assemblies than vapor diffusion ever could. In fact, only 1% to 5% of moisture issues in buildings come from vapor diffusion . As Allison A. Bailes III, PhD from Energy Vanguard, explains:
> "Holes in the vapor barrier that allow humid air through may allow a lot more water vapor into an assembly than the vapor barrier is stopping. Because of this, air sealing is more important than vapor retarders" .
That said, vapor retarders still play a role in keeping condensation off cold surfaces inside your walls. The trick is picking the right type for your climate and avoiding materials that trap moisture. For example, in cold areas like Climate Zone 7, homes using polyethylene as both an air and vapor barrier often achieve airtightness scores of 2 to 2.5 ACH50 . However, traditional polyethylene (a Class I vapor retarder) can create problems by blocking the walls from drying toward the interior .
Smart Vapor Retarders for Cold Climates
Smart vapor retarders, such as Intello and MemBrain, offer a better approach for homes in climates with both heating and cooling seasons. These materials adjust their permeability based on humidity levels. When the wall is dry, they stay tight, but when moisture builds up, they open up to allow drying . This adaptability solves one of the biggest issues with traditional polyethylene: the inability to let trapped moisture escape.
Polyethylene should be avoided on the interior of walls in regions where air conditioning is common. When outdoor humidity meets the cooled interior surface of a poly vapor barrier, it can lead to condensation and moisture damage . Bill Rose, author of _Water in Buildings_, supports the move toward materials that allow for better drying:
> "Given the fact that a very small percentage of building problems (1 to 5% at most...) are associated with wetting by water vapor diffusion, the argument for enhanced drying potential becomes much stronger" .
Integrating Vapor Retarders with Air Barriers
For the best moisture control, combine a continuous air barrier with a vapor retarder that has the right permeability for your climate. In colder regions, place the vapor retarder on the interior side of the wall to stop warm, moist indoor air from condensing on cold exterior sheathing . In hot, humid areas, it should go on the exterior to block humid outdoor air from entering the wall cavity .
To ensure proper installation, seal any tears, punctures, or penetrations - like those around electrical boxes, plumbing stacks, and vent fans - with compatible tape or caulk . Add foam gaskets behind electrical outlet and switch plates on exterior walls to prevent air and vapor from slipping through . If adding a membrane isn’t feasible in an existing home, consider using vapor-retardant paints on interior walls to slow moisture diffusion .
For a quick check of your air barrier’s continuity, try the "Red Pen Test." Trace the air control layer on a section drawing of your house with a red pen - there should be no breaks in the line as it outlines the building envelope . In most cases, standard building materials like gypsum board already provide adequate vapor control, so there’s no need to add a Class I vapor retarder .
Once your vapor retarder is properly installed and integrated, your air sealing system is ready to deliver long-term protection and performance.
Conclusion and Key Takeaways
Making your home more energy-efficient through air sealing doesn't have to be complicated. By using straightforward materials and techniques, you can achieve results similar to those of passive house builders. The key is creating an unbroken air barrier that wraps your entire building, from the basement floor to the attic ceiling. Pay extra attention to sealing areas like attics and rim joists, as these spots are often the biggest culprits when it comes to energy loss.
Air leaks can increase heating and cooling expenses by more than 30% . Simple fixes, such as applying caulk around stationary gaps like window frames and adding weatherstripping to moving parts like doors, are not only effective but often pay for themselves within a year . Be thorough - seal every penetration to ensure a complete air barrier. This step is a cornerstone of any energy-efficiency plan.
It's also important to remember that air sealing and insulation go hand in hand. Neither works as well without the other. The U.S. Department of Energy emphasizes this point:
> "Reducing the amount of air that leaks in and out of your home is a cost-effective way to cut heating and cooling costs, improve durability, increase comfort, and create a healthier indoor environment."
Once your home is sealed, consider installing controlled ventilation to maintain good air quality and manage moisture levels. To check your progress, a blower door test can help you measure success - aim for 3 ACH50 or lower if you're in Climate Zones 3–8, as outlined in the 2012 International Energy Conservation Code .
FAQs
What are the best materials for air sealing your home in a cold climate?
To tackle [DIY air sealing](/blog/best-diy-air-sealing-materials-techniques-beginners) in a cold climate, start with high-quality caulk to seal cracks and gaps in stationary spots like walls, ceilings, and floors. For areas with movement, such as doors and windows, weatherstripping works best to keep drafts at bay.
Combine these efforts with dense-packed [cellulose insulation](/glossary/cellulose-insulation), which not only offers strong thermal resistance but also fills gaps snugly, enhancing your home's airtightness. For those tricky, hard-to-reach spaces, spray foam can be a smart choice, as it provides both insulation and air-sealing benefits. Be sure to pick materials that align with your home’s unique needs to boost energy efficiency and keep things cozy.
What’s the difference between dense-packed cellulose and spray foam insulation, and how do I choose?
Choosing between dense-packed cellulose and spray [foam insulation](/blog/complete-guide-exterior-foam-insulation-energy-efficient-roofs) comes down to what matters most to you - whether it's cost, energy savings, or environmental considerations.
Dense-packed cellulose stands out as a wallet-friendly and eco-conscious option. Made from recycled materials, it’s a great pick for those aiming to reduce their carbon footprint. However, it does require extra steps, like additional air sealing, to ensure your space is airtight.
On the flip side, spray foam insulation offers a two-in-one solution. It not only insulates but also seals air leaks in a single application. With its higher R-values, it’s especially effective in tricky, hard-to-reach areas. The trade-off? A steeper upfront cost.
If you’re leaning toward affordability and sustainability, cellulose might be your go-to. But if you’re after top-notch energy efficiency and convenience, spray foam could be worth the splurge.
What is a blower door test, and why is it important for checking home airtightness?
A blower door test is a practical way to assess how airtight your home is. It uses a high-powered fan to create pressure differences, making it easier to spot air leaks. These leaks can let outside air in or allow heated or cooled air to escape, which impacts both energy efficiency and indoor comfort.
By identifying these problem areas, a blower door test enables you to focus on sealing gaps and weak spots more effectively. The result? Lower energy costs, better indoor air quality, and improved comfort - especially during those hot summers or chilly winters.