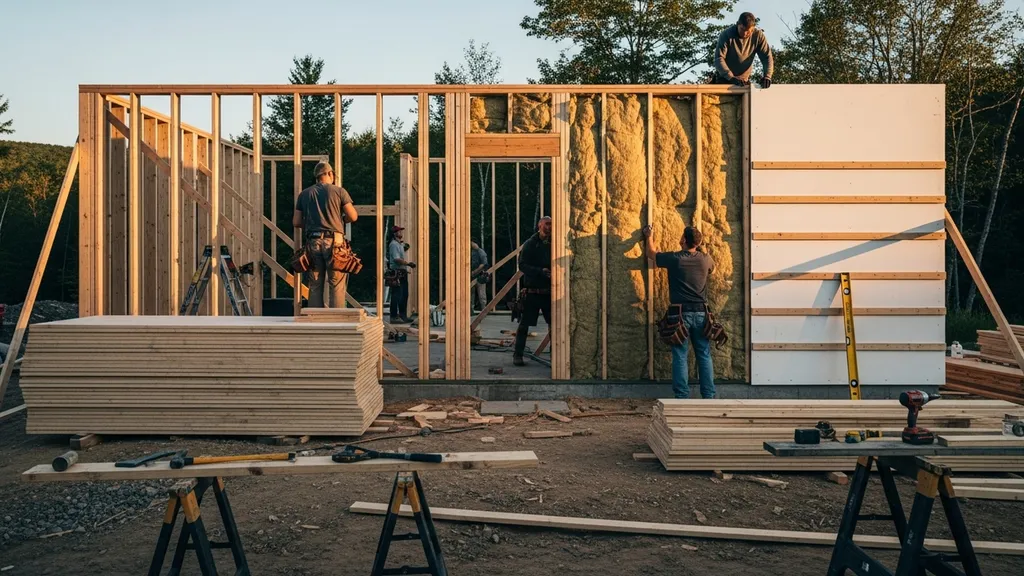
Step-by-step guide to cabin wall assembly covering framing options, insulation strategies, air/vapor control, sheathing, and performance details.
Cabin Wall Assembly: Framing and Insulation
A cabin wall assembly is the layered system that provides structure, thermal control, moisture management, and airtightness for a small home. This guide on cabin wall assembly explains framing choices, insulation materials and placement, air and vapor control, sheathing and rainscreen detailing, and a practical construction sequence. Readers will get clear performance targets (R-value ranges and airtightness goals), material trade-offs, and step-by-step actions appropriate for budget-conscious DIY builders and small self-build teams.
TL;DR:
- Aim for whole-wall R-values of R-15 to R-23 in temperate climates and R-30+ in cold climates; target 1–3 ACH50 for tight, buildable cabins.
- Prioritize continuous exterior insulation to cut thermal bridging and use a continuous air barrier (taped sheathing, membrane, or sealed OSB) for long-term moisture control.
- For budget builds use dense-pack cellulose in deep cavities plus a modest exterior board; for high-performance go double-stud or Larsen truss with exterior mineral wool or polyiso.
Overview: What a Cabin Wall Assembly Does
A cabin wall assembly ties together four roles: support, thermal resistance, rain/moisture control, and air control. Structure comes from studs, plates, and sheathing; thermal control is achieved with cavity insulation and often continuous exterior insulation; moisture control uses a weather-resistive barrier (WRB) and rainscreen; air control relies on a continuous air barrier and sealed penetrations.
Performance targets that are realistic for many DIY cabins:
- Airtightness: 1–3 ACH50 aspiration for a “tight but buildable” cabin; Passive House targets are much lower (0.6 ACH50) and require stricter detailing and testing.
- Thermal: In temperate/mild climates, whole-wall R of roughly R-15–R-23 is common. For cold climates, aim R-30+ for walls. These are whole-wall numbers — studs and fasteners reduce effective R if thermal bridging is unaddressed.
Trade-offs matter. High cavity R via deep studs or double-stud walls raises material and labor costs. Continuous exterior insulation reduces thermal bridging but adds finish detailing and may increase cladding attachment work. Research and construction guides such as the Department of Energy's construction guide for high-performance walls provide useful comparisons of common 2x4 and 2x6 wall approaches for real-world climates (see the construction guide to next generation high performance walls).
Common constraints for DIY cabin builders include limited crew size, transport and storage of insulation and sheathing, and the need to sequence air-sealing work while walls are accessible. Builders should weigh skill level against desired performance and pick a framing and insulation path that fits time and budget.
Framing Options for Cabin Walls
Framing choice determines cavity depth, thermal bridging, and build speed. Typical options: 2x4/2x6 conventional stick framing, advanced framing, double-stud walls, and Larsen truss assemblies.
Conventional Stick Framing (pros and Cons)
- Description: 2x4 or 2x6 studs at 16" or 24" o.c., sheathed with OSB or plywood.
- Pros: Fast, low skill barrier, wide material availability, lighter wall weight for small foundations.
- Cons: Studs cause thermal bridging, limiting whole-wall R; 2x4 limits cavity R without exterior CI.
- Practical pointer: Use 2x6 at 16" o.c. if you want higher cavity R without exotic methods.
Advanced Framing and High-performance Options
- Advanced framing: Packs framing members to reduce wood content (e.g., 24" o.c., single top plates, optimized headers) to increase cavity insulation volume.
- Pros: Lower material cost, slightly better whole-wall R.
- Cons: Requires stricter nailing schedules, more careful detailing for shear and bracing — check local code and the Department of Energy case studies for high-R walls which show where advanced framing works well (High-R walls case study analysis).
- Recommendation: Use advanced framing only if comfortable with engineering shear bracing or adding structural sheathing.
Larsen Truss and Double-stud Approaches
- Double-stud walls: Two stud walls offset to reduce bridging; deep cavities for dense-pack cellulose or batt insulation; simpler to build but thicker.
- Larsen truss: A lightweight truss attached to the outside of the load-bearing wall, creating a deep continuous cavity with reduced bridging and an easy path for continuous insulation.
- Trade-offs: Both give high cavity R but require more lumber and labor; Larsen truss often allows a thinner overall footprint than a true double-stud wall and results in fewer structural fasteners penetrating the air barrier.
- Resources: Compare methods in the Larsen truss guide and a double-stud comparison to pick an approach that matches desired R, thickness, and skill level.
Structural notes: wind and snow loads change stud spacing, sheathing nailing schedule, and bracing. Follow local code for nailing patterns and provide continuous bracing where required. For cabins in high-wind or high-snow areas, use engineered studs or consult a structural engineer.
Insulation Strategies: Materials and Where to Place Them
Insulation selection balances R per inch, moisture behavior, cost, and embodied carbon. Placement choices — cavity-only, cavity plus continuous exterior insulation, or fully exterior strategies — significantly affect whole-wall performance and thermal bridging.
Cavity Insulation Options (batts, Cellulose, Spray Foam)
- Fiberglass batts: R ≈ 3.2–3.8 per inch. Low upfront cost, widely available. Needs careful installation to avoid gaps; poor at air control unless combined with an internal air barrier.
- Cellulose (dense-pack): R ≈ 3.2–3.8 per inch, better at filling odd cavities and reduced convective loops; lower embodied carbon if using recycled fiber. Works well for retrofit and new double-stud cavities.
- Spray polyurethane foam (open-cell): R ≈ 3.5–3.7 per inch; provides both insulation and air-sealing when applied correctly. Closed-cell spray foam: R ≈ 6–6.5 per inch; acts as vapor barrier in some cases but has higher embodied carbon and cost.
- Guidance: For budget cabin builds, dense-pack cellulose often hits the best trade-off between cost, performance, and carbon. See our comparison of spray foam vs cellulose for detailed trade-offs.
Continuous Exterior Insulation (foam, Mineral Wool Boards)
- Purpose: Cuts thermal bridging by adding a continuous thermal break over studs and sheathing.
- Common materials: Polyiso (R ≈ 6–6.5/in.), XPS (R ≈ 5/in.), mineral wool boards (R ≈ 3.5–4/in.). Polyiso performs best per inch but loses performance at low temperatures.
- Installation tips: Use appropriate cladding attachment methods (screws with furring, long nails through blocking, or approved clip systems). See the complete guide to exterior foam insulation for best practices.
- When to prioritize CI: If thermal bridging through studs is a major loss (2x6 studs with little thermal break), adding 1"–2" of continuous foam can increase whole-wall R substantially with modest thickness.
Natural Fiber Choices and Carbon Considerations
- Options: Cellulose, sheep's wool, hemp, and wood fiber boards. R per inch varies: cellulose ~3.5/in., wood fiber ~3–3.8/in., sheep's wool ~3.5/in.
- Trade-offs: Natural fibers generally have lower embodied carbon and are vapor-permeable, which helps with drying potential. They can be more expensive or harder to source.
- Resources: For a deep dive on low-carbon options consult the ultimate guide to natural fiber insulation and embodied-carbon research such as RDH's resources on enclosure carbon targets (embodied carbon resources for building enclosures).
Recommended minimum R by climate (general ranges):
- Climate zones 1–3 (mild): Whole-wall R ≈ R-15–R-23
- Climate zones 4–5 (mixed): Whole-wall R ≈ R-23–R-30
- Climate zones 6–8 (cold/very cold): Whole-wall R ≈ R-30–R-40+
Hybrid strategy: Cavity insulation (cellulose or batt) + 1"–2" exterior polyiso or 1.5" mineral wool board reduces thermal bridging and keeps cavity materials inside the conditioned envelope for moisture safety.
Air and Vapor Control: Barrier Types and Placement
Air control and vapor management are separate but related. The air barrier limits convective heat and moisture movement; the vapor retarder controls vapor diffusion. For energy and moisture reasons, air control is often the higher priority.
Air Barrier Materials and Continuity Best Practices
- Common air-barrier materials: Taped sheathing (OSB/plywood with taped seams), sealed plywood/OSB, self-adhered or fluid-applied membranes, and smart vapor-control membranes (e.g., MemBrain).
- Continuity rules: Air barrier must be continuous around the conditioned envelope — seal top plates, sill plates, window and door rough openings, and any penetrations. Tape seams, flash penetrations with membrane patches, and use gaskets at sill plates.
- Testing: Blower-door testing during construction locates leaks; Passive House airtightness guidance can be helpful for stricter projects (see the complete guide to passive house airtightness).
Vapor Control — Interior vs Exterior Placement
- Rule of thumb: Vapor retarder placement depends on climate and wall assembly. In cold climates, place a low-perm vapor retarder on the warm interior side or use smart vapor retarders. In hot-humid climates, avoid interior vapor barriers that trap moisture — consider impermeable exteriors instead.
- Study resources: For step-by-step placement techniques consult the vapor barrier installation guide and the full discussion on vapor barrier placement.
- Design approach: Favor assemblies that dry toward the exterior (vapor open toward outside) when local climate allows; use vapor-permeable insulation and exterior WRB to enable drying.
Penetrations, Services, and Airtight Detailing
- Penetration sealing: Use preformed grommets for electrical cables, membrane boots for pipes, and tape/flashing for conduit. Seal plumbing vents and electrical boxes with airtight boxes or gaskets and spray-foam backer where appropriate.
- Window and door flashing: Flash sill pans, tape head and jambs, and integrate the WRB to create a continuous drainage plane. Install WRB tape at sheathing seams and over corner flashings.
- DIY tips: Perform rough-in routing of services before insulation where possible. For retrofit situations, the air sealing existing homes DIY guide lists typical leak locations and practical sealing methods.
Research on hygrothermal performance underscores that airtightness and proper vapor control reduce condensation risk and lower heating loads. An academic study that models wall assemblies for Las Vegas shows how vapor flows and drying potential vary by assembly and climate (Identify an ideal residential wall assembly for Las Vegas climate).
Sheathing, Cladding and Rain Screen Details
Sheathing, WRB, and cladding form the exterior defense against weather. Their selection affects structural shear, air barrier performance, moisture resilience, and finish longevity.
Sheathing Materials and Structural/air-barrier Roles
- Common sheathing: OSB and plywood. Plywood typically performs better in wet conditions and holds fasteners well; OSB is more economical.
- Practical note: When using OSB or plywood as an air barrier, tape all seams and seal penetrations. See the OSB vs plywood comparison for material pros and cons.
- Sheathing as shear: If the wall needs shear capacity, use rated structural panels and follow nailing schedules per local code or manufacturer guidance.
Rainscreen Concept and Drainage Plane Details
- What it is: A rainscreen is an intentional ventilated gap between the cladding and WRB/sheathing that permits drainage and drying. Typical gap: 3/8"–3/4".
- Build method: Attach vertical battens or furring strips over the WRB, install cladding on battens, and provide insect mesh at the bottom and top of the cavity. The cavity should slope any sill details toward the exterior or allow free drainage to a flashing plane.
- Why it helps: Rainscreens reduce moisture load on cladding, slow wetting, improve cladding lifespan, and reduce risk of hidden rot. Our practical how-to explains installation in the rain screen assembly.
- Fasteners: Use corrosion-resistant fasteners in coastal or humid locations; stainless or hot-dipped galvanized screws are common.
Cladding Choices and Fastening Best Practices
- Cladding options: Wood siding, fiber cement, metal panels, shingles, and board-and-batten are all suitable with different maintenance and attachment requirements.
- Fastening: Follow manufacturer guidance for fastener spacing and embedment. Over exterior foam, use long screws to reach structural sheathing or use engineered clip systems.
- WRB selection: Use a permeable housewrap or a fluid-applied WRB and always integrate flashing at openings. For detailed research on high-R walls and cladding interactions see Building Science's high-R walls report (Building America high-R walls report).
Thermal Performance, R-values and a Comparison Table
Thermal performance needs to be evaluated as whole-wall R, not just cavity R. Thermal bridging through studs, fasteners, and connectors reduces net performance; continuous exterior insulation or truss-based walls reduce that loss.
Thermal Bridging: Why It Matters and Simple Mitigation
- Explanation: Studs conduct heat faster than insulation; a 2x6 wall with R-19 cavity loses effective wall performance due to studs. Continuous exterior insulation (CI) or offset framing (double-stud, Larsen truss) interrupts that heat path.
- Mitigation strategies: Add 1"–2" of CI, use 24" o.c. studs with insulated headers, or adopt Larsen truss/double-stud approaches.
How to Interpret R-values in Composites (whole-wall R)
- Whole-wall R: Add R-values of layers but factor in framing fraction. For example, a 2x6 wall with R-19 cavity and 1" polyiso exterior might achieve whole-wall R ≈ R-22–R-24 depending on stud fraction and sheathing.
- Example calculation: A 16% stud fraction reduces system R. Modeling or whole-wall calculators provide more precise results; see R-value comparison posts like R-13 vs R-23 for further reading.
Sample Comparison Table: Common Insulation Types and Specs
| Insulation type | R per inch | Permeability | Typical 2x6 thickness | Approx cost /1000 ft² | Carbon/embodied note |
|---|---|---|---|---|---|
| Fiberglass batts | 3.2–3.8 | High permeability | R-19 (5.5") | $250–$450 | Low embodied carbon, fossil-based |
| Cellulose (dense-pack) | 3.2–3.8 | Moderate | R-19 (5.5") | $300–$600 | Lower carbon (recycled content) |
| Open-cell spray foam | 3.5–3.7 | Vapor open | R-19 (5.5") | $1,200–$2,000 | Higher embodied carbon, good air seal |
| Closed-cell spray foam | 6–6.5 | Vapor closed | R-33 (5.5") | $2,000–$3,500 | Highest embodied carbon, structural benefit |
| Mineral wool board | 3.5–4.0 | Vapor permeable | 2" ext. = R-7–8 | $900–$1,400 | Mineral raw materials, fire resistant |
| Polyiso board | 6–6.5 | Low perm at warm temps | 1" ext. = R-6 | $750–$1,200 | Good R/in, performance drops in cold |
Cost ranges are approximate and depend on region and installation. Embodied carbon notes are high-level: closed-cell foams tend to have higher CO2 impact; cellulose and natural fibers lower impact. For deeper R comparisons and trade-offs, see posts like R-13 vs R-21 and embodied carbon case studies such as the small-cabin analysis from Clark Nexsen (small cabin embodied carbon case study).
Construction Sequence: Step-by-step Cabin Wall Assembly
This section outlines a practical sequence for a timber-framed cabin wall: layout, framing, insulation, air barrier, sheathing, rainscreen, and cladding. Times given are for a small crew (2–3 people) with basic tools.
Site Prep, Layout and Framing Sequence
- Site prep and plates: Level the sill plate, install a sill gasket on the foundation wall and anchor the sill per code. Time: 1–2 hours per wall line.
- Wall layout: Mark stud locations on plates at chosen spacing (16" or 24" o.c.) and pre-cut studs and headers. Panelizing walls on the ground accelerates the process — 2–6 hours per wall panel depending on openings.
- Raise walls: Stand panels and temporarily brace. Install top plates and blockings for shear connection and alignment. Time: a few hours per panel for a small cabin.
- Shear bracing: Install structural sheathing or hold-downs per plan before insulating.
Installing Insulation, Air Barrier, and Sheathing
- Air barrier first: If using taped sheathing as the air barrier, apply sheathing and tape seams before interior finishes. If using interior membrane, install after rough-ins but before finish drywall.
- Cavity insulation: For batts or dense-pack cellulose, fill cavities fully with no gaps. For spray foam, follow manufacturer cure times and safety protocols.
- Continuous exterior insulation: Install rigid boards, tape seams, and secure with appropriate fasteners. If a rainscreen is planned, install furring strips over the CI to create the ventilation gap.
- WRB and flashing: Apply a WRB over sheathing or foam per flashing sequence: sill pan → jamb/head flashing → housewrap taped to sill pan.
Cladding, Flashing and Finish Details
- Install rainscreen battens (3/8"–3/4" gap) and insect screen at vents.
- Attach cladding using corrosion-resistant fasteners.
- Seal around penetrations and finish interior air-sealing with gaskets and caulk where needed.
Key Points: Quick Checklist for DIY Crews
- Seal sill to foundation: Use sill gasket and anchor bolts.
- Tape sheathing seams: Create a continuous air barrier early.
- Slope sills for drainage: Ensure water runs away from openings.
- Flash openings correctly: Start with a pan flashing at the sill.
- Install WRB integration: Tie window flashing into housewrap.
- Preserve continuous CI: Avoid thermal bypass at corners.
- Seal penetrations: Use membrane patches and grommets.
- Test airtightness: Do a blower-door test mid-build if possible.
Tooling list: pneumatic nailer, circular saw, insulation blower (for cellulose), spray-foam equipment or contractor, tape and membrane knives, caulking guns, long fasteners for CI attachment, and a blower-door for testing.
Off-grid and Passive-house Considerations During Build
- Mechanical penetrations: Route photovoltaic conduits, battery ventilation, and off-grid conduits through planned chase walls and seal penetrations at the air barrier. See the off-grid electrical setup for routing guidance.
- Solar planning: Pre-locate conduit penetrations and mounting points during framing using the solar site checklist.
- Conditioned envelope: Keep water heaters, batteries, and distribution lines inside the insulated envelope where feasible to reduce heat loss and condensation risk.
- Airtightness sequencing: Air-seal the top plate-to-ceiling plane and exterior wall-to-window interfaces before insulation where possible to allow easy access.
Watch this step-by-step guide on insulating a 100 year old house and not destroy it - old house renovation 5:
Key Considerations for Retrofit or Limited-budget Builds
When budgets are tight, phase upgrades and prioritize interventions that deliver the most performance per dollar.
Phased Upgrades and When to Prioritize Upgrades
- Phase 1 — Air sealing: Seal top plates, sill plates, windows, and service penetrations. This often reduces heating loads quickly and costs very little.
- Phase 2 — Insulation improvements: Add cavity insulation or dense-pack cellulose; for minimal disruption, add blown-in cellulose to walls if interior finishes allow access.
- Phase 3 — Continuous insulation and cladding upgrades: Add exterior mineral wool or polyiso where budget allows.
Material Substitutions to Save Cost Without Sacrificing Performance
- Reuse good sheathing: If existing plywood/OSB is structurally sound, keep it and tape seams to create an air barrier.
- Choose cellulose over spray foam: Cellulose offers similar R per dollar in many situations and lower embodied carbon.
- Selective CI: Instead of full-depth CI, add CI at critical thermal-bridge locations (corners, headers, rim joists) first.
Permits and inspections: Always check local codes; many jurisdictions set minimum R-values and require specific fire and structural protections. For budget-conscious green materials and alternatives, consult guidance on recycled-content building products and low-carbon concrete mixes for adjacent projects.
The Bottom Line
Select a framing approach that matches your crew skill and insulation goals; ensure a continuous air barrier early in the build and add continuous exterior insulation when you want to cut thermal bridging. For most DIY cabins, prioritize airtightness and good flashing over exotic materials. Three build-path recommendations:
- Budget build:
- Use 2x6 stick framing at 16" o.c.
- Dense-pack cellulose in cavities and taped sheathing for air control.
- Add targeted exterior mineral wool at headers and rim joists.
- High-performance DIY:
- Use Larsen truss or double-stud framing for deep cavities.
- Combine cavity insulation with 1"–2" continuous mineral wool or polyiso.
- Perform mid-build blower-door testing and detail all penetrations.
- Passive-minded self-build:
- Design for very low air leakage (approach Passive House airtightness).
- Use continuous exterior insulation of ≥2" polyiso or mineral wool and plan mechanical ventilation with heat recovery.
- Specify durable rainscreen cladding and high-quality windows.
These steps will improve thermal comfort, reduce energy demand, and extend the life of the building. The right cabin wall assembly balances cost, buildability, and long-term performance.
Frequently Asked Questions
How thick should cabin wall insulation be for cold climates?
For cold climates aim for whole-wall R-values of R-30 or higher; that typically means R-21 to R-23 cavity insulation in a 2x8 wall plus 1"–2" of continuous exterior insulation, or a deep double-stud or truss wall with dense-pack cellulose to reach R-30–R-40. Always check local code minimums and consider the trade-off between wall thickness and foundation/roof sizing.
Is exterior continuous insulation necessary for a small cabin?
Not always necessary, but CI is highly effective at reducing thermal bridging and improving whole-wall R. For small cabins with limited framing depth, adding 1"–2" of exterior polyiso or mineral wool often yields better performance per inch than deepening studs alone.
Can I use natural fiber insulation in a damp cabin?
Natural fibers such as cellulose and wood fiber are vapor-permeable and can work if the assembly is detailed to dry outward and the envelope is airtight. In persistently damp locations choose water-resistant materials or add a protective exterior rainscreen and WRB. For tricky sites consult a hygrothermal analysis or local expert.
Should I install the vapor barrier on the inside or outside?
Vapor barrier placement depends on climate: cold climates generally use a low-perm interior vapor retarder; hot-humid climates avoid interior impermeable barriers. Using a smart vapor retarder or vapor-open assembly with exterior drainage often simplifies moisture management. See the linked placement guide for step-by-step rules of thumb.
What are the quickest airtightness fixes for an older cabin?
Start with sealing top plates and sill plates, adding gaskets under sills, weatherstripping doors, and caulking window perimeters. Seal visible penetrations for plumbing and electrical with grommets or spray foam and add taped sheathing or an interior membrane where budget allows. A blower-door test helps prioritize the largest leaks.