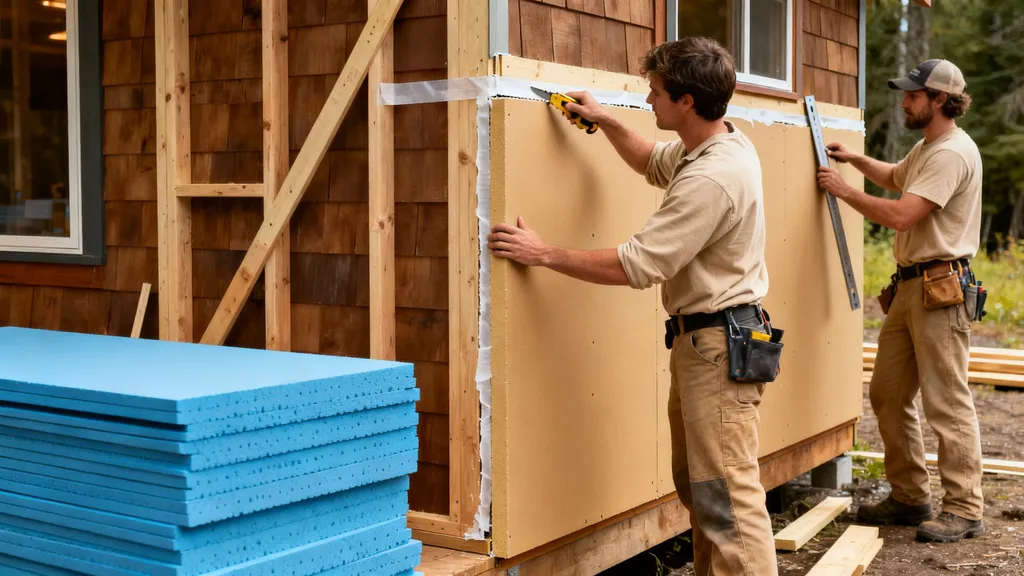
Practical guide to rigid foam insulation — XPS, EPS, and polyiso — where to use each, installation tips, costs, and code considerations for DIY eco-builds.
Rigid Foam Insulation: Types and Applications
Rigid foam insulation is a family of foam board products used to add thermal resistance and control air and moisture paths in walls, roofs, and foundations. For DIY eco-builders, understanding rigid foam insulation helps you choose the right material—XPS, EPS, or polyiso—where it will save the most energy and how much to install to meet target insulation r-value goals. This guide compares performance numbers, shows common applications, gives hands-on installation tips, and covers code and health considerations so you can plan a cost-effective, durable assembly.
TL;DR:
- Use 2–4 in. of continuous rigid foam board to add R-10–R-20 to exterior walls; polyiso gives the highest R/inch in warm climates, XPS balances moisture resistance and compressive strength, EPS is the cheapest per board foot.
- For foundations and under-slab, choose XPS or EPS with 1–4 in. depending on frost depth and slab design; add foam to stop thermal bridging on framed walls for passive-house retrofit gains.
- DIY installation is straightforward: cut with a utility knife or circular saw, fasten per manufacturer patterns, and seal all joints with compatible tape or liquid flashing; watch vapor profiles and follow local code for thermal barrier requirements.
What is Rigid Foam Insulation and How Does It Work?
Short Definition and Common Board Types
Rigid foam insulation (also called foam board insulation) refers to solid panels made from closed-cell or bead-expanded plastics. The three mainstream types for building work are:
- Extruded polystyrene (XPS): Dense, closed-cell board often colored blue or pink (e.g., Dow Styrofoam is a common brand example).
- Expanded polystyrene (EPS): Bead-foam board sold as white blocks; less dense and typically less expensive.
- Polyisocyanurate (polyiso): Closed-cell board with foil facings often used on roofs and exterior continuous insulation.
How Rigid Foam Reduces Heat Flow (thermal Resistance vs Air Sealing)
Rigid foam reduces heat flow primarily through thermal resistance (R-value) offered by the foam core. Closed-cell boards also resist convective flows and can act as a partial air barrier when seams are taped. When installed as continuous exterior insulation over framing, foam boards reduce thermal bridging through studs and increase whole-wall performance far more than adding the same R-value inside the stud cavity.
Example: a 2x6 wall with R-19 cavity insulation has an average assembly R lower than R-19 due to studs. Adding 2 in. of polyiso (roughly R-12 at warm temps) as continuous exterior foam can raise the wall assembly R by 30–40% depending on details.
Key Performance Metrics to Watch (r-value Per Inch, Compressive Strength, Moisture)
- R-value per inch: EPS ~3.6–4.0, XPS ~5.0, polyiso ~5.6–6.5 initial (polyiso can drop in cold temps).
- Compressive strength: Varies from ~10–30 psi for many EPS grades, 15–40+ psi for XPS, and similar ranges for polyiso when facer-reinforced. Higher psi matters for under-slab and foundation uses.
- Moisture behavior: EPS beads can soak and wick if not protected; XPS is more moisture resistant; polyiso is susceptible to long-term moisture if foil facers are breached. Water absorption percentages differ by product and test method—check the manufacturer's datasheet.
Research and government guidance on retrofit methods and air control strategies can help when applying foam to existing walls; see the Department of Energy lab guide on rigid foam for existing exterior walls for stepwise recommendations.
Comparing XPS, EPS and Polyiso — a Specs and Performance Table
Thermal Performance and R-value Per Inch
This table summarizes key properties for side-by-side planning.
| Property | XPS | EPS | Polyiso |
|---|---|---|---|
| R-value per inch | ~5.0 | ~3.6–4.0 | ~5.6–6.5 initial (drops in cold) |
| Typical board thicknesses | 1/2–4 in. | 1/2–4 in. | 1/2–4 in. (often foil-faced) |
| Compressive strength (psi) | 15–40+ | 10–30 (varies by density) | 16–40 (facer-dependent) |
| Water behavior | Low absorption; closed cell | Can absorb more if bead gaps; beads trap water | Susceptible if facers damaged; moderate absorption |
| Recommended uses | Foundations, exterior CI, under slab | Budget CI, under-slab if protected, interior | Roofs, warm climates exterior CI, high R per inch |
| Typical cost (relative) | Mid | Low | High |
| Blowing agents / GWP | Historically HFCs; newer lines use lower-GWP | Pentane (lower GWP) | HFOs or HCFC alternatives; varies by maker |
Moisture Behavior, Compressive Strength and Use Limits
- For foundations and under-slab work, choose foam with higher compressive strength and low water absorption. XPS is common in those applications because of its closed-cell structure.
- EPS can be used economically if protected from direct exposure to water and mechanical damage. Many EPS products include treated facers or coatings for exterior use.
- Polyiso excels on warm roofs and as exterior CI in temperate climates; however, its R-value can fall at low ambient temperatures, so factor that into cold-climate assembly design.
Environmental Impact and Blowing Agents
Rigid foams historically used blowing agents with various global warming potentials (GWPs). Many manufacturers have moved to low-GWP agents (HFOs, pentane). EPS can contain recycled content; XPS and polyiso suppliers also report recycled or improved blowing agents in current lines. Check manufacturer data and local spec sheets for up-to-date environmental information.
For continuous technical guidance on R-value gains with insulating sheathing, manufacturer technical notes such as Henry Company's R-TECH overview provide performance context and ASHRAE-based test references.
Common Applications: Where to Use Rigid Foam Insulation
Exterior Continuous Insulation on Walls (clad-out Details)
Continuous exterior insulation (CI) is one of the most effective uses for rigid foam. Adding a continuous layer (2–4 in.) outside the sheathing reduces stud thermal bridging and simplifies air-barrier detailing. Practical thickness targets:
- R-10 CI: ~2 in. polyiso or XPS (varies by product)
- R-15–R-20 CI: 3–4 in. foam or a combination of foam and dense-packed cavity fill
For step-by-step cladding and fastener patterns see the exterior insulation guide. When cladding over foam, install vertical furring strips through the foam into the studs or sheathing; fasten long screws with washers or use screw-attached clips for rainscreen systems.
Roof, Cathedral Ceiling and Attic Uses
Polyiso is commonly specified on low-slope roofs and above-deck roof insulation because of its high R per inch and foil facers that support a vapor-resistant layer. For cathedral ceilings, continuous exterior foam plus vented or unvented cavities behind it is a reliable method to increase assembly R without deepening rafters. For roof-specific installation details, consult our roof foam installation guide.
Foundations, Under-slab and Basement Applications
Use XPS or high-density EPS for foundation walls and under-slab insulation. Typical under-slab thickness for frost-protected shallow foundations or small garages ranges from 1–4 in. depending on climate and frost depth; check local codes. See the foundation frost protection guide for sample designs. For basement retrofit, the choice between interior or exterior foam depends on moisture risk; read the detailed options in our basement insulation options.
Interior Uses and Retrofit Spots (over Studs, Under Finishes)
Rigid foam is handy for interior wall retrofits where depth is limited — e.g., adding 1–2 in. of foam under new drywall to reduce thermal bridging. It also works under finished floors in small cabins. For small-cabin examples and practical thickness decisions see the small cabin build.
DIY Installation Basics: Cutting, Fastening, Sealing, and Common Mistakes
Tools, Cutting Techniques and Fastening Options
Tools you’ll need: utility knife with hook blades, straightedge, circular saw with fine-tooth blade for thicker boards, measuring tape, long screws and washers or adhesive for interior work, foam-compatible construction adhesive for exterior panels, and cap screws for furring attachment.
- Cutting: Score and snap 1/2–1 in. boards with a straightedge and utility knife. For thicker or foil-faced polyiso, a circular saw yields cleaner cuts—cut slowly to avoid melting.
- Fastening: Use long screws with washers into studs for interior installs; for exterior CI, use long screws into sheathing or framing through the foam and into studs or blocking, or use a rainscreen or furring strip attachment system specified by the foam maker.
Reference sheathing compatibility and fastening strategies in our article on sheathing choice.
Sealing Joints, Tapes, and Integrating with Air and Vapor Control Layers
Sealing is where assemblies gain airtightness. Use foil-faced tape for polyiso facers, high-quality acrylic or butyl tapes for XPS/EPS facings, and liquid flashing for irregular gaps. Sequence recommendation:
- Install sheathing and weather-resistive barrier (WRB) per usual.
- Install rigid foam as CI, staggering vertical joints when using multiple layers.
- Tape all seams and seal openings at windows and penetrations with compatible liquid flashing.
- Install furring strips and cladding.
For airtight membrane techniques that mesh with foam boards, see our airtight membrane techniques article.
Watch this step-by-step guide on installing foam board insulation with radiant barrier to shed.:
Common Installation Mistakes and How to Avoid Them
- Leaving unsealed vertical seams or gaps at corners — always tape or liquid-seal.
- Installing vapor barriers on the wrong side in mixed-climate assemblies — consult climate-zone guidance and manufacturer data.
- Exposing foam to prolonged UV: store and cover foam; use cladding or paint for delayed finishes.
- Under-fastening long-span foam without blocking — follow manufacturer screw spacing.
- Mismatching tapes and facers — use products listed as compatible by the foam manufacturer.
Fine Homebuilding's review of rigid foam installation highlights common field errors and corrective details for DIYers.
Cost, R-value Planning, and Choosing the Right Thickness for Budgets
Quick Key Points List for Budget Decisions
- Cheapest per board foot: EPS is typically the least expensive.
- Best value per R in moderate climates: XPS balances R and moisture resistance.
- Highest R per inch: Polyiso, but watch cold-climate performance.
- Where to spend more: Under-slab and foundation uses where compressive strength and water resistance matter.
- Where to save: Interior non-structural retrofit spots where EPS can be protected by drywall.
How to Calculate Required Thickness to Meet Target R-value
- Set your target assembly R (for example, R-20 continuous exterior + cavity).
- Subtract cavity insulation R (e.g., dense-packed cellulose R-13 in a 2x4).
- Remaining R is the continuous exterior foam needed. Convert to thickness using R/in. For example, to add R-10 using polyiso at R-6/in. you need ~1.7 in. (round to 2 in. for practical boards).
- Allow for performance derating: use manufacturer cold-temperature R if in a cold climate; polyiso may test lower at -20°F.
Manufacturers and third-party charts provide R-value per thickness tables — see a recent breakdown for multiple foam types at R-Value Associates for granular thickness-to-R charts.
Lifecycle Costs and When Higher-cost Foam Pays Back
Higher initial cost for polyiso or high-density XPS can pay back when:
- It reduces framing depth or eliminates the need for deeper rafters.
- It prevents thermal bridging, enabling a smaller mechanical system.
- It reduces condensation risk and potential moisture repair costs in basements or slabs.
For attic and cavity strategies that combine foam and loose-fill options, compare with our attic insulation options.
For budget-conscious green builds, see the budget green materials guide to weigh cost vs sustainability for foam vs natural alternatives.
Health, Fire Safety, and Building-code Considerations
Flame Spread, Required Coverings, and Code References
Rigid foam is combustible and in many jurisdictions requires a thermal barrier (e.g., 1/2 in. gypsum board) or an approved ignition barrier in concealed locations. Building codes such as the International Energy Conservation Code (IECC) and local adaptations reference thermal and ignition barrier requirements. Consult local code officials for exact compliance steps.
Common mitigation: install 1/2 in. gypsum drywall as a 15-minute thermal barrier, or use tested intumescent coatings where permitted by local code. For guidance comparing foam to other insulation types and health trade-offs, see our spray foam comparison post.
Off-gassing, Vocs and Indoor Air Quality Considerations
Off-gassing varies by product and manufacturer. To reduce VOC risk:
- Allow foam with facers to cure per datasheet before enclosure.
- Use sealed joints and an exhaust for ventilation during construction.
- Choose products with low-VOC certifications when available.
Industry studies and product datasheets provide VOC emissions testing results—consult the manufacturer's safety data sheet (SDS) for specifics.
Disposal, Recycling and Environmental Safety
EPS is often recyclable where municipal or private programs accept it; XPS and polyiso recycling is more limited but some manufacturers offer take-back or recycle programs. Dispose of off-cuts per local hazardous-waste guidance; avoid burning foam due to toxic combustion byproducts. For environmental safety summaries and comparative context, see technical write-ups like Argyle Bros' foam board guide.
Using Rigid Foam in Retrofits and Passive-house Strategies
Continuous Exterior Insulation to Reduce Thermal Bridging
Rigid foam as continuous exterior insulation is a straightforward retrofit to reduce thermal bridging and help meet passive-house-style goals. Adding 2–3 in. of exterior foam combined with improved air-sealing can drop heat loss significantly and often reduces the size requirement for heating systems.
For detailed retrofit sequences that show how to layer air control, foam and cladding, consult the Department of Energy lab guide referenced earlier and our passive-house retrofit tips.
Combining Foam with Natural Fiber or Cavity Insulation
A hybrid assembly pairs rigid foam outside with natural fiber or cellulose in the cavity to balance moisture buffering and embodied carbon. For example, 2 in. of exterior foam plus dense-packed cellulose in a 2x6 cavity can reach high assembly R with excellent hygrothermal behavior. See our natural fiber options for compatible cavity insulation choices.
Ventilation and Airtightness Integration for High-performance Homes
When adding continuous foam and sealing the building envelope, ventilation becomes essential. Mechanical ventilation with heat recovery (HRV/ERV) preserves indoor air quality and recovers heat in cold climates. Our ventilation guide explains system sizing for small homes and cabins. Also consider whole-assembly vapor profiles: exterior foam often moves the dew point outward, which reduces interior condensation risk if detailed correctly.
For scaling passive-house strategies that include foam-based CI and thermal-bridge reduction, see our guide on how to apply passive-house strategies.
The Bottom Line
Rigid foam insulation gives DIY builders flexible, high-impact options to raise whole-wall R-values, reduce thermal bridging, and simplify air-barrier work. Choose EPS for the lowest material cost, XPS for balanced moisture resistance and compressive strength (good for foundations), and polyiso for the highest R per inch in warm-to-moderate climates. For beginners: use exterior CI for retrofit and new-frame projects, protect foam from UV and mechanical damage, and follow local code for thermal barriers and ventilation.
Frequently Asked Questions
Which rigid foam is best for foundations?
XPS or high-density EPS is usually best for foundation walls and under-slab use because closed-cell XPS resists moisture and high-density EPS provides good compressive performance when protected; choose product densities and thicknesses that meet local frost and load requirements and follow manufacturer datasheets.
Can I install rigid foam myself?
Yes—many DIYers install rigid foam by cutting with a utility knife or saw, fastening to studs or sheathing, and sealing seams with compatible tape or liquid flashing; follow manufacturer instructions for fastener spacing and use proper PPE when cutting facers.
How thick should rigid foam be for a wall retrofit?
To hit common continuous insulation goals, 2 in. (≈R-10 polyiso/XPS) is a practical starting point; 3–4 in. raises R substantially (R-15–R-20). Calculate needed thickness by subtracting cavity R from target assembly R and converting using product R/inch.
Is rigid foam safe indoors?
Rigid foam is safe when installed per code—avoid leaving foam exposed in living spaces without an approved thermal barrier and allow products to cure and ventilate during installation to minimize VOC exposure; check SDS and local code for safety steps.
How does rigid foam compare to spray foam?
Spray foam (closed-cell) provides excellent air sealing and similar R per inch but is often more expensive and requires professional application; rigid foam is easier for DIY continuous insulation and is recyclable in some formats—compare life-cycle, cost, and air-sealing needs when choosing.