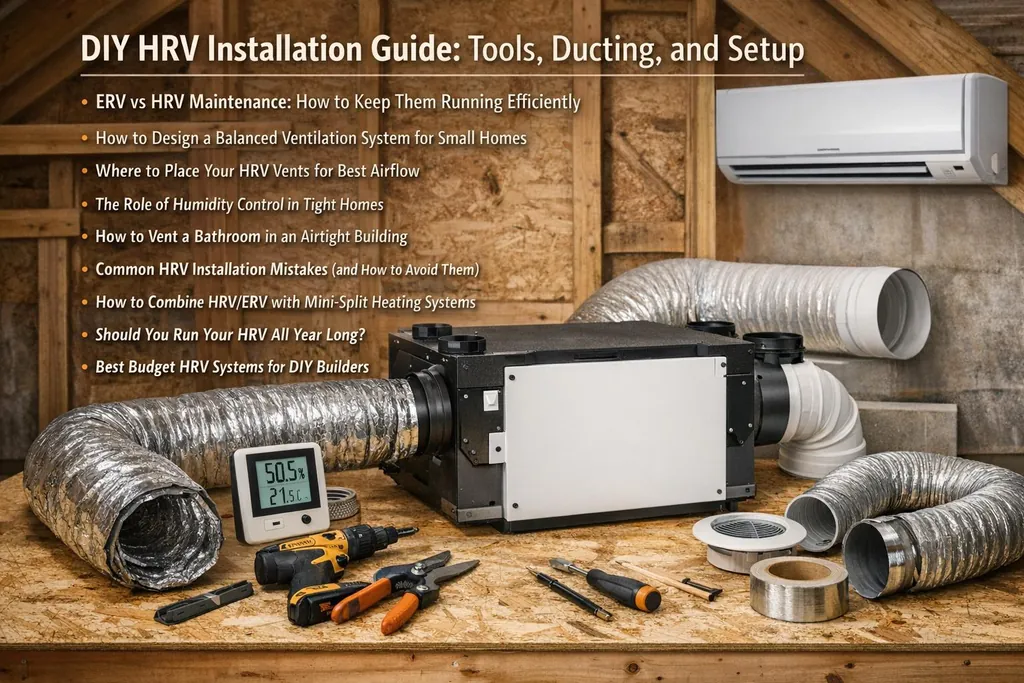
Step-by-step DIY HRV/ERV installation and maintenance guide covering tools, ducting, vent placement, balancing, ERV vs HRV, integration, and budget options.
DIY HRV Installation Guide: Tools, Ducting, and Setup
Tightly sealed homes are great for energy savings but can trap moisture, allergens, and pollutants. A Heat Recovery Ventilator (HRV) or Energy Recovery Ventilator (ERV) solves this by exchanging stale indoor air with fresh outdoor air while conserving energy. Here's what you'll learn:
- Installation Basics: Tools, ducting, and setup for a DIY HRV system.
- Vent Placement: Where to position intake and exhaust vents for optimal airflow.
- Maintenance Tips: How to clean filters, manage condensation, and balance airflow.
- Common Mistakes: Avoid imbalanced airflow, poor duct sealing, and inaccessible units.
- Budget Options: Affordable systems under $1,000 and DIY kits for small homes.
Whether you're retrofitting or building new, this guide covers everything from planning to maintaining your system. You’ll also discover how to integrate ventilation with mini-split heating systems and whether to run your HRV year-round. Let’s get started.
Another DIY project: HRV and ducting- HVAC installation.
Tools and Materials for HRV Installation
Having all the necessary tools and materials ready before you start can save you a lot of time and hassle. The good news? Most of the equipment is fairly standard - nothing too specialized or pricey. Since you’ll be drilling, cutting ducts, sealing joints, and wiring low-voltage controls, it’s important to have the basics covered.
Tools You Need
To mount the unit, you’ll need a drill and screwdriver set, along with wall clips or chains. A measuring tape is essential for planning your duct layout and ensuring proper spacing between intake and exhaust terminations - these should typically be at least 10 feet apart on the exterior unless you’re using a concentric vent . For cutting through walls to create duct openings, a jigsaw or reciprocating saw is ideal, and a hole saw kit works well for smaller openings.
When it comes to sealing, a sealant applicator is necessary for applying duct mastic at every joint. Keep in mind that building codes require mastic or UL 181-rated HVAC tape - standard duct tape won’t cut it . You’ll also need wire strippers to connect the low-voltage control wiring between the unit and wall-mounted controls .
Balancing the intake and exhaust airflow is critical. For this, an airflow measurement tool is a must. Options include a manometer, airflow measurement tool, or fan flow hood to ensure intake and exhaust rates are within 10% of each other, as codes often require . If you’d rather skip this step and avoid purchasing specialized equipment, newer HRV models with auto-balance technology can handle this task for you . Additionally, you might want to use multi-sensor wireless thermometers to monitor temperature exchange efficiency .
Now, let’s move on to the materials you’ll need for the installation.
Materials Checklist
Choosing the right duct material is crucial. For interior runs, you can use rigid or flexible ducts, but make sure to insulate ducts located in unconditioned spaces (like attics or exterior walls) to at least R-8 to prevent condensation . If you’re looking for a balance between durability and ease of installation, semi-rigid aluminum ducts are a solid choice and cost around $10 for an 8-foot section .
For exterior connections, install intake hoods with screens and exhaust hoods with dampers to keep debris out and manage airflow . A concentric vent, which combines intake and exhaust into a single wall penetration, is another option that simplifies installation and reduces the materials needed . Don’t forget to use flashing and caulk to weatherproof any exterior penetrations.
Since HRVs produce condensate, you’ll need a condensate drain line or a condensate pump to handle the water . Make sure to slope the unit and exterior-bound ducts slightly - at least 1/4 inch per foot - toward the outdoors or a drain . To maintain good indoor air quality, stock up on MERV 11 filters or higher . Lastly, ensure there’s a 15-amp or 20-amp electrical outlet near the installation site to power the unit .
Step-by-Step HRV Installation
::: @figure 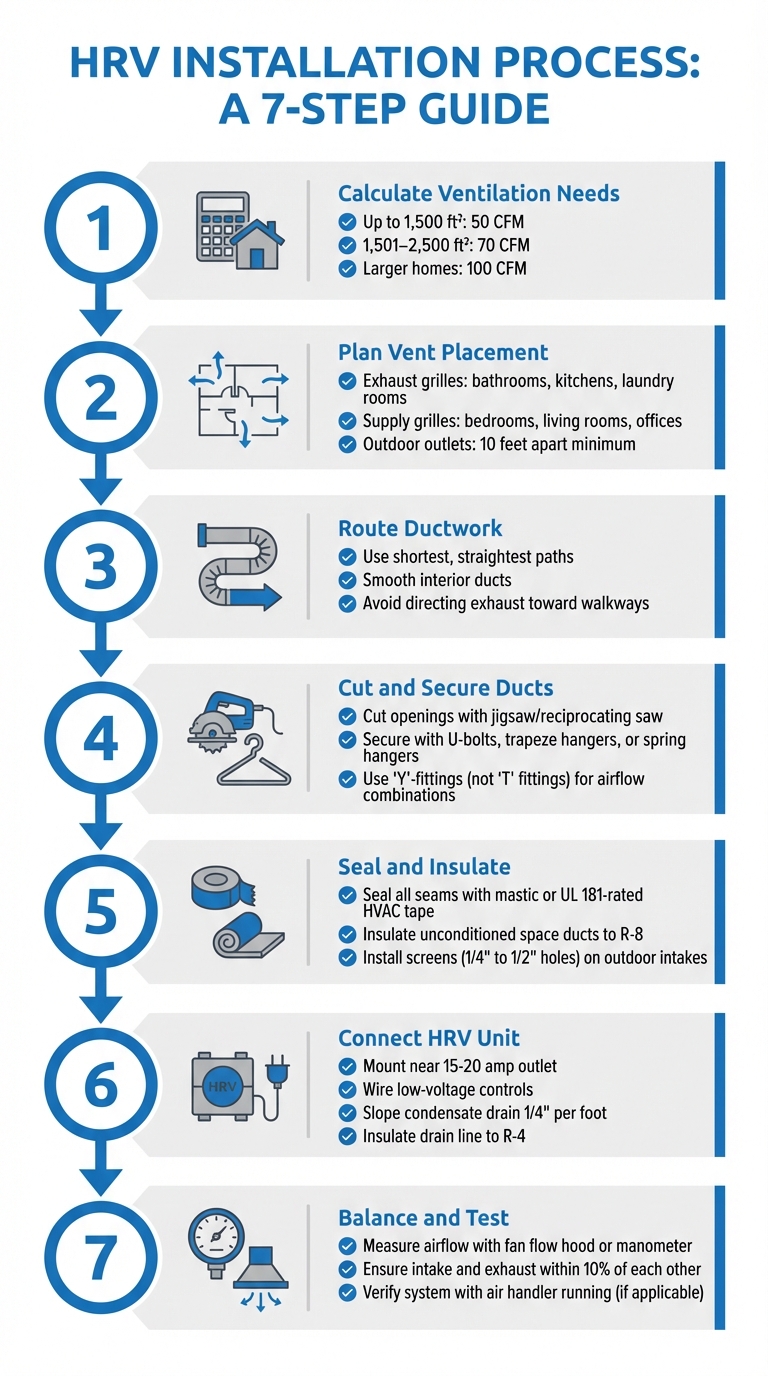 :::
:::
Planning and Layout
Once you've gathered your tools and materials, the first step is to plan your system layout. Start by calculating your home's ventilation needs: 50 cfm for spaces up to 1,500 ft², 70 cfm for 1,501–2,500 ft², and 100 cfm for larger homes . These figures will serve as the foundation for designing your system.
Next, identify where to place intake and exhaust grilles. Install exhaust grilles in areas prone to moisture, like bathrooms, kitchens, and laundry rooms. Supply grilles, on the other hand, should be located in living spaces such as bedrooms, living rooms, and home offices . If you have a smaller home, you'll need to decide whether to use a dedicated duct system - offering easier balancing and predictability - or integrate the HRV into your existing HVAC ducts, which saves space but requires careful planning .
When routing ducts, aim for the shortest and straightest paths possible. Use smooth duct interiors to minimize airflow resistance . For outdoor exhaust outlets, position them at least 10 feet away from air intakes and avoid directing airflow toward walkways . Finally, place the HRV unit in an easily accessible location for maintenance tasks like filter changes - this will save you time and effort down the road .
With your layout finalized, you’re ready to move on to installing the ductwork and other components.
Installing Ductwork and Components
Begin by cutting openings for the ducts using a jigsaw or reciprocating saw. Secure the ducts with U-bolts, trapeze hangers, or spring hangers to keep them in place . Seal all seams and connections using mastic or UL 181-rated HVAC tape to ensure airtight connections.
For ducts running through unconditioned spaces, such as attics or exterior walls, wrap them in insulation rated to at least R-8 to prevent energy loss . Use caulk or spray foam to seal any gaps where ducts penetrate exterior walls, stopping unwanted air infiltration . When combining airflows, use "Y"-fittings or collection boxes rather than "T" fittings to maintain smooth airflow . Outdoor air intakes should be equipped with corrosion-resistant screens (with a hole size between 1/4" and 1/2") and properly flashed to keep water out .
Once the ductwork is secure, move on to connecting the HRV unit and testing the system for proper operation.
Connecting and Testing the HRV Unit
To simplify future maintenance, make sure the HRV unit is easily accessible. Connect it to a 15- or 20-amp outlet and wire the low-voltage controls to the wall-mounted panel. If your HRV includes a condensate drain, ensure the line is sloped correctly and insulated to at least R-4 if it runs outside the thermal boundary . Mount the unit using chains or wall clips, keeping it isolated from building framing to reduce noise transfer .
Balancing the system is crucial. Use a fan flow hood or manometer to measure airflow, ensuring that the intake and exhaust are within 10% of each other . If your HRV is connected to a central air handler, run the air handler during the balancing process to account for the system's overall pressure . Even if your HRV is advertised as "self-balancing", it's always a good idea to verify airflow with actual measurements rather than relying solely on factory settings.
ERV vs HRV Maintenance: Keeping Your System Running
Routine Cleaning and Maintenance Tasks
Keeping your ERV or HRV in top shape requires regular maintenance. Start with the filters - clean or replace MERV 8–11 filters every 3 to 6 months . Dirty filters reduce airflow by increasing resistance, so keeping them clean ensures your system runs smoothly .
Next, focus on the heat exchange core. Clean it annually to avoid mold and bacteria buildup . Depending on the material, some cores - like those made of plastic or aluminum - can be washed with water, while ERV cores with moisture-transfer materials should only be vacuumed. Always check your manufacturer’s manual for specific instructions . Also, don’t forget to inspect the condensate drain, ensuring it’s clear and the trap is primed to block odors .
Exterior components need attention too. Check intake and exhaust hoods regularly for obstructions like bird nests, leaves, or snow, especially during winter months . The pest screens, sized between 1/4" and 1/2", should remain clear to maintain balanced airflow . Additionally, make sure the air volumes for intake and exhaust stay within 10% of each other to avoid pressurization problems .
While these tasks apply to both HRVs and ERVs, there are some key differences in their maintenance requirements.
ERV vs HRV Maintenance Comparison
Here’s how maintenance differs between HRVs and ERVs:
| Maintenance Feature | Heat Recovery Ventilator (HRV) | Energy Recovery Ventilator (ERV) |
|---|---|---|
| Core Cleaning | Water-washable if plastic or aluminum | Vacuum-only; water damages moisture-transfer material |
| Condensate Management | High priority; produces significant water in winter | Lower priority; transfers moisture back into air streams |
| Frost/Freeze Risk | Higher; needs active defrosting in cold climates | Lower; moisture transfer keeps core warmer, reducing frost |
| Filter Requirements | MERV 8–11+ to protect core and indoor air | MERV 8–11+ to prevent dust buildup on moisture surfaces |
> "Energy recovery ventilation systems require more maintenance than other ventilation systems. They need to be cleaned regularly to prevent deterioration of ventilation rates and heat recovery and to prevent mold and bacteria on heat exchanger surfaces." - U.S. Department of Energy
During mild but humid weather in the spring or fall, you might want to adjust fan speeds or even turn the system off temporarily to manage indoor humidity levels . This flexibility helps you strike the right balance between fresh air circulation and energy savings year-round.
Designing a Balanced Ventilation System for Small Homes
Calculating Airflow Requirements
When planning ventilation for small homes, it’s important to fine-tune airflow rates to match the size of the living space. For homes up to 1,500 square feet, aim for about 50 CFM (cubic feet per minute). Homes ranging from 1,501 to 2,500 square feet typically need around 70 CFM, while larger spaces often require 100 CFM or more. These rates assume the system operates at a steady, low speed, which is both energy-efficient and ideal for tightly sealed, well-insulated homes.
In airtight homes, mechanical ventilation is essential to maintain air quality. On the other hand, older homes that allow more natural air infiltration may need less mechanical airflow. The number of bedrooms also plays a role, as more occupants generate higher levels of moisture and carbon dioxide. For instance, a 2,500-square-foot home with four bedrooms generally requires about 60 CFM of continuous fresh air.
Keep in mind that static pressure caused by ducts, elbows, grilles, and filters can reduce the actual airflow. To address this, use the ANSI/ACCA Manual D to calculate the equivalent length of duct runs and size your equipment accordingly. Choose a ventilation unit where the mid-speed setting aligns closely with your desired airflow. This ensures higher speeds are available for temporary increases in demand, such as during cooking or showering. This approach complements earlier system design strategies by maintaining flexibility and efficiency.
Duct Sizing and Placement
Once airflow requirements are set, the next step is designing an optimized duct system to ensure smooth operation. Keep duct runs as short and straight as possible to reduce resistance and noise. Opt for smooth-interior ducts with larger diameters when feasible - this minimizes static pressure and allows air to move more quietly. To prevent air leaks, seal all joints using mastic or UL 181 tape, and insulate any ducts located outside the home’s thermal envelope with at least R‑8 insulation.
Strategic placement of vents is equally important. Supply vents should be positioned in high-use areas like bedrooms, living rooms, and home offices, while exhaust vents are best placed in moisture-heavy spaces such as bathrooms, kitchens, and laundry rooms. Avoid placing exhaust vents too close to stoves. This setup encourages natural airflow from fresh-air zones to areas where air needs to be removed, with open or undercut doors facilitating the movement.
For outdoor ventilation components, ensure that intake and exhaust hoods are spaced at least 10 feet apart to avoid cross-contamination. Finally, balance the system using tools like a flow hood or an anemometer to verify that the amount of air coming in matches the air going out, staying within a 10% margin. This balance helps maintain neutral pressure inside the home, preventing unwanted drafts or pressure imbalances.
Common HRV Installation Mistakes and How to Avoid Them
Improper Duct Insulation and Sealing
Using the wrong materials for duct sealing is one of the most common mistakes. Skip the standard "silver" duct tape - it doesn't hold up in unconditioned spaces and can lead to leaky seals. Instead, seal all seams with mastic or UL 181-rated tape for a long-lasting airtight connection . As Martin Holladay, Senior Editor at _Fine Homebuilding_, puts it:
> "Duct seams should be carefully sealed with mastic or HVAC tape."
To prevent energy loss, condensation, or freezing, insulate ducts in unheated areas to R-8 and condensate lines to R-4 . Use spray foam or caulk to seal where ducts pass through exterior walls, and keep duct runs as short and straight as possible, avoiding unnecessary elbows. After sealing and insulating, double-check that all backdraft dampers can open and close without obstruction .
Imbalanced Airflow Issues
Once you've handled duct sealing and insulation, the next challenge is balancing the system's airflow. Imbalanced intake and exhaust airflow can lead to serious problems, like condensation, radon intrusion, or backdrafting . A properly balanced system has a difference of no more than ±10 CFM between intake and exhaust airflow .
Before testing, close all windows and doors, and turn off other exhaust devices like bathroom fans and dryers . Start by measuring the exhaust airflow, which usually faces more restriction than intake airflow. For accurate results, place your measurement probes in a straight section of metal duct, at least 18 to 36 inches away from the unit or any elbows. To check for pressure imbalances, hold a tissue near a 1-inch window gap - if it moves inward, there's negative pressure; if it moves outward, there's positive pressure. Adjust the dampers until the tissue stays still. Finally, inspect exterior hoods for debris that could block airflow .
Inaccessible Unit Placement
Even if the ducts and airflow are perfect, poor unit placement can make maintenance a nightmare. Regular upkeep - like cleaning filters every two months, washing the heat exchanger annually, and servicing fan blades - is essential for efficient operation . To make maintenance easy, install the HRV unit in a spot where the front panel can fully open, giving you access to filters and the core. Place it near a 15-amp or 20-amp electrical outlet and a floor drain for power and condensate management .
The unit should also be in a location where the temperature stays above 60°F to prevent the core from freezing and to maintain efficiency . To reduce noise and vibration, mount the unit securely to a wall using speed brackets or hang it with a chain kit . As the _Canada Mortgage and Housing Corporation (CMHC)_ points out:
> "If your HRV is easily accessible, this \[filter cleaning\] takes only 5 minutes to do."
Choose a location that keeps duct runs short to optimize airflow while ensuring maintenance tasks are quick and hassle-free.
How to Combine HRV/ERV with Mini-Split Heating Systems
Connecting the Systems
For ductless mini-splits, the best approach is to install a fully ducted HRV/ERV system that delivers fresh air independently. This setup avoids relying on the mini-split's blower, ensuring each system works efficiently on its own. As Martin Holladay, Senior Editor at _Fine Homebuilding_, puts it:
> "Fully ducted systems are best... These systems use less energy than systems connected to heating ductwork, and they are far easier to balance."
If you're using a ducted mini-split, you can integrate the HRV/ERV by channeling fresh air into the return plenum. In this type of "exhaust-ducted" hybrid system, it's crucial to follow specific guidelines for proper airflow. The fresh-air duct should connect to the return-air duct at least 10 feet away from the air handler, while the exhaust-air connection needs to be at least 3 feet upstream. To prevent reverse airflow, install an electrical interlock that ensures the mini-split fan operates whenever the HRV/ERV is running. Additionally, a motorized backdraft damper on the supply duct is essential to stop air from flowing backward when the system is off .
This setup not only balances airflow but also ensures the system works efficiently without wasting energy. Now, let’s look at how to fine-tune your system for even better performance.
Improving System Efficiency
To enhance efficiency, position the HRV/ERV unit close to the air handler. This reduces duct lengths, cutting down on static pressure . Exterior ducts should be insulated to R‑8 to prevent condensation issues , and all duct seams must be sealed with mastic or UL 181-rated tape to minimize air leaks and maintain performance .
Keep in mind that running a mini-split's air handler continuously to support a simplified HRV system can draw up to 800 watts, which could add more than $900 per year to your electric bill . If the systems share ductwork, ensure your air handler uses an energy-efficient electronically commutated motor (ECM). This type of motor can significantly reduce energy consumption. Finally, balance the system while the air handler is running to ensure that incoming and outgoing airflow is equal under real operating conditions .
Should You Run Your HRV All Year Long?
Benefits of Continuous Operation
Running your Heat Recovery Ventilator (HRV) year-round ensures a steady flow of clean air in your home. It works by removing pollutants like radon, formaldehyde, volatile organic compounds (VOCs), and odors, while bringing in fresh, filtered air \[22, 23\]. This process also helps control humidity levels, reducing problems like window condensation, mold growth, and material deterioration - especially in tightly sealed homes \[22, 5\].
Unlike simply cracking open a window or relying on exhaust fans, an HRV is much more energy-efficient. It can recover between 60% and 95% of the heat from outgoing air, using it to pre-condition the incoming air. This reduces the strain on your heating and cooling systems. Kevin Dickson, President of Energy Services Air Conditioning, Heating and Electrical, explains:
> "By pre-warming the incoming air, an HRV reduces the burden on your heating system, helps maintain consistent indoor temperatures, and prevents drafts from cold outside air" .
Additionally, an HRV helps maintain balanced air pressure in your home, which prevents harmful backdrafting from combustion appliances and keeps allergens like pollen and dust at bay \[22, 23\]. Modern HRVs are designed to run quietly, often operating at less than 1.5 sones, so noise won’t be an issue . For high-moisture activities like showering or cooking, you can use the boost mode, then switch back to low speed for everyday ventilation \[5, 23\].
While the system provides consistent performance, it may need occasional adjustments to match changing conditions.
Seasonal Speed Adjustments
To get the most out of your HRV, tweak its settings based on the season. In winter, for example, if you notice condensation or fogging on your windows, you can increase the fan speed to bring in drier outdoor air \[13, 2\]. On the flip side, if the indoor air feels too dry, lowering the ventilation rate can help. During humid but mild summer days, it might be better to run the HRV only when your air conditioning is on, to avoid pulling in too much moisture .
Don’t forget to keep up with regular maintenance, like cleaning filters and heat exchange cores, to ensure the system continues to run efficiently . If you live in an area with extremely cold winters, make sure your HRV includes an automatic defrost feature to prevent the core from freezing .
Budget HRV Systems for DIY Builders
DIY Kit Options
If you're working with a limited budget, modern self-balancing HRV/ERV units can make installation much easier compared to older systems. Brands like Venmar, Broan, and Vanee now offer models that automatically adjust their dampers, eliminating the need to manually balance pressure using a manometer. As AlexPoi, a member of the GreenBuildingAdvisor community, explained:
> "The new Venmar models (and therefore Broan and Vanee) are self-balancing so it's even easier to DIY now" .
For smaller spaces or single-room applications (roughly 300–600 sq. ft.), through-the-wall units like the TwinFresh series are a practical and budget-friendly alternative to whole-house ducted systems. These units require only a single wall opening and are perfect for areas like home offices, bedrooms, or additions where fresh air is needed without the complexity of ductwork .
To keep costs down and improve airflow efficiency - especially important for lower-powered budget units - use rigid "Y" branches instead of right-angle ducts. A straightforward trunk-and-branch layout, incorporating rigid connectors and flexible lines, can be assembled for as little as $300. This is a fraction of the cost of proprietary manifold systems, which can exceed $3,000 .
If you'd rather avoid assembling a system yourself, you might want to explore pre-assembled options detailed in the next section.
Pre-Assembled Units Under $1,000
For those looking for a pre-assembled solution, the Panasonic Intelli-Balance stands out as a reliable and budget-conscious choice, typically priced around $1,000 . If your budget allows for a bit more flexibility, the Vents Frigate Energy Recovery Ventilator is another excellent option, with prices ranging from $930 to $1,557. This makes it a solid entry-level choice for whole-home ERV systems . Keep in mind, adding features like the Vents AC208EM2+LP Wall Control Panel will increase your total cost by $292 .
When selecting a unit, ensure it meets your home's airflow needs. Look for models certified by the Home Ventilating Institute (HVI), which allows you to compare efficiency ratings. Opt for units with hand-washable filters and easily accessible cores to minimize long-term maintenance expenses .
Conclusion
This guide has walked you through the key steps for a successful HRV/ERV installation. With proper planning and attention to detail, installing an HRV or ERV yourself is entirely doable. Start by ensuring the unit's capacity matches your home's size to maintain effective performance . Balancing the intake and exhaust airflows is equally important for keeping neutral pressure in your home and avoiding problems like backdrafting .
Placement of outdoor intakes and exhaust outlets plays a big role in system efficiency. Keep intakes at least 10 feet away from exhaust outlets and any sources of contaminants. Additionally, seal all duct seams using mastic or UL 181 tape, and make sure ducts outside the thermal envelope are insulated to at least R-8 to minimize energy loss and prevent condensation .
Ease of maintenance should also be part of your plan. Position the unit, service disconnect, filters, and condensate drains in accessible locations to simplify routine servicing . Regular maintenance, especially cleaning or replacing filters and cores, is essential for maintaining energy recovery efficiency .
Lastly, consider your climate when choosing between an HRV and an ERV. HRVs are ideal for cold, dry climates, while ERVs are better suited for humid or mixed climates, thanks to their ability to manage moisture transfer . Once everything is installed, test the system using a flow hood or anemometer to ensure it's ventilating your home as intended .
FAQs
What’s the difference between maintaining an HRV and an ERV system?
The key distinction between maintaining a Heat Recovery Ventilator (HRV) and an Energy Recovery Ventilator (ERV) lies in how each system manages moisture. Both systems are designed to bring in fresh air, expel stale air, and transfer heat for better energy efficiency. However, ERVs go a step further by transferring moisture between the incoming and outgoing air streams, which can influence their upkeep.
Because ERVs handle humidity, they may need extra care to address moisture-related components. This is particularly important in humid climates, where improper maintenance could lead to issues like moisture buildup or mold. HRVs, by contrast, are dedicated to heat exchange and typically involve less concern around moisture, making their maintenance a bit more straightforward.
For both systems, routine tasks include replacing filters, cleaning ducts, and inspecting the unit to ensure everything runs smoothly. If you have an ERV, it’s wise to pay closer attention to moisture-related parts during maintenance to prevent any potential problems.
Where should I place HRV vents in my home for the best airflow?
To maximize airflow and ensure proper ventilation, it's important to position HRV vents thoughtfully based on your home's layout. Supply vents should go in areas where fresh, clean air is a priority - think living rooms and bedrooms. On the other hand, exhaust vents are best placed in spaces like bathrooms and kitchens, where moisture and pollutants tend to build up.
Keep supply and exhaust vents far enough apart to avoid short-circuiting, which can compromise the system's efficiency. Aim to position vents in a way that encourages natural airflow between rooms. Additionally, try to keep duct runs as short and straight as possible to reduce energy loss. For the best results, always refer to the manufacturer's guidelines and make sure you're following local building codes.
Is it worth running an HRV system all year round?
Running an HRV system throughout the year is an efficient way to maintain steady indoor air quality while conserving energy in tightly sealed homes. These systems work by constantly swapping out stale indoor air for fresh outdoor air, which helps control humidity levels, cut down on pollutants, and enhance overall comfort.
To get the most out of your HRV, make sure it’s the right size for your home and adjust its settings to suit the changing seasons. Routine maintenance is equally important - clean the filters regularly and check the ducts to ensure the system operates smoothly all year long.