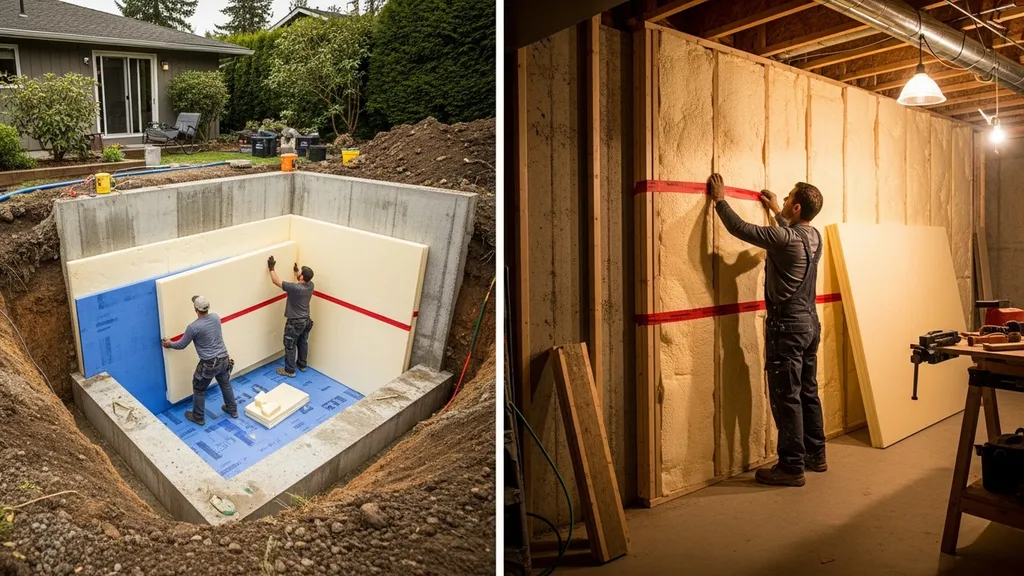
Compare interior and exterior basement insulation methods — costs, moisture risks, R-value, and which approach fits your DIY project.
Basement Insulation: Interior vs Exterior Methods
Basement insulation is one of the highest-impact upgrades for comfort, energy use, and making below-grade space usable. This guide compares interior and exterior approaches — what each does to R-value, moisture risk, airtightness, and long-term durability — so DIY builders can choose the right assembly for new construction or a retrofit. You’ll learn typical R-values per wall, relative material and labor cost bands, how each method addresses thermal bridging and drying potential, and practical tips like capillary breaks, furring-strip details, and when to call a pro.
TL;DR:
- Install exterior continuous rigid board when you can excavate: best for reducing thermal bridging and protecting the foundation; expect the highest upfront cost (often the largest energy savings over decades).
- Use interior sealed rigid foam or closed-cell spray foam for retrofit or when exterior access is limited: near-continuous insulation and strong air control, moderate-to-high cost, limited exterior protection.
- Framed stud walls with mineral wool or fiberglass are the lowest-cost DIY route for finished basements; they’re easier to finish but need careful moisture and air-control detailing to avoid condensation and mold.
Basement Insulation: Quick Comparison (interior vs Exterior)
Why the Choice Matters for Energy, Moisture, and Durability
Choosing between interior and exterior basement insulation changes where the foundation sits relative to the thermal envelope and how moisture can move or dry. Exterior continuous rigid board installs the foundation inside the insulated envelope, cutting thermal bridging at the wall-to-slab junction and protecting the concrete and waterproofing. Interior options vary: stud cavities with batts are inexpensive and easy to finish, but studs act as thermal bridges and cavities can trap moisture unless you provide a drying path or use non-water-sensitive materials. Sealed interior rigid foam or closed-cell spray foam gives better air control and moisture resistance, but they don’t protect the exterior waterproofing or soil contact.
Research and industry guidance emphasize starting with water management: fix leaks, ensure perimeter drainage, and address hydrostatic pressure before insulating. For practical material selection see our best insulation for tiny house materials and R-values, and for regional moisture tips consult local guidance like Horizon Homes’ basement insulation checklist (Basement wall insulation guide for maine).
Typical R-values and cost bands (broad):
- Exterior continuous rigid board: R-3 to R-6 per inch (polyiso ≈ R-6, XPS ≈ R-5, EPS ≈ R-3.6–4); relative cost: high (ballpark: material+labor often substantially more than interior work due to excavation and waterproofing tie-in).
- Interior stud wall with batts: R-13 to R-21 (2x4 or 2x6 cavity), cost: low–moderate (DIY-friendly).
- Interior rigid foam + furring: R-3 to R-6 per inch; cost: moderate.
- Closed-cell spray foam (ccSPF): R-6 to R-7 per inch; cost: moderate–high to high.
- Slab/rim insulation: varies with approach; under-slab insulation is more expensive than perimeter edge strips but significantly reduces slab heat loss for heated slabs.
Thermal bridging, airtightness, and moisture tradeoffs:
- Exterior CI reduces bridging and keeps mass warm; best for cold climates.
- Interior assemblies can work if air and vapor controls are correct; rigid foam or ccSPF reduce condensation risk.
- Exterior work protects waterproofing and structural materials but requires excavation and attention to termite/soil contact rules in some jurisdictions.
Basement Insulation: Quick Comparison Table — Interior vs Exterior Methods
| Method | Typical R-value (per wall) | Key strengths | Main weaknesses | Typical cost relative | DIY difficulty |
|---|---|---|---|---|---|
| Exterior rigid board (continuous) | R-3 to R-6 per in | Reduces thermal bridging, protects foundation, ties into slab edge | Requires excavation, waterproofing tie-in, higher cost | High | High |
| Interior framed stud wall with batts | R-13 to R-21 | Low cost, easy finish, DIY-friendly | Thermal bridging through studs, moisture in cavity | Low | Low |
| Interior rigid foam + furring (sealed) | R-3 to R-6 per in | Continuous interior CI, good air control, easier than exterior | Limited exterior protection, needs taped joints | Moderate | Moderate |
| Interior closed-cell spray foam | R-6 to R-7 per in | Air barrier and high R-value, resists moisture | Higher cost, professional application often required | Moderate–High | Moderate–High |
| Slab/rim insulation (edge/under-slab) | Varies: R-5–R-10 typical | Reduces slab heat loss, improves comfort | Under-slab adds cost and needs vapor retarder | Low–High (assembly dependent) | Low–Moderate |
For a technical baseline on when wall vs under-slab insulation is preferred, see the Department of Energy’s Basement Insulation Measure Guide (Measure guideline: basement insulation basics).
Basement Insulation: Exterior Method — Continuous Rigid Insulation on Foundation Walls
Overview of the Approach
Exterior continuous insulation (CI) involves excavating around the foundation, applying waterproofing or drainage board to the concrete or CMU, then installing rigid foam insulation (XPS, EPS, or polyiso) against the foundation exterior. Insulation is typically run from footing to sill, and the slab-edge is insulated or tied into the wall insulation to create a continuous thermal path. This approach places the foundation structural elements within the conditioned envelope and reduces thermal bridging.
Strengths
- Reduces thermal bridging at studs/sills and at the slab edge when detailed correctly.
- Protects waterproofing and foundation materials from freeze-thaw and moisture fluctuations, extending durability.
- Better overall energy performance for cold climates; less heat loss through the concrete mass.
- Easier to meet airtightness and passive-house targets when combined with above-grade CI strategies. See how continuous exterior insulation reduces bridging in our article on continuous exterior benefits.
Weaknesses
- Requires excavation and careful waterproofing tie-in; costs and site logistics are the main barriers.
- Termite and soil-contact issues: some jurisdictions require special termite shields or using non-biodegradable insulation at/near grade.
- Drainage and backfill coordination is essential to prevent trapping water against the wall.
- Repairs to exterior systems can be disruptive.
Industry guidance (Energy Star) recommends insulating basement perimeters rather than between floors; for climate-based best practices see the Energy Star information sheet on basement insulation (BSC Information Sheet 511: Basement Insulation for all Climates).
Best For
- New construction or full excavations where long-term performance and reduced heat loss are priorities.
- Cold climates where keeping foundation mass within the thermal envelope improves heating loads.
- Projects that can absorb higher upfront cost for lower operating cost and improved durability.
For practical installation steps and material choices on exterior rigid board, see our exterior insulation guide. Rain-screen and moisture-management concepts above grade also apply to the above-grade portion of foundation walls; refer to our rain screen details for principles that help when combining CI with cladding.
Basement Insulation: Interior Method — Framed Stud Wall with Batt Insulation
Overview of the Approach
This common retrofit method builds a framed stud wall set slightly away from the concrete, fills the cavity with mineral wool, fiberglass batts, or natural fibers, and finishes with drywall. Typical stud options are 2x4 or 2x6 depending on desired R-value. A capillary break or furring strips keep the framing from sitting directly on the concrete to limit moisture wicking.
Strengths
- Low cost and highly DIY-friendly; easy to run electrical and plumbing in the framed cavities.
- Clean finished interior surface ready for drywall, trim, and finishes.
- Mineral wool options provide better moisture tolerance and fire resistance than fiberglass; see our mineral wool options and the comparison of rockwool vs fiberglass.
Weaknesses
- Studs create thermal bridges; whole-wall R-value is lower than continuous insulation.
- Cavity insulation can trap moisture if interior air contacts cold concrete without a vapor/air control layer.
- Vapor-barrier placement matters: in many climates you should not put a Class I vapor barrier on the warm-in-winter side if the wall cannot dry to the interior. For detailed vapor strategies, read our piece on vapor barrier placement.
- Requires tight sealing at top and bottom plates and careful flashing to avoid air pathways that bring warm, moist air into the cavity.
Practical DIY tips:
- Use a treated bottom plate or sill gasket as a capillary break and seal with polyurethane sealant.
- Space studs to allow for thicker insulation if aiming for higher R-values (2x6 or double-stud).
- Choose mineral wool for higher moisture tolerance and better acoustic performance.
- Seal rim joist areas separately and consider continuous exterior methods at the sill if possible; more on thicker wall assemblies in our wall assembly options.
Best For
- Finished basements where you want a straightforward interior finish.
- Budget-conscious DIYers who can accept lower overall R per wall and address moisture risks first.
- Projects where excavation is impossible or prohibitively expensive.
Guidance from the Building America Solution Center and PNNL underscores that basements should be dry and drained before insulation work; see their checklist on insulating basement walls (Basement wall insulation - building america solution center).
Basement Insulation: Interior Method — Rigid Foam Board Plus Furring (closed Assembly)
Overview and Typical Assemblies
Interior sealed rigid foam involves attaching foam boards (EPS, XPS, or polyiso) directly to the concrete wall, sealing and taping seams to create a continuous interior insulation and air barrier, then attaching vertical furring strips to which the finish material is fastened. This assembly mimics exterior CI in functions but from the inside.
Typical details:
- Tape or seal all joints; use compatible foam tape or spray foam for corners and penetrations.
- Fasten furring through the foam to concrete using long fasteners with certified pull-out values.
- Maintain a capillary break at the slab edge and ensure the slab edge is insulated or detailed as needed.
Strengths
- Provides continuous insulation with reduced thermal bridging compared with stud cavities.
- Good air-sealing potential when seams are taped and penetrations are sealed; improves airtightness and reduces convective heat loss.
- Easier than full exterior excavation and can be done by an experienced DIYer.
Weaknesses
- Exterior waterproofing is not protected; the foundation remains exposed to soil and freeze cycles.
- Foam type selection matters: polyiso has higher R/in but loses performance at cold temperatures; XPS and EPS have different moisture and vapor characteristics. Check manufacturer data.
- Fastening and fire-code compliance (covering foam with 15-minute thermal barrier like drywall) are required by many codes.
The Department of Energy provides guidance on basement insulation options, including interior sealed foam assemblies; see their article on basement insulation systems (Basement insulation systems. building america top ...).
Practical air-sealing techniques that translate to taped foam boards are described in our air sealing details article.
Best For
- Retrofits where exterior access is impossible or too costly.
- Homeowners who want a durable, warm interior surface with good airtightness without excavation.
- Situations requiring moderate R-value and strong vapor/air control.
Basement Insulation: Interior Method — Spray Polyurethane Foam (closed-cell)
Overview
Closed-cell spray polyurethane foam (ccSPF) is sprayed directly to foundation walls to create a combined insulation, air barrier, and water-vapor retarder. It adheres to concrete and fills irregularities, offering high R-value per inch (approximately 6–7 per inch) and excellent air-sealing.
Strengths
- High R-value in thin layers and strong air-sealing reduces infiltration heat loss.
- Acts as a moisture barrier to vapor diffusion and can add structural stiffness to walls in some cases.
- Effective at sealing gaps around penetrations, piers, and odd-shaped surfaces.
Weaknesses
- Higher cost than many alternatives; professional equipment and training are usually required for reliable results.
- Embodied carbon and off-gassing are concerns; ensure proper ventilation during and after installation and follow manufacturer cure times.
- Difficult to remove or modify later; repairs or running new services through the foam add cost.
- Building code and inspection requirements may require thermal barrier cover (e.g., 1/2" gypsum) and appropriate fire-safety measures.
Buildingscience recommends non-water sensitive insulation on basements and discusses spray foam use in basement assemblies (Info-511: Basement Insulation | buildingscience.com). For a deeper tradeoff comparison between spray foam and other choices, see our spray foam tradeoffs.
Best For
- Situations where high R in minimal thickness is required and airtightness is a priority.
- Retrofit basements with irregular concrete or many penetrations where taped foam would be difficult.
- Projects where owners accept higher cost for superior air-sealing and moisture resistance.
Basement Insulation: Slab and Rim Insulation — Exterior or Interior Approaches
Why Slab Edge and Rim Matter
The slab edge and rim (band) are common heat-loss paths. For heated basements or slabs-on-grade, insulating the slab edge and under-slab area reduces heat loss to soil and frost penetration. Insulating the rim band and band joist reduces bridging where the slab meets the wall.
Exterior Slab/edge Insulation Options
- Tie exterior wall CI down to the slab edge and extend insulation below grade a minimum depth based on climate and code; this creates continuity.
- Use rigid boards at the slab edge and protect them with a mechanical barrier or concrete curb where necessary.
- Frost-protected shallow foundation (FPSF) designs relocate insulation to exterior slab edge to eliminate deep footings; see our frost-protected foundations guide for when FPSF applies.
Interior Slab-edge and Under-slab Options
- Interior perimeter rigid foam: install foam at slab edge on the interior side and seal; useful when exterior work isn’t possible.
- Under-slab insulation (EPS or XPS) is installed before pouring a heated slab; it provides large energy savings for conditioned slabs but adds cost and coordination.
- Use a Class I or II vapor retarder under the slab per local code and manufacturer recommendations to control moisture migration.
Best Practices for Diyers
- Prioritize drainage and install a capillary break where the slab meets wall framing.
- For heated slabs, under-slab insulation yields clear operating-cost benefits; budget accordingly.
- In cold climates, extend perimeter insulation to the recommended depth to control frost heave — our cold-climate tips explain typical depths and performance considerations.
- If you choose an interior edge-only approach, ensure you maintain continuity with the wall insulation to avoid a thermal short at the slab-to-wall junction.
Basement Insulation: Which Should You Choose?
Decision Flow: New Build vs Retrofit
- New build with excavation access: Exterior continuous rigid board plus insulated slab edge yields the best long-term performance and durability.
- Retrofit with dry, accessible interior: Interior taped rigid foam with furring is often the best compromise — moderate cost, good thermal continuity, manageable DIY scope.
- Retrofit with finished basement and limited budget: Framed stud wall with mineral wool and a careful air/vapor plan is the fastest, lowest-cost path to a finished space.
Budget vs Performance Tradeoffs
- Highest performance per dollar over the long run is often exterior CI for cold climates, but upfront cost and disruption are higher.
- Closed-cell spray foam gives compact high-R and airtightness but carries higher material and application cost.
- Stud-cavity batts are economical and easy to finish but reduce overall wall R due to studs and require more attention to moisture control.
Climate-driven Guidance (cold, Mixed, Warm)
- Cold climates: Prefer exterior CI or interior ccSPF to keep foundation mass warm and reduce condensation risk; ensure slab-edge insulation continuity.
- Mixed climates: Interior rigid foam with taped seams performs well; stud–batts can be acceptable if drying potential exists.
- Warm/humid climates: Avoid interior vapor barriers that trap moisture; use materials tolerant of occasional moisture and prioritize ventilation and drainage.
For climate-specific R-values and recommended assemblies see our climate zone 6 guide and factor insulation choices into heating system sizing with help from our heating load impacts article.
Watch this step-by-step guide on insulating a basement:
Quick Scenarios and Recommended Approaches
- You have a new build in a cold zone and want low operating cost: Exterior continuous rigid board + insulated slab edge.
- You have a finished basement with drywall already in place and limited budget: Address moisture first, then add a framed stud wall with mineral wool and an interior capillary break.
- You have a damp basement with chronic seepage: Fix exterior drainage and waterproofing before insulating; consider exterior CI if budget allows.
- You want maximal airtightness and minimal wall thickness: Hire pros for ccSPF applied directly to walls.
The Bottom Line
Exterior continuous rigid insulation offers the best long-term thermal performance and protects foundation materials, but it costs more upfront and requires excavation. Interior sealed rigid foam or closed-cell spray foam are excellent retrofit solutions that improve airtightness and reduce condensation risk. For budget DIY projects, framed stud walls with mineral wool work if moisture is fixed first and air barriers are applied.
Frequently Asked Questions
Can I insulate my basement walls from the inside without causing mold?
Yes — but only if you address existing water problems first and choose an assembly that allows for drying or uses non-water-sensitive materials. Repair exterior leaks, ensure perimeter drainage, and remove any existing mold. Interior taped rigid foam or closed-cell spray foam limits warm interior air from contacting cold concrete surfaces, reducing condensation risk. If you use a stud wall with cavity insulation, prefer mineral wool and include an air barrier and capillary break; read our vapor barrier placement guide for assembly-specific advice.
How thick should foam board be on a basement wall?
Recommended thickness depends on climate and desired R-value. As a rule of thumb, 1–2 inches of rigid foam (XPS or polyiso) provides meaningful improvement, while 2–4 inches gives much better performance; closed-cell spray foam is about R-6–7 per inch. Check local code for minimums and manufacturer data for R-per-inch at low temperatures. The Department of Energy’s guidance suggests basing decisions on insulation strategy (wall vs slab) and climate; see their measure guide (Measure guideline: basement insulation basics).
Do I need a vapor barrier on basement walls?
Not always. The correct approach depends on your climate, the wall assembly, and whether the assembly can dry to the interior or exterior. Rigid foam with taped seams can act as a vapor retarder, while stud-cavity walls may need vapor control strategies that do not trap moisture. Energy Star and Building America recommend basing vapor control strategy on materials and drying potential; consult our vapor barrier placement resource for specifics.
Is spray foam worth the cost for a DIYer?
Closed-cell spray foam offers high R-value and excellent air-sealing, but it usually requires professional application due to equipment, health, and quality-control factors. For small spots, some manufacturers offer DIY kits, but these can be tricky to install consistently. Consider rigid foam with sealed seams as a DIY alternative that captures many air-sealing benefits without the higher cost and specialized equipment. For a full tradeoff analysis, see our spray foam tradeoffs.
Will exterior insulation reduce my foundation repair needs?
Exterior insulation can protect waterproofing and reduce freeze–thaw cycling on foundation walls, which may extend the life of the foundation finish and waterproofing system. However, insulation does not replace proper drainage, footing repairs, or structural fixes. If you have active foundation problems, repair those first; then consider exterior CI to reduce future moisture-related stress. For guidance on frost-protected options and when exterior approaches are most effective, see our article on frost-protected foundations.