Step-by-step guide to choosing and installing exterior insulation on walls for better energy, reduced thermal bridging, and durable wall assemblies.
Exterior Insulation on Walls: Installation Guide
Exterior insulation walls are a proven way to boost a building’s effective R-value, cut thermal bridging at studs, and protect sheathing from large temperature swings. This guide explains why exterior insulation is often the best route for retrofits and new builds targeting low-energy performance, how to choose between rigid foam and vapor-open alternatives, and a step‑by‑step installation sequence with fastener spacings, seam detailing, and rainscreen considerations. Read on to learn material trade-offs, moisture-control rules of thumb for different climates, cost ranges, and the most common installation mistakes to avoid.
TL;DR:
- Exterior insulation can cut whole-wall heat loss by 10–25% in temperate climates and significantly reduce stud thermal bridging; continuous exterior insulation is recommended by Passive House and PHIUS.
- Choose insulation by R/in, permeability, and cladding strategy: polyiso for high R/in, mineral wool for vapor-open fire performance, and wood fiber for low embodied carbon.
- Prioritize flashing and taped seams, maintain a rainscreen drainage gap, and fasten boards with both adhesive and mechanical fasteners to avoid compression and uplift.
Why Choose Exterior Insulation for Walls?
Exterior insulation provides continuous insulation (CI) that wraps the structure outside the sheathing, which reduces thermal bridging where studs and framing penetrate cavity insulation. Studies and modeling show effective whole-wall U-factor improvements when CI is added; energy models for temperate climates often predict HVAC energy savings in the 10–25% range compared with cavity-only strategies, depending on baseline construction and window performance. The Department of Energy’s guide on insulating sheathing explains how exterior rigid insulation protects sheathing and increases whole-assembly performance: the Department of Energy's guide to exterior rigid insulation.
Key technical benefits:
- Continuous exterior insulation reduces stud thermal bridging, raising effective R-value without increasing cavity depth.
- Exterior CI keeps the sheathing warmer in winter and cooler in summer, lowering moisture risk and cyclic stresses.
- It simplifies meeting high-performance targets (Passive House, PHIUS, or IECC prescriptive/assembly thresholds) because the CI treats the whole envelope.
Key points:
- Use exterior insulation when upgrading older homes, adding a thermal layer over masonry, or designing to Passive House / PHIUS standards.
- Exterior insulation is often preferable to cavity-only upgrades when you need to raise whole-wall R-value without rebuilding stud depth.
- Exterior insulation integrates well with a rainscreen wall system and reduces risk of condensation on the sheathing.
Related reading: compare how exterior roof insulation affects envelope performance in our article about exterior roof insulation performance. Also consider window upgrades alongside CI — see our cost and performance notes on window and whole-envelope costs.
Exterior Insulation Materials and How to Pick Them
Choosing the right exterior insulation for your walls means balancing thermal performance, moisture behavior, fire resistance, and attachment strategy. Below are the main families and when they make sense.
Rigid Foam Boards: Polyiso, EPS, XPS
- Polyiso: Highest R/in (about 6–6.5 at moderate temps), lightweight, easy to cut and tape. Performance drops at low temperatures. Often used above grade where high R/in matters.
- EPS (Expanded Polystyrene): R/in ~3.6–4.2, more vapor-permeable than XPS, lower embodied carbon and cost.
- XPS (Extruded Polystyrene): R/in ~5, lower moisture absorption but lower permeability and higher embodied carbon.
Mineral Wool and Natural Alternatives
- Mineral wool: R/in ~3.7, vapor-open, non-combustible, good fire performance and sound attenuation. Heavier and needs mechanical fastening.
- Wood fiber board: R/in ~2.5–3.5 depending on density, vapor-open and moisture buffering, lower embodied carbon than foams but thicker for same R.
- Cork: Natural, rot-resistant, vapor-open; used on specialty projects and retrofits where sustainability is a priority.
Performance Table: R-values, Moisture Behavior, and Install Notes
| Material | R-value per in | Vapor permeable? | Ease of taping/seaming | Typical board sizes | Best use |
|---|---|---|---|---|---|
| Polyiso | 6.0–6.5 | No (low permeance) | High — foil/scrim facer tapes well | 4x8, 1–2 in typical | Above-grade CI where space is limited |
| XPS | ~5.0 | No (low permeance) | Moderate — plastic facers need compatible tape | 4x8, 1–2 in | Below-grade/limited moisture sites |
| EPS | 3.6–4.2 | Yes (more permeable) | Good — smooth facer, easy to seam | 4x8, variable thickness | Budget CI, retrofit over cladding |
| Mineral wool | 3.7 | Yes (vapor-open) | Challenging — needs mechanical continuity | 4x2.5–4x8, thicker boards | Fire-sensitive assemblies, vapor-open designs |
| Wood fiber | 2.5–3.5 | Yes (vapor-open) | Moderate — requires careful shimming | Various, often thicker | Low-carbon CI for hygrothermal designs |
Cost: approximate material cost varies by region and supplier; expect foam board materials roughly $0.50–$3.00/sqft per inch (EPS low end, polyiso high end), mineral wool higher on a per-R basis. Seek product sheets and third-party test data from manufacturers.
Trade-offs and environmental notes:
- Foam plastics generally have higher embodied carbon; EPS and some polyiso lines offer recycled-content or low-global-warming-potential blowing agents.
- Mineral wool and wood fiber boards offer lower operational risk for moisture because they’re vapor-open and allow drying to the exterior.
- For a deeper comparison of foam options, see our polyiso vs EPS vs XPS guide and consult the continuous insulation foundation guide for foundation-adjacent details.
Mentioned alternatives: spray foam and cellulose are common for cavities but less practical as continuous exterior boards; read the foam vs cellulose comparison for trade-offs.
Planning and Design: Wall Assemblies, Moisture Control, and Codes
Exterior insulation must be planned with the wall type, climate, and cladding strategy in mind. The main choices hinge on where the vapor control layer sits, whether the assembly needs to dry to the exterior, and how thick the CI must be to keep sheathing above the dew point.
Choosing Compatible Wall Assemblies
- For wood-frame walls with OSB or plywood sheathing, exterior CI moves the dew point outward. Keep sheathing warm enough in cold climates by providing a fraction of total R-value on the exterior; Passive House guidance often calls for enough exterior insulation to avoid condensation risk.
- For masonry or brick veneer, CI can be installed over the existing cladding with furring or under a new cladding system; consider ventilation behind the insulation when required.
- SIPs and structural assemblies: exterior CI can be used to augment SIP R-value but check manufacturer guidance for fastening and thermal expansion.
Moisture and Vapor Control: Hygrothermal Basics
- Climate matters. Use DOE climate zone maps to assess inward vs outward vapor drive and required exterior insulation fractions. The general rule: colder climates require more exterior R to keep sheathing warm enough to avoid condensation; warmer, humid climates favor vapor-open assemblies with exterior drying.
- Include a continuous drainage plane at the sheathing (WRB) and a rainscreen gap (~3/16"–3/8" for most claddings; deeper for wood siding).
- For prescriptive guidance on external wall best practice, consult the INCA best-practice document: external wall insulation best practice guide.
Permits and Local Code Considerations
- Check IECC prescriptive assemblies and local amendments. Some jurisdictions have limits on foam plastic on exteriors without ignition barriers, or require specific fire-resistance ratings.
- Consult local permit offices or state guides such as our local permit guidance or the California permit tips page for state-level issues.
- For complex hygrothermal situations, hire a building scientist or use hygrothermal modeling (Wufi) for exact dew-point and drying calculations.
Also consider framing adjustments early. If planning advanced framing, review our advanced wall framing guide for interactions with CI thickness and stud layout.
Step-by-step Installation Guide
This section gives a practical sequence for installing continuous exterior insulation on a wood-framed wall. Follow the order and use both adhesives and mechanical fasteners where recommended.
Prep: Substrate Inspection, Flashing, and Air-sealing
- Inspect Sheathing: Verify sheathing is sound, free of rot, and adequately fastened. Repair or replace any damaged areas.
- Install WRB and Flashing: Apply the weather-resistive barrier (WRB) per manufacturer instructions. Flash window and door openings using integrated sill pan flashing and head flashings.
- Air-Seal Interior Transitions: Install or verify the continuity of the air barrier at floor lines and ceiling. See our guide on airtight membranes how-to for methods.
- Mark Layout: Snap vertical and horizontal lines to align boards and fasteners.
Installing and Fastening Continuous Insulation Boards
- Start at the bottom: Install a starter course set on blocking or a base that prevents bottom water exposure.
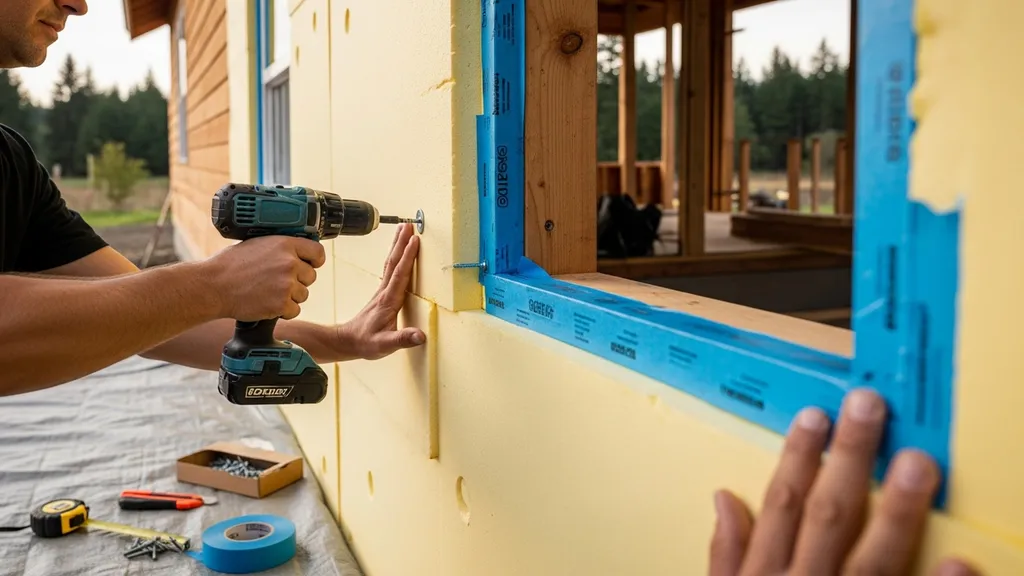
- Adhesive + Mechanical Fastening: For most foam boards use a bead-and-dab compatible foam adhesive and follow that with manufacturer-recommended long screws with washers or cap plates into studs or blocking. Typical fastener spacing for 1–2 in foam: 12–16 in o.c.; for thicker boards (3–4 in) spacing generally 8–12 in o.c. Always check manufacturer specs and local code.
- Stagger joints: Offset vertical seams between courses to minimize air paths.
- Avoid compression: Use shims or furring where cladding requires through-fastening so fasteners don’t compress the insulation under load.
Taping Seams, Detailing Windows and Openings
- Tape Horizontal and Vertical Seams: Use compatible seam tape (butyl or acrylic for polyiso; specialized tapes for other facers). Ensure full contact across seams and overlap WRB flashing at window perimeters.
- Window Jamb Extensions: Extend the flashing and WRB up over the insulation layer. Build out jambs with insulated extensions or use factory jamb extensions so windows sit on the plane created by CI.
- Penetration Seals: Seal around mechanical penetrations with backer rod and compatible sealant; consider pipe collars for service penetrations.
Adding Rainscreen and Cladding
- Install Ventilated Furring: Attach vertical furring strips through the CI into studs using long stainless screws or galvanized fasteners sized for the total depth (insulation + furring). Typical rainscreen gap is 3/16"–3/8" minimum; many builders use 1/2"–3/4" for drainage and drying.
- Through-Fastening: If cladding requires through-fastening, ensure structural members transfer loads to framing and do not rely on the insulation for shear.
- Flash and Trim: Finish window trim, drip edges, and eaves to shed water and allow the rainscreen to drain.
Tools and PPE: Utility knife or saw for cutting boards, low-expansion foam safe for foam board facers, seam tape, long screws and washers, adhesive, caulking, safety glasses, gloves, and a respirator when cutting dusty materials.
Watch this step-by-step guide on installing a window with exterior insulation:
Retrofit tips: If installing over existing siding, evaluate substrate condition before deciding to remove siding or install CI over top with furring. See retrofit-specific notes below and consult permit guidance.
Internal references: For more on air sealing and interior-exterior transitions, read our air-seal house tips.
Common Mistakes, Troubleshooting, and Quality Checks
This section covers typical installation errors and how to detect or fix them.
Seam and Flashing Errors That Lead to Leaks
- Fault: Leaving seams untaped or tapes incompatible with facers. Result: Water and air infiltration at joints.
- Fix: Re-tape with a compatible high-performance tape and ensure WRB overlaps tape at windows and base flashing. Check the Department of Energy guide for recommended practices.
Fastening and Compression Mistakes
- Fault: Compressing insulation under cladding fasteners or siding stops, which reduces R-value and creates cold spots.
- Fix: Use furring strips or screw shims to transfer load to framing. Replace compressed boards.
Inspection Checklist and Simple Tests
- Visual Seam Inspection: Walk the perimeter and look for visible untaped seams, gaps wider than 1/8", or torn facers.
- Probe Test: Press along seams and corners to find soft spots indicating rot or moisture behind the board.
- Airtightness: A blower-door test aims for appropriate airtightness targets for your performance goal (Passive House has its own numbers; many energy codes use different requirements). Use a blower-door to find leakage paths at windows, corners, and utility penetrations.
- Thermal Check: Use an IR camera or thermal imaging during a cold snap to reveal thermal bridging or missing CI coverage.
Troubleshooting fixes
- Localized leaks: Remove affected cladding, repair WRB and sheathing, replace insulation board, re-tape seams, and re-clad.
- Compressed boards: Remove and replace, or add additional CI and shim to restore thickness if feasible.
Quality acceptance: Aim for continuous taped seams, no contact between siding fasteners and insulation that compresses it, and correctly detailed window flashings that extend over the insulation.
Refer to the Housing Consortium’s wall guidelines for sample acceptance criteria: guidelines for wall assemblies.
Thermal Performance, R-values, and Sizing Examples
Understand both R-value per inch and whole-wall performance. Continuous exterior insulation increases the effective R-value by reducing studs’ conduction path.
How to Calculate Required Exterior Insulation Thickness
- Define target whole-wall R (or U-factor) based on code or design goal.
- Sum cavity insulation R (e.g., R-19 in a 2x6 wall) and add CI R to reach the target, adjusting for stud fraction (typically 10–25% of wall area).
- Use product R/in to convert CI R to thickness.
Example Calculations
- Scenario A: 2x6 wood-framed wall with R-19 cavity insulation (approx R-19). Target whole-wall effective R of R-30.
- Stud fraction estimate: studs reduce effective R; adding 2 in polyiso (R ≈ 12) brings whole-wall effective R close to R-30 depending on stud layout.
- Scenario B: 2x4 framed wall with R-13 cavity, aiming for whole-wall R-20.
- Adding 1.5 in of polyiso (≈ R-9) may achieve near R-20 whole-wall once thermal bridging is reduced.
Example quick reference table: thickness to R targets (polyiso, EPS, mineral wool)
| Target R (exterior CI only) | Polyiso thickness | EPS thickness | Mineral wool thickness |
|---|---|---|---|
| R-6 | 1 in | 1.5 in | 2 in |
| R-12 | 2 in | 3 in | 4 in |
| R-20 | 3.3 in | 5 in | 6–7 in |
Note: These are approximations. For precise design, calculate whole-wall U-factor including studs, windows, and thermal bridges. The NREL report on thick exterior insulation provides modeling results showing diminishing returns beyond certain thicknesses: incorporating thick layers of exterior rigid insulation on walls.
Practical guidance:
- Diminishing returns occur once studs’ bridging is effectively mitigated; adding more CI yields smaller incremental savings.
- Pair exterior insulation with better windows and attic insulation for whole-house gains — see our attic guidance: attic insulation amounts and small-structure examples: shed insulation r-values.
Cost, Sustainability, Finishes, and Maintenance
Material and labor costs
- Material ranges (ballpark): EPS $0.50–$1.50/sqft/in, XPS $1.00–$2.00/sqft/in, polyiso $1.50–$3.00/sqft/in, mineral wool $1.50–$3.50/sqft/in. Expect variation by thickness and market.
- Labor: DIY labor reduces cost but adds time. Hiring contractors for full CI and rainscreen installation typically adds $2.50–$6.00/sqft installed depending on complexity and region.
Carbon and Environmental Considerations
- Foam plastics have higher embodied carbon and potential high-GWP blowing agents in some older polyiso/XPS products. Newer low-GWP lines and recycled EPS reduce impacts.
- Mineral wool and wood fiber boards have lower embodied carbon and support vapor-open drying, which can reduce long-term material replacement risk.
- For retrofit projects where embodied carbon matters, prioritize recycled-content products and local suppliers.
Finishing Options and Long-term Maintenance
- Direct-applied stucco over foam is common but requires a proper lath and mesh and attention to cracking. Many builders prefer cladding on furring with a rainscreen (wood siding, fiber cement, metal, etc.) because it allows drying and simplifies repairs.
- For finish-compatible options and low-VOC coatings see our coverage of eco-friendly exterior coatings.
- Maintenance tasks: inspect flashings annually, check siding attachment points, clear drainage planes, and repair damaged insulation boards promptly.
When to replace or upgrade
- Replace CI if you find significant moisture damage, sheathing rot, or persistent air leaks that can’t be repaired through localized fixes. Adding a second exterior layer is sometimes a simpler path than removing existing material.
The Bottom Line
Exterior insulation walls provide a cost-effective way to reduce thermal bridging, raise whole-wall R-values, and protect sheathing — especially for retrofit projects and low-energy new builds. Choose materials by R/in, permeability, and fire requirements; detail flashing, taped seams, and a rainscreen gap; and plan fasteners to avoid compression. If you’re starting a project, assess wall type and climate, pick a CI material that matches vapor control goals, and detail windows and flashings before purchasing materials.
Frequently Asked Questions
Can I add exterior insulation over existing siding?
Yes, you can install exterior insulation over existing siding in many cases, but it depends on the siding condition and local code. First inspect the substrate for rot and make needed repairs. For most retrofit installs you can add CI over the siding with furring and a rainscreen, or remove the siding and install the CI directly over the sheathing for better continuity. For detailed flashing and air-sealing steps, follow the sequence in the installation section above and consult your local permit office for code requirements.
How thick should exterior insulation be for cold climates?
Thickness depends on your whole‑wall R target and how much of the total R you want outside the sheathing. A common rule of thumb is to provide enough exterior R to keep the sheathing warm during winter; that often means several inches of polyiso or several inches of mineral wool in cold climates. For precise values, use climate-zone specific guidance or hygrothermal analysis. The NREL modeling on thick exterior insulation shows performance improvements but also diminishing returns as thickness increases: see [NREL's analysis of exterior rigid insulation](https://docs.nlr.gov/docs/fy15osti/63337.pdf).
Is foam board exterior insulation a fire hazard?
Foam plastics are combustible and many jurisdictions require an ignition or thermal barrier when foam is used on exterior walls, especially near eaves and openings. Mineral wool is non-combustible and often chosen where fire resistance is a priority. Always check code requirements (IECC and local amendments) and manufacturer recommendations, and discuss any concerns with the building inspector before installation.
Do I still need a vapor barrier with exterior insulation?
It depends on the climate and the material chosen. Vapor control strategy must be considered holistically: in cold climates, providing a higher fraction of insulation outside the sheathing reduces the need for an interior vapor-impermeable layer; in mixed- or hot-humid climates, vapor-open assemblies that dry to the exterior are often preferred. Use climate maps and hygrothermal guidance when choosing whether an interior vapor barrier is needed.
How does exterior insulation affect window flashing and trim?
Exterior insulation changes the wall plane, so window flashing and jambs must be extended to the new plane. That means installing flashing that integrates with the WRB over the insulation and using insulated jamb extensions, or factory jambs sized for the CI thickness. Proper sequence is WRB, window flashing, CI, jamb extension, then trim or cladding. Refer to the step-by-step detail in the installation section and the linked video for visual guidance.