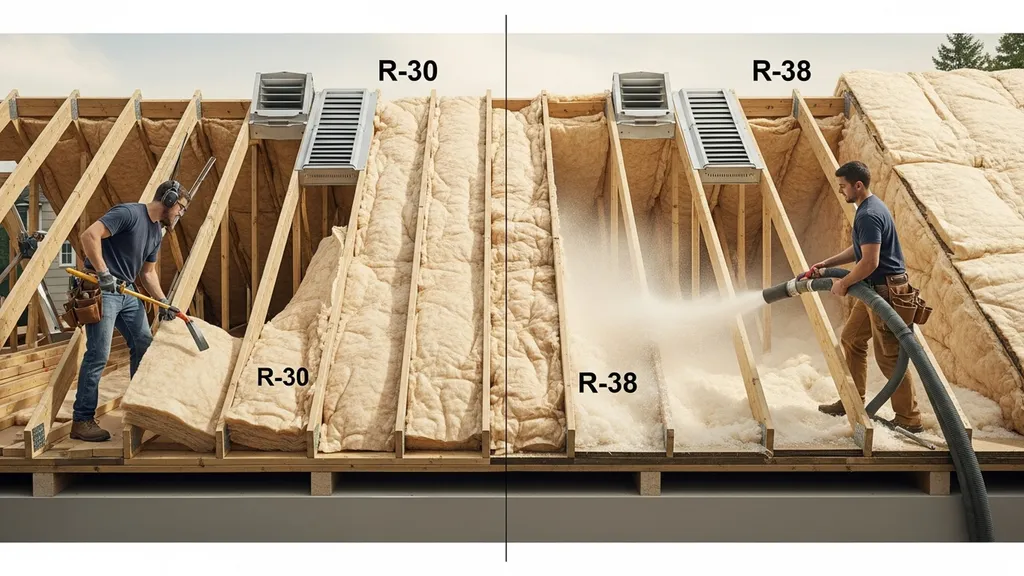
Compare R-30 and R-38 insulation for attics and roofs — costs, depth, materials, and real-world recommendations to help budget-conscious DIY builders choose.
R-30 vs R-38 Insulation: Which Do You Need?
Choosing between R-30 vs R-38 insulation is a common decision for DIY builders upgrading an attic or designing a small self-built home. This article compares the two R-values in plain terms—what each delivers for thermal performance, how much depth different materials require, retrofit constraints, and which choice makes sense in specific scenarios. Readers will get practical installation tips, material trade-offs, and tools to estimate cost-effectiveness so you can decide the right balance of comfort, budget, and space.
TL;DR:
- R-30 saves about 10–15% less heat loss than R-38 in attic assemblies, typically requiring roughly 6–8 inches less depth depending on material.
- R-38 is usually worth it in cold climates or highly conditioned homes; R-30 often suffices in mild climates if you air-seal first.
- If cavity depth is limited, combine rigid foam on the roof deck or use spray foam for air sealing rather than only adding thickness.
R-30 vs R-38 Insulation: Quick Overview and Why This Matters
Short TL;DR for DIY Builders
The phrase "r30 vs r38 insulation" sums up a trade-off: increased thermal resistance versus added material, depth, and cost. For a budget-conscious DIYer building a cabin or retrofitting an attic, the decision comes down to available cavity depth, climate goals, and airtightness. Install R-30 where space or budget is constrained and the climate is temperate; choose R-38 when winters are long, heating fuel is expensive, or you plan to condition the attic space.
Industry guidance helps, but it varies by region. The Energy Star recommended R-values table is a useful starting point for assessing climate-based priorities and cost-effective insulation targets: see the Department of Energy and Energy Star summaries for recommended levels and cost-effectiveness analysis (Energy Star recommended home insulation R–values).
When R-value Choices Move the Needle
R-value is only one factor. If there are big air leaks or thermal bridges, adding a few inches of insulation yields less benefit than fixing leaks or adding continuous exterior insulation. That means an air-sealing-first approach often gives better comfort per dollar than immediately jumping from R-30 to R-38. Also, beyond a point, returns diminish: moving from R-30 to R-38 reduces heat flux, but not proportionally to the cost in every climate. Use a savings calculator to model your specific fuel and climate.
R-30 vs R-38 Insulation: Side-by-side Comparison Table
| Metric | R-30 (approx) | R-38 (approx) |
|---|---|---|
| Relative thermal improvement vs lower baseline | Baseline | ~10–15% less heat flow than R-30 (typical attic assembly) |
| Typical material options | Fiberglass batts in 2x10, blown cellulose, layered rigid foam + batt | Deeper fiberglass batts, denser blown cellulose, layered rigid foam + batt |
| Typical installed depth (fiberglass batt) | ~8–9 in | ~10–12 in |
| Typical installed depth (blown cellulose) | ~7–9 in | ~10–12 in |
| Typical installed depth (open-cell spray foam) | ~6–8 in | ~8–10 in |
| Estimated incremental cost per sq ft vs R-30 | Low-to-moderate | Moderate-to-higher |
| Retrofit difficulty | Easier—fits shallower cavities | Harder—may need baffles, raise vents, or alternate approaches |
| Best-use cases | Mild climates, conditioned attics, limited clearance | Colder climates, highly conditioned homes, long heating seasons |
Notes: Values are typical and approximate. The Insulation Institute discusses batt dimensions and typical thicknesses for R-30 and R-38 batts in product literature (insulation product guide PDF). Use the insulation savings calculator to model payback for your climate and fuel type.
R-30 vs R-38 Insulation: R-30 — What R-30 Delivers for DIY Projects
Overview of R-30 in Practice
R-30 delivers a solid level of thermal resistance for many mild-to-temperate climates and for unconditioned attics that are not primary living space. Builders commonly reach R-30 with a single layer of fiberglass batts in 2x10 joists or with roughly 7–9 inches of blown cellulose. For open attic floors, R-30 gives noticeable comfort gains and reduces heating/cooling loads compared with lower R-values.
Strengths of Choosing R-30
- Fits shallower cavities: easier to install in many existing attics without altering roof/rafter geometry.
- Lower material cost: described as low-to-moderate incremental cost per square foot compared with higher R-values.
- Retrofit-friendly: less chance of compressing insulation in tight spaces and simpler to add without moving ductwork or vents.
- Effective when paired with good air sealing: sealing attic bypasses often improves performance more than adding a few R-value points; see our air-sealing tips.
Weaknesses and Limits of R-30
- Less effective in cold climates with long heating seasons: those homes will see larger savings from higher R-values.
- Reduced margin for thermal bridging and leakage: if framing, attic hatches, or recessed lights are not addressed, R-30 will not meet comfort targets in a highly conditioned home.
- Diminishing return when aiming for near-passive performance: passive-style builds typically target much higher effective R-values and continuous insulation strategies.
Best For: Specific DIY Use Cases
- Mild coastal retrofit where attic clearance is limited and heating demand is low.
- Small cabins or sheds where cost and ceiling height are constrained—see the insulating a shed guide for small-structure specifics.
- Budget-first DIYers who will prioritize air sealing now and add more insulation later if needed.
For an overview of material options and assembly-specific guidance, the Department of Energy's guide to home insulation is a helpful technical reference (Guide to home insulation pdf).
R-30 vs R-38 Insulation: R-38 — What Extra R-value Changes
Overview of R-38 in Practice
R-38 is the next step up and is common in colder regions or where homeowners plan to condition attic spaces. Achieving R-38 typically requires deeper fiberglass batts (10–12 inches), more blown cellulose, or combinations like polyiso board combined with thinner batts. The larger thickness reduces conductive heat loss further, but the incremental benefit shrinks relative to the added material and labor.
Strengths of Choosing R-38
- Better winter performance in cold climates: more insulation reduces peak heat loss and lowers heating loads.
- Greater comfort margin for highly conditioned attics or living spaces under the roof.
- When paired with air sealing and reduced thermal bridging, R-38 helps enable smaller mechanical systems and lower fuel use.
Weaknesses and Trade-offs
- Depth and retrofit complexity: you may need to raise baffles, reroute wiring, or move ducts to avoid compression and to maintain ventilation paths.
- Higher materials and labor: incremental cost per square foot is moderate-to-higher than R-30 and can be significant on large roofs.
- Diminishing returns if air leakage or thermal bridging remain unaddressed — the effective performance may be less than nominal R-value improvements. The North Carolina Office of State Fire Marshal notes differences in U-factor between R-30 and R-38 in ceiling assemblies and shows how small changes in R-value yield modest U-factor shifts (see analysis example: R-30 vs R-38 U-factor note).
Best For: Specific DIY Use Cases
- Small cold-climate cabins or off-grid homes where heating fuel is limited or expensive.
- High-performance retrofits where owners also plan to address airtightness and thermal bridging.
- Builds seeking long-term energy savings and improved occupant comfort in cold regions.
For deeper detail about choosing materials to reach higher R-values, see our article on attic insulation materials.
R-30 vs R-38 Insulation: How Material Choice Affects Achieving R-30 or R-38
Fiberglass Batts vs Blown Cellulose vs Spray Foam
Different materials deliver different R-value per inch and different performance in practice:
- Fiberglass batt: Typically about R-3.0–R-3.3 per inch. To hit R-30 you need ~8–10 inches; to hit R-38 you need ~11–13 inches, depending on batt density and manufacturer.
- Blown cellulose: Around R-3.5–R-3.8 per inch in dense-pack; needs less depth than fiberglass for a given R. Expect ~8–9 inches for R-30 and ~11–12 inches for R-38 in blown applications.
- Open-cell spray foam: Roughly R-3.6 per inch; closed-cell spray foam is higher at about R-6.5–R-7 per inch. Closed-cell can reach R-38 in thinner layers but is higher-cost and has higher embodied energy.
These numbers are typical and vary by product and density. When considering "fiberglass vs cellulose r-value", cellulose often wins for settled performance and airflow resistance, while spray foam adds air-sealing. See our spray foam vs cellulose comparison for deeper trade-offs.
Rigid Foam Layers and Combining Insulation Types
When cavity depth is limited, a common tactic is to add rigid foam (polyiso, EPS, XPS) above the roof deck or under sheathing to create continuous insulation and limit thermal bridging. Polyiso delivers higher R/inch at moderate temperatures, but performance varies with temperature and facers—our comparison of polyiso vs EPS vs XPS explains typical effective R-values and moisture management considerations.
A layered approach might be:
- Add 1–2 inches of polyiso on the sheathing (adds R-6–R-12 depending on thickness and product) and then fill the cavity with R-30 batts to approach an effective R-38 without deepening the rafters.
Moisture, Settling, and Long-term Performance Differences
- Cellulose can settle a bit over time if not dense-packed; plan for slightly higher initial depth or dense-pack technique.
- Fiberglass doesn't settle but can lose performance if compressed.
- Spray foam resists settling and provides an air barrier, but closed-cell products change vapor profiles and may require careful detailing.
Addressing air leakage improves the effective R-value of any assembly. See common leak locations in our air leakage points guide.
Installation Tips That Change Effective R-value
- Protect and maintain ventilation paths with baffles when adding depth.
- Avoid compressing batt insulation around joists and over ducts.
- Use a continuous layer of rigid foam to reduce thermal bridging through rafters.
- Seal penetrations and attic hatches before adding insulation—air sealing often yields larger energy savings than small R-value increments.
Before watching a how-to clip, the following video helps visualize installed depths, baffle placement, and material differences: viewers will see side-by-side attic cross-sections and common DIY installation pitfalls.
This video compares the options to help you decide:
For readers curious about natural options, see our discussion of cork insulation uses and where those materials fit relative to conventional R-values.
R-30 vs R-38 Insulation: Cost, Space, and Retrofit Considerations for Diyers
Installed Depth vs Roof/rafter Space
Measure the clear cavity height before deciding. If you have only 8–9 inches of usable depth, R-30 with a denser material may be the practical choice. To reach R-38 you might need to:
- Raise the baffles or install rafter extensions.
- Add rigid foam above the roof deck.
- Consider converting an attic to conditioned space and insulating the roof plane instead of the ceiling.
Mobile homes and other nonstandard assemblies have tighter cavities; see our mobile home insulation options for tailored solutions.
Retrofit Challenges and Common Fixes
- Ventilation: When increasing depth, preserve intake and exhaust vents. Use baffles to keep vents clear.
- Recessed lights: Replace or box off non-IC-rated fixtures before covering with insulation.
- Wiring and HVAC: Avoid compressing insulation around ducts; reroute or insulate ducts to preserve capacity.
- Access: Staged installs (air-seal first, insulate later) help spread costs.
Estimating Incremental Cost and Payback
Incremental cost depends on material choices, local labor, and scale. Instead of quoting national averages, use a modeled approach: run your numbers through the insulation savings calculator to estimate annual savings and payback given your climate, fuel type, and installation method. For sheds and small buildings, the shed insulation calculator gives quicker approximations.
Tools and Techniques for DIY Installation
- Blown-in blower for cellulose or fiberglass when using loose-fill.
- Long-handled rake and knee pads for batt installs.
- Vapor-permeable roof underlayment and baffles for ventilation.
- Expandable foam or gaskets for attic hatch sealing.
- Use a tape measure to map depths in several attic bays before ordering materials.
Also consider complementary envelope upgrades such as exterior coatings if you plan broader renovations—our exterior coatings guide explains how coatings interact with insulation upgrades.
R-30 vs R-38 Insulation: Which Should You Choose? Scenario-based Recommendations
Small Cold-climate Cabin or Off-grid Home
Choose R-38 or higher in the ceiling/roof assembly if you have the depth and budget. If ceiling depth is limited, use closed-cell spray foam at the rafters or add continuous rigid foam to the exterior to reach effective R-38 while preserving airtightness. The higher R reduces fuel use and improves comfort during long cold snaps.
Mild Coastal or Temperate Climate Home
R-30 is often sufficient in unconditioned attics, particularly if you first air-seal attic bypasses and insulate ducts. Prioritize sealing and targeted upgrades before committing to the cost of R-38.
Tight Passive-style Build Prioritizing Airtightness
Focus on airtightness and thermal bridging reduction first—air sealing and continuous exterior insulation usually deliver bigger gains than jumping from R-30 to R-38 inside cavities. If cavity depth is limited, prefer spray foam or exterior rigid foam; consult passive building resources such as PHIUS guidance for whole-assembly strategies.
Limited-ceiling-depth Retrofits
Combine thin but high-performance layers: add 1–2 inches of polyiso and then fill the cavity with R-30 batt to approach the thermal performance of a deeper R-38 assembly while keeping existing rafter geometry.
Budget-first Diyers Who Want the Best Bang-for-buck
Air-seal now, insulate later. Use the insulation savings calculator to identify which rooms or roof areas show the best return and prioritize those locations. For small outbuildings, test options in the shed insulation calculator.
For small structure choices such as sheds and tiny cabins, see our insulating a shed article for compact-space recommendations. If window performance is also on your upgrade list, our piece on window upgrade considerations helps weigh glazing versus insulation investments.
R-30 vs R-38 Insulation: Quick Installation Checklist and Cost-saving Tips
Pre-install Checks (venting, Baffles, Wiring)
- Measure cavity depths across multiple bays before buying materials.
- Inspect and clear intake vents; add baffles where depth increases could block airflow.
- Identify lighting and electrical penetrations and plan to seal or box fixtures.
- Check for knob-and-tube wiring and consult an electrician if present.
Air-sealing Priorities Before Insulating
- Seal attic bypasses: top plates, chimneys, plumbing stacks, recessed lights.
- Install gaskets at attic hatch and seal with weatherstripping.
- Use expanding foam for rim-joist gaps and caulk for small penetrations.
See our air-sealing tips for step-by-step measures.
Smart Material Choices to Stretch a Budget
- Use blown cellulose where access and wall cavities allow to get more R per dollar.
- Consider staged insulating: do air sealing and add R-30 now; plan to add rigid foam later to reach R-38.
- Use polyiso or other rigid foam layers when cavity depth prevents thicker batts.
When to Hire a Pro
- If you have complex roof geometry, suspect moisture problems, or require closed-cell spray foam.
- For dense-pack cellulose in cathedral ceilings or for certified air-barrier systems tied to mechanical design.
- When code compliance or insurance requires documented assemblies or blower-door testing.
If you plan concurrent daylighting projects while in the attic, consider installing solar tubes during the same visit—see our guide on how to install solar tubes for tips on coordination.
The Bottom Line
R-30 vs R-38 insulation is a balance of depth, cost, and climate: pick R-30 where space or budget is tight and the climate is mild, and choose R-38 for cold climates or highly conditioned spaces. Remember that air sealing and reducing thermal bridging often deliver larger real-world gains than modest R-value increases—use the insulation savings calculator to test options for your site and heating fuel.
Frequently Asked Questions
How much deeper is R-38 than R-30 for common materials?
Typical depths vary by material: fiberglass batts commonly need about 8–9 inches for R-30 and 10–12 inches for R-38; blown cellulose often needs ~7–9 inches for R-30 and ~10–12 inches for R-38; closed-cell spray foam requires far less depth (roughly half the thickness) but costs more. These are typical numbers—always check manufacturer specs for exact R/inch ratings and plan for baffles and clearances.
Is R-38 worth it in mild climates?
In many mild climates, R-30 paired with thorough air sealing will meet comfort goals and offer better near-term value than R-38. The incremental savings from R-38 shrink in temperate zones. Use the insulation savings calculator to estimate payback for your climate and fuel type before deciding.
Can I mix insulation types to reach R-38?
Yes. A common approach is to combine rigid foam (polyiso, EPS, or XPS) for continuous insulation with batt or blown insulation in the cavity. That reduces thermal bridging and can achieve an effective R-38 without deepening rafters. See our comparison of polyiso vs EPS vs XPS and the spray foam vs cellulose article for guidance on combinations.
How does air leakage change the R-value I actually need?
Air leakage can cut effective thermal performance significantly. Fixing major leaks—attic bypasses, top plates, vents—often yields larger comfort and energy benefits than increasing cavity R-value. Prioritize air sealing before adding insulation where possible; our air-sealing tips cover the most common leak locations and practical fixes.
Will adding insulation cause moisture issues?
Moisture risk depends on assembly details and climate. Introducing continuous exterior foam or using closed-cell spray foam changes vapor profiles and can help control condensation if detailed correctly. Avoid blocking ventilation paths and ensure vapor control is appropriate for your region. If in doubt, consult building science guidance or a professional for assemblies in cold or mixed climates.