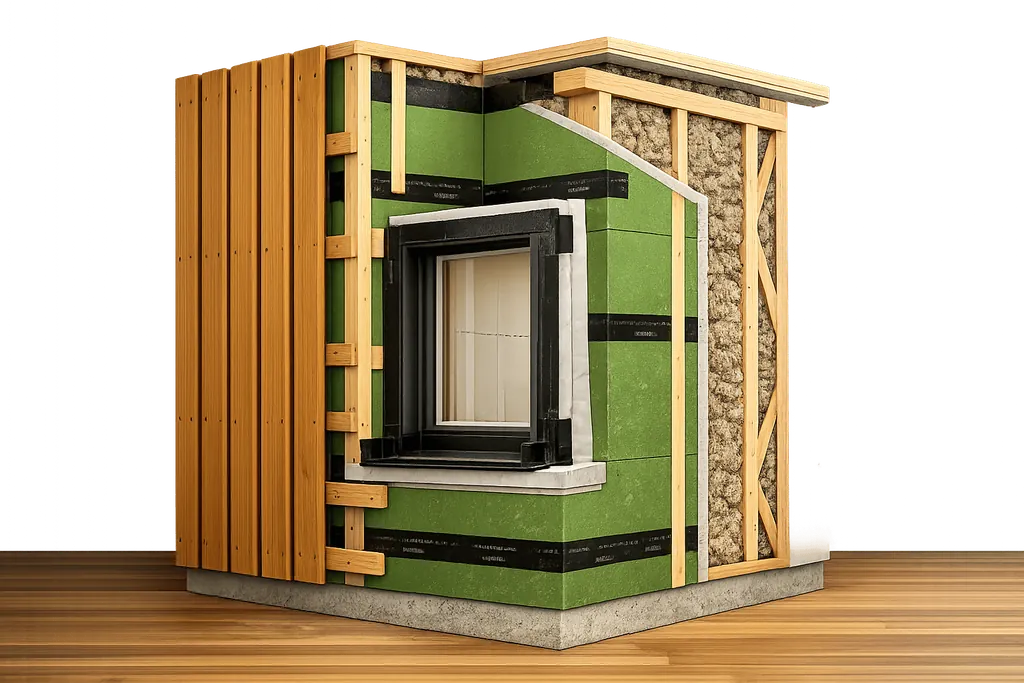
Step-by-step guide to building Larsen truss walls: framing, sheathing, rainscreen, window flashing, and dense-packed insulation for airtightness.
How to Build a Larsen Truss Wall (Step-by-Step)
Building a Larsen Truss Wall is an effective way to achieve high-performance insulation and airtightness, especially for Passive House projects. This method combines a structural 2x4 or 2x6 wall with external trusses to allow for uninterrupted insulation, reducing energy use and thermal bridging. Here's a quick summary of the process and key considerations:
- Framing: Use a 2x6 load-bearing wall as the structural core.
- Sheathing: Apply plywood or OSB as the air and vapor barrier, sealing all seams with high-performance tapes or liquid flashing.
- Trusses: Attach 12-inch I-joists or open-web trusses to create a cavity for dense-packed cellulose insulation, achieving R-values of R-36 to R-40 or more.
- Airtightness: Ensure airtight sheathing with meticulous sealing to meet Passive House standards (≤0.6 ACH₅₀).
- Moisture Control: Add a rain screen with furring strips for drainage and airflow behind the cladding.
- Windows: Position windows within the insulation layer using plywood bucks, flashing them carefully to prevent leaks.
- Soundproofing and Fire Safety: Choose sheathing and insulation materials that enhance acoustic and fire resistance.
This approach not only improves energy efficiency but also extends the durability of your wall assembly. By paying attention to details like airtightness, moisture management, and insulation continuity, you can create walls that perform reliably for decades.
Double-Stud Walls with Larsen Truss Wall System Design. Super-Insulated Passive House USA, Canada
Materials and Tools You'll Need
Constructing a Larsen Truss Wall calls for a carefully selected mix of materials to achieve a highly insulated and airtight assembly. Using the right combination of framing lumber, sheathing, insulation, and fasteners is essential to meet Passive House standards.
Materials List
Begin with 2x6 framing lumber for the primary structural wall. This forms the core structure, supporting all loads. For sheathing, opt for plywood or OSB on the wall's exterior, which acts as the main air and vapor control barrier.
Instead of traditional trusses with plywood gussets, use 12-inch I-joists (actual measurement: 11 7/8 inches) or open-web floor trusses. In January 2024, Passive House builder Josh Edmonds from New York shared his experience using 12-inch I-joists as Larsen trusses, securing them every 2 feet with structural screws to achieve exterior insulation values in the mid-R-40s range .
For insulation, dense-packed cellulose is a strong choice, offering R-3.7 per inch and costing about $2.78 per square foot for a 12-inch cavity . Alternatives include blown fiberglass, priced at around $1.80 per square foot (R-3.5 per inch), or mineral wool, which adds moisture control and fire resistance. Some builders also install a 1.5-inch wood fiberboard layer as a thermal break, adding an extra R-4 to the assembly.
Airtightness is a critical factor. Use high-performance tapes - acrylic adhesive tapes (3–4 inches wide) for vertical sheathing joints and butyl adhesive tapes (4–6 inches wide) for horizontal joints and window flashing. Additionally, you'll need structural screws for truss attachment, button cap nails for foam sheathing, and 1/4‑inch hardware cloth insect screening to protect the insulation cavity from pests.
Now, let's look at the tools you'll need to get the job done efficiently.
Required Tools
For the main wall construction, have framing nail guns and circular saws on hand. When working in tighter spaces, architect Steve Baczek suggests using a palm nailer or 90-degree driver for fastening screws into studs at right angles, making single-person installation easier.
To ensure the truss face is straight and plumb - especially when retrofitting older walls - use stringlines, shims, and levels. A dense-packing blowing machine is essential for filling deep truss cavities with cellulose or mineral wool, preventing settling and air loops.
To achieve Passive House–level airtightness, invest in pressure rollers for bonding high-performance tapes securely to sheathing surfaces. Keep caulk guns ready for sealing window bucks and penetrations, and make sure to clean surfaces before applying tape to ensure proper adhesion.
With these materials and tools, you'll be well-prepared to build a high-performing Larsen Truss Wall.
How to Build a Larsen Truss Wall (Step-by-Step)
::: @figure 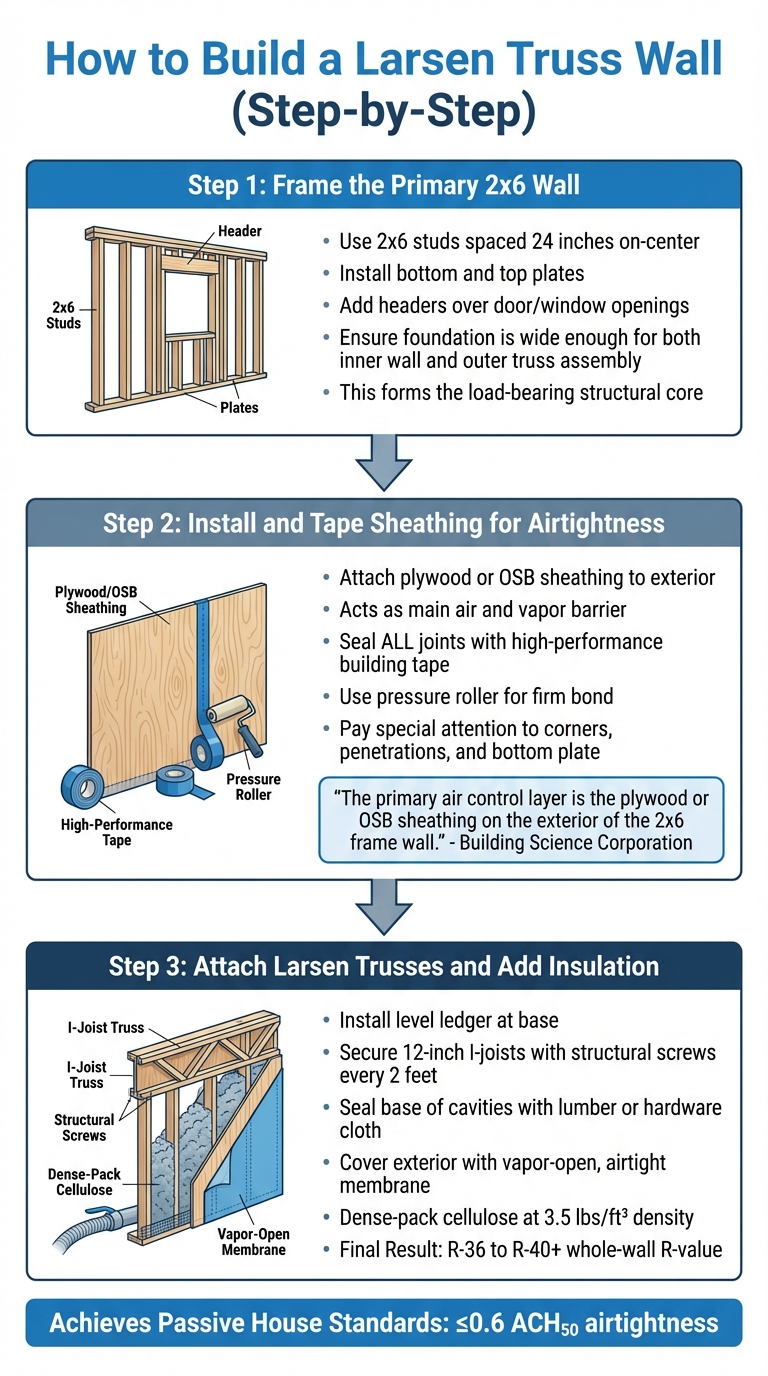 :::
:::
Creating a Larsen Truss Wall involves three key phases: framing the structural wall, sealing the sheathing for airtightness, and attaching trusses with insulation. Each stage is crucial for achieving the high-performance standards of a Passive House. Here’s how to tackle each step effectively.
Step 1: Frame the Primary 2x6 Wall
Start by building a sturdy load-bearing wall using 2x6 studs spaced 24 inches on-center. This wall serves as the backbone, supporting all loads while providing space for insulation.
To frame the wall, install bottom and top plates, position the studs, and add headers over openings like doors and windows. Make sure the foundation or sill is wide enough to accommodate both the inner wall and the outer truss assembly. This prevents the need for complicated cantilevering fixes later on.
Step 2: Install and Tape Sheathing for Airtightness
Attach plywood or OSB sheathing to the exterior of the framed wall. This layer acts as the main air and vapor barrier. Many builders prefer plywood because it becomes more vapor-permeable when wet, allowing the assembly to dry more easily.
Seal all sheathing joints immediately using high-performance building tape. Use a pressure roller to firmly bond the tape, ensuring a long-lasting airtight seal. Be meticulous around corners, penetrations, and the bottom plate connection, as these areas are prone to air leaks.
> "The primary air control layer is the plywood or OSB sheathing on the exterior of the 2x6 frame wall." - Building Science Corporation
Once the sheathing is airtight, you’re ready to move on to the truss installation.
Step 3: Attach Larsen Trusses and Add Insulation
Begin by installing a level ledger at the base of the wall to support the trusses. Secure the trusses by fastening them through the sheathing into the studs with structural screws placed every 2 feet. Alternate the screws on each side of the truss web for added stability.
Before adding insulation, seal the base of the truss cavities with lumber, sheet goods, or hardware cloth to prevent insulation from escaping and to keep pests out. Then, cover the exterior face of the trusses with a vapor-open, airtight membrane. This layer contains the insulation and acts as a secondary weather barrier.
Finally, dense-pack the truss cavities with cellulose insulation at a density of 3.5 lbs/ft³ to prevent settling. Use a leap-frog blowing method to ensure consistent density throughout. When complete, a 12-inch assembly built this way achieves a whole-wall R-value of around R-36, with some designs reaching R-40 or higher depending on the truss depth.
How to Achieve Passive House-Level Airtightness
Passive House certification sets a high bar for airtightness, requiring no more than 0.6 air changes per hour at 50 pascals (n₅₀ ≤ 0.6 ACH₅₀). To meet this standard, the sheathing layer must be meticulously sealed. Any gaps in the air barrier can compromise thermal performance and lead to condensation issues.
In a Larsen Truss wall, the plywood or OSB sheathing serves as the primary air barrier. Achieving airtightness means sealing every joint, penetration, and transition without exception. Even minor imperfections can derail your efforts to meet Passive House standards.
Best Sheathing Options for Airtightness
Both plywood and OSB (such as the ZIP System) can deliver excellent airtightness when installed and sealed correctly.
The ZIP System sheathing is a popular choice because it combines sheathing and a built-in weather barrier, eliminating the need for separate housewrap. It also provides a smooth surface for tape adhesion. On the other hand, standard plywood requires more preparation but allows for flexibility in selecting vapor permeability, which can be tailored to your specific climate zone.
Regardless of the material, proper sealing is non-negotiable. Use high-performance acrylic adhesive tapes and apply them with a pressure roller to ensure strong adhesion. Surfaces must be clean, dry, and free of dust. Temperatures below 15°F can cause tape failure, leading to air leaks that compromise airtightness.
Taping vs. Liquid Flashing for Sheathing Seams
Both taping and liquid flashing can achieve Passive House-level airtightness, but each method has its strengths depending on the application.
| Method | Best Applications | Advantages | Limitations |
|---|---|---|---|
| Acrylic Tape | Straight seams on sheathing panels | Quick installation, UV resistant, proven in Passive House projects | Requires precise application and pressure rolling; edges can lift if misapplied |
| Liquid Flashing | Complex geometries, rough openings, uneven surfaces | Seamless coverage, conforms to irregular shapes, no wrinkling | More expensive, requires correct thickness for effectiveness, longer curing time |
For most projects, a combination of both methods works best. Use acrylic tape for straight sheathing seams to save time and money. For tricky areas like window openings, corners, or irregular surfaces, liquid flashing provides a seamless seal that tape can’t match.
When taping horizontal seams, offset the tape so that two-thirds overlaps the upper panel and one-third overlaps the lower panel. This creates a shingle effect that directs water away from the joint. To further reduce risk, consider orienting panels vertically to minimize horizontal seams altogether.
Attention to detail in surface preparation and sealing techniques is key to achieving Passive House airtightness. A strategic mix of materials and methods ensures efficiency without sacrificing performance.
Design Considerations for Larsen Truss Walls
When working with Larsen Truss walls, attention to design details is essential to optimize their performance. These walls go beyond simply adding insulation; their thicker assembly introduces challenges like managing moisture, addressing thermal bridging, and integrating windows effectively. Tackling these considerations early on can help avoid complications later. Below, we’ll explore key design elements to ensure a well-performing Larsen Truss wall.
What Is a Rain Screen and Why Is It Important?
A rain screen is a system designed to manage moisture by creating a drainage and ventilation gap behind the wall's cladding. This air gap allows water to drain away and promotes airflow, which helps dry the assembly and prevents water from lingering .
For Larsen Truss walls, the rain screen is typically created by installing vertical furring strips over the Weather Resistant Barrier (WRB). This setup forms a continuous air gap - usually at least 3/8 inch - from top to bottom . Water that gets past the cladding drains downward, while air circulation helps dry the wall assembly.
Because these walls often use dense-packed cellulose insulation, a rain screen becomes even more critical. It allows any absorbed moisture to dry efficiently. For example, builder John Hodges achieved an approximate R-65 rating by combining 1.5-inch ECO4 wood fiberboard insulation, 11 7/8-inch I-joists, and strapping .
Some builders prefer polymer drainage mats with a 93% open design instead of wood furring strips. These mats ensure a consistent capillary break and speed up drying, though traditional wood furring strips remain the more budget-friendly choice for most projects .
Once moisture management is in place with a rain screen, the next step is to carefully detail corners to maintain insulation continuity.
How to Detail Corners for Continuous Insulation
Corners in Larsen Truss walls need special attention to maintain a continuous insulation cavity while still providing adequate support for cladding. The goal is to avoid using solid wood in corners, as it can create thermal bridges.
A practical solution is prefabricating a corner truss by joining two straight trusses at a right angle. One side is nailed directly to the house, and the adjacent gap is bridged with short horizontal truss sections spaced every 24 inches . If I-joists are used, an additional joist can be fastened perpendicular to the corner joist, with horizontal 2x4s or plywood/OSB connecting the ends .
> "To cope with outside corners, we've found it easiest to prefabricate a corner truss from two straight trusses. One side of this right-angle truss is then nailed directly along one edge of the corner of the house." - John Hughes, Builder
To keep the cavity open for insulation, avoid solid wood blocking. Instead, use ladder-style blocking or plywood gussets. Ensure the detailing provides enough surface area for securely attaching corner boards and siding .
How to Flash Windows in Thick-Wall Assemblies
Properly flashing windows in a Larsen Truss wall is key to maintaining airtightness and minimizing thermal bridging. This process requires careful planning.
Instead of mounting windows with exterior nail flanges, they should be positioned in the thermal middle of the wall assembly . This involves building a plywood box, often called a "buck", that extends from the inner framing to the outer plane of the wall. The buck must be flashed and air-sealed directly to the primary wall sheathing before attaching the trusses .
To install, cut the opening in the sheathing, apply flashing or high-performance tape around the perimeter, and then fit a level, plumb plywood buck that spans the wall's thickness. Seal all joints thoroughly and over-insulate the window frame to reduce thermal bridging .
For heavier attachments like decks or porches that must penetrate the thick wall, use specialized stand-off brackets. These brackets are secured directly to the structural wall, as standard fasteners may not reach through the non-structural trusses to the load-bearing frame .
How to Prep Walls for Siding and Cladding
Once you've installed airtight sheathing and window flashing, it's time to prepare your wall exterior for siding. After insulating your Larsen Truss wall and setting up the rainscreen system, the next step is to maintain the ventilation gap while securing the cladding.
Start by applying a _vapor-open membrane_ like Siga Majcoat over the trusses. This membrane protects the dense-packed cellulose insulation from liquid water while allowing moisture to escape, ensuring the wall assembly stays dry and functional .
Next, attach 1x3 or 1x4 furring strips to the exterior of the trusses to create a rainscreen gap. For horizontal siding, use a lattice pattern: begin with a horizontal layer of furring strips, followed by a vertical layer. This setup ensures proper drainage and provides a sturdy surface for nailing the siding. The gap should be at least 3/8 inch, but 3/4 inch is ideal for better airflow and drainage .
For example, in early 2024, Passive House builder Josh Edmonds from New York used 12-inch I-joists as Larsen trusses and applied Siga Majcoat over them to contain dense-packed cellulose. His team then created a ventilated rainscreen gap by installing a lattice pattern of furring strips before adding the final cladding . Similarly, in 2019, builder John Hodges in Perth, Ontario, used 1.5-inch wood fiberboard rigid insulation, a weather-resistant barrier, and strapping to create a rainscreen gap for his Passive House .
To optimize airflow, include vents at both the top and bottom of the rainscreen system. Use insect screening combined with solid blocking, such as pressure-treated lumber or synthetic deck boards, at the base. Also, make sure the rainscreen battens don’t obstruct window frames, allowing for uninterrupted ventilation throughout the system .
How Sheathing Choice Affects Soundproofing and Fire Safety
When building high-performance Larsen Truss walls, the choice of sheathing plays a crucial role in soundproofing and fire safety. While all three common materials - plywood, OSB, and fiberboard - offer basic protection, their performance in these areas can vary significantly.
For soundproofing, fiberboard is the top performer. Its dense, fibrous structure makes it highly effective at dampening sound, especially in thick-wall assemblies. In contrast, plywood and OSB provide only moderate acoustic insulation .
On the fire safety front, the materials behave differently under high heat. Plywood and OSB, being wood-based, are combustible and have similar fire ratings. However, polyisocyanurate sheathing stands out for its ability to char rather than melt when exposed to intense heat, which helps limit flame spread and improves fire resistance . Additionally, using cellulose insulation treated with borates can further enhance fire protection by slowing flame spread and safeguarding the framing .
When choosing a sheathing material, it's essential to weigh fire and acoustic performance alongside other factors like moisture management. For example:
- Plywood offers a balance of strength and vapor control.
- Fiberboard excels in soundproofing and drying capabilities.
- OSB is a cost-effective option but provides less moisture buffering .
Ultimately, your decision should align with the specific needs of your project, balancing these critical performance aspects.
Conclusion
Constructing a Larsen Truss wall demands close attention to three essential principles: structural sequencing, material choices, and meticulous detailing. Start with a sturdy 2x6 wall, seal it with taped sheathing, and attach trusses to create a continuous insulation cavity. This method ensures your structural sheathing stays warm and protected, minimizing condensation risks.
The key to success lies in achieving the right R-value balance - approximately two-thirds of the total insulation should be on the exterior of the sheathing. When done correctly, this system can deliver insulation levels exceeding R-50. For example, a home in Vermont reached a HERS index of 46 while cutting energy use by 64% compared to a standard IECC\-compliant house .
Your sheathing serves as the critical control layer for air, vapor, and water. Once it's enclosed by the truss system, repairs become extremely difficult. To ensure durability, use high-quality acrylic tapes for sealing seams and choose insulation that can safely handle moisture redistribution. Dense-pack cellulose, at a density of 3.5 lbs/ft³, offers excellent thermal performance and allows the assembly to dry if a flashing leak occurs .
Finishing touches are just as important for maximizing performance. Install a rain screen with furring strips to create a ventilated gap behind the cladding. Pay close attention to window bucks, ensuring they are flashed directly to the primary sheathing. Protect the bottom of the trusses with solid blocking and insect screens to keep pests out of the insulation cavity .
Durability plays a significant role in sustainability - extending a building's lifespan effectively doubles its resource efficiency . By applying these principles carefully at every connection and transition, you can create a wall assembly capable of meeting Passive House standards and performing reliably for decades. This approach underscores the importance of the techniques outlined above.
FAQs
What makes a Larsen Truss Wall a great choice for energy-efficient construction?
A Larsen Truss Wall is a smart option for energy-efficient construction because it supports thicker insulation layers and reduces thermal bridging, which plays a big role in cutting down heat loss. With this design, you can achieve high R-values - often surpassing R-36 when using dense-packed cellulose insulation. This makes it a great fit for projects aiming to meet or exceed [passive house](/blog/erv-vs-hrv-ventilation-system-better-home) standards.
By enhancing insulation and ensuring tight [air sealing](/blog/best-diy-air-sealing-materials-techniques-beginners), Larsen Truss Walls boost energy efficiency, lower heating and cooling expenses, and create a home that's both more comfortable and environmentally friendly.
Should I use tape or liquid flashing for sealing sheathing seams?
When deciding between tape and liquid flashing, it all comes down to the specific requirements of your project. Tape for sheathing seams works well on flat, smooth surfaces, offering a strong and continuous air and water barrier. Meanwhile, liquid flashing shines when dealing with irregular or tricky joints, as it creates a flexible, seamless seal that conforms to uneven surfaces.
To choose the right option, think about the seam complexity, the type of sheathing you're using, and the guidance provided by the manufacturer. Both methods can deliver airtight and watertight results when applied properly.
What is a rain screen, and how does it help manage moisture?
A rain screen plays an important role in keeping walls safe from moisture-related issues. It works by creating a ventilated gap between the outer cladding and the wall structure. This gap allows any water that sneaks behind the cladding to drain away, while the airflow helps dry out lingering moisture.
By preventing water damage, mold growth, and rot, rain screens enhance the durability of your walls and help maintain your home’s energy efficiency. Plus, keeping the wall cavity dry improves insulation performance and supports a healthier indoor environment.