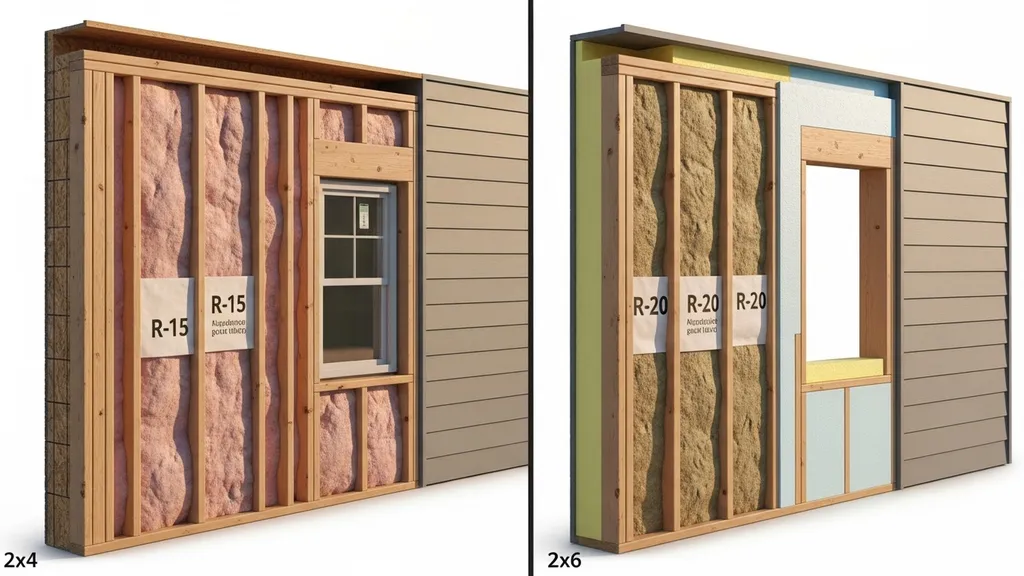
Compare R-15 and R-20 insulation — performance, cost, installation, and which is best for your walls, attic, or retrofit project.
R-15 vs R-20 Insulation: Which Do You Need?
R-15 vs R-20 insulation is a common decision for budget-conscious DIY self-builders deciding between 2x4 and 2x6 wall assemblies, retrofit options, or higher-R thin-wall strategies. This article compares what each R-value actually means in real wall assemblies, how to achieve R-15 or R-20 with batts, dense-pack, rigid foam, or spray foam, and which choice makes sense by climate, wall depth, and budget. Readers will get clear installation tips, common mistakes to avoid, and scenario-based recommendations so they can pick the most cost-effective path for their project.
TL;DR:
- R-15 matches a standard 2x4 batt (≈3.5"), suitable for mild climates and interior partitions; choose when wall depth or budget is limited.
- R-20 is typical for 2x6 cavities (≈5.5") or achieved with rigid foam or spray-foam hybrids; it reduces heat flow roughly 15–25% vs R-15, so favor it in cold climates and new builds.
- If cavity depth is constrained, use continuous rigid foam or closed-cell spray foam (higher R/in) or use dense-pack cellulose for retrofits; run the insulation savings calculator to compare payback.
R-15 vs R-20 Insulation: Quick TL;DR + Comparison Table
TL;DR Summary
For DIY builders the main trade-offs are cavity depth, thermal bridging, air sealing, and cost. R-15 is the typical target for a 2x4 stud wall with fiberglass or mineral wool batts. R-20 is common in 2x6 walls, dense-packed cellulose, or when combining cavity fill with continuous rigid insulation. Energy-efficiency gains depend on climate and airtightness more than a single R increment; see Energy Star's guidance for cost-effective R-values in different climates: Recommended home insulation R–values - Energy Star.
Side-by-side Comparison Table
| Typical assembly | Typical thickness | Common materials | U-factor / relative heat flow | Typical cost per sq ft | Best uses |
|---|---|---|---|---|---|
| 2x4 batt (R-15) | ~3.5" | Fiberglass, mineral wool | Higher heat flow (worse) | low–moderate | Mild climates, interior walls, simple retrofits |
| 2x6 batt (R-20) | ~5.5" | Fiberglass, dense-pack cellulose, mineral wool | Lower heat flow (better) | moderate–higher | Cold climates, new 2x6 walls |
| 2x4 + 1" polyiso | cavity + 1" | Polyiso board + batt | Similar to R-20 (reduced bridging) | moderate | Thin-wall upgrade without re-framing |
| Continuous polyiso/XPS | Varies | Polyiso, XPS, EPS | Low heat flow, reduces thermal bridging | moderate–higher | New builds, passive-house strategies |
| Spray foam hybrid | Thin cavity + foam | Closed-cell/open-cell spray | Very low heat flow, airtight | higher | Rim-joists, tiny homes, mobile homes |
For broader whole-house R planning compare wall targets to recommended attic R-values in our attic insulation guide and use the insulation savings calculator to model payback.
R-15 vs R-20 Insulation: What R-15 Means (2x4 Cavity Batt)
Overview of Assemblies That Yield R-15
R-15 commonly refers to the thermal resistance delivered by standard batts sized for a 2x4 stud cavity — roughly 3.5 inches of depth. Typical materials are fiberglass batts and some mineral wool products sized for 2x4 cavities. The Department of Energy offers a helpful catalog of insulation types and typical installed performance: Types of insulation | Department of Energy.
In practice, an "R-15" batt delivers its rated performance only when installed correctly: full cavity fill, no compression, and with an effective air barrier or sealed drywall. Compression, gaps, and bypasses reduce effective R-value significantly.
Strengths
- Lower material cost and easy availability.
- Simple DIY installation for new walls and retrofits where drywall is removed.
- Fits within standard 2x4 framing, keeping wall thickness and foundation sizing minimal.
- Works well for interior partition walls or in warm/mild climates where incremental insulation returns diminish.
Weaknesses
- Less thermal resistance than R-20; more heat flow in cold climates.
- Performance drops if batts are compressed or gaps occur at framing members or around wiring.
- Offers limited mitigation of thermal bridging through studs; studs conduct heat across the insulation layer.
- Requires careful air sealing to realize expected savings — see the air-sealing checklist.
Best For
- Mild climate zones where code minimums and cost-effectiveness favor thinner assemblies.
- Budget-first retrofit projects where re-framing or exterior work is impractical.
- Interior non-load-bearing walls or garages where thermal control demands are low.
R-15 vs R-20 Insulation: What R-20 Means (2x6 Batt and Dense-pack)
Overview of Assemblies That Yield R-20
R-20 is typically achieved with standard batts sized for 2x6 cavities (approximately 5.5 inches), dense-packed cellulose in a 2x6 cavity, or higher-density mineral wool batts. When installed as intended, dense-pack cellulose also improves airtightness and reduces convective loops inside cavities.
Industry guidance shows that moving from R-15 to R-20 in wall cavities reduces heat flow by a noticeable margin — often in the 15–25% range depending on climate and detailing — but actual savings depend on air sealing and thermal bridging. The Insulation Institute provides details on fiberglass and other batt products and proper installation techniques: A guide to selecting fiber glass insulation products for new ....
Strengths
- Better thermal resistance for cold climates; reduces heating load and peak demand.
- Fits common 2x6 framing without adding exterior thickness when cavity-only approach is used.
- Dense-pack cellulose adds sound control and improved convective control inside cavities.
- Longer-term energy savings in heating-dominated climates can outweigh higher material costs.
Weaknesses
- Increased wall thickness affects window jamb depth, trim, and some architectural details.
- Cavity-only R-20 still suffers thermal bridging through studs; continuous insulation still helps.
- Marginal returns in very mild climates; the extra cost may take longer to pay back.
Best For
- New builds with 2x6 walls in cold and mixed climates.
- Homeowners prioritizing long-term energy savings and comfort.
- Renovations where cavity depth exists or where exterior insulation is not possible.
R-15 vs R-20 Insulation: Achieving R-20 with Rigid Foam (polyiso, XPS, EPS)
How Rigid Foam Gives Higher R Per Inch
Rigid foam boards — polyisocyanurate (polyiso), extruded polystyrene (XPS), and expanded polystyrene (EPS) — have higher R per inch than typical fibrous batts. Polyiso commonly offers the highest R/in at moderate temperatures, but its published R-value decreases at low ambient temperatures; this is a well-documented manufacturer/industry point explored in technical comparisons. Using continuous exterior rigid insulation also reduces thermal bridging across studs, allowing lower cavity R to achieve similar whole-wall performance.
For prescriptive code and assembly examples that include exterior rigid foam strategies, see California’s code guidance: 2019 Energy Code Insulation and QII Requirements (PDF).
Common Board Choices and Real R-values
- Polyiso: high R/in at room temp, reduced performance at cold temperatures.
- XPS: consistent R/in, better moisture resistance and compressive strength than EPS.
- EPS: lower R/in but very moisture-tolerant; lowest embodied cost.
For an in-depth technical comparison of these boards, see our guide: polyiso vs eps vs xps foam board energy efficiency.
Strengths
- Achieve R-20 whole-wall equivalents with slimmer total thickness than cavity-only approaches.
- Continuous exterior foam reduces thermal bridging and stabilizes sheathing temperatures.
- Allows existing 2x4 framing to meet higher whole-wall R targets without re-framing.
Weaknesses
- Polyiso’s temperature-dependent R-value can reduce effectiveness in very cold climates.
- Exterior foam requires careful flashing and moisture detailing at windows, doors, and roof intersections.
- Costs are moderate–higher, and trades need to install proper WRB/air-barrier layers.
Best For
- Projects where cavity depth is constrained (2x4 walls) but higher insulation is desired.
- Builders targeting passive-house-like reductions in thermal bridging with slimmer walls.
- Retrofitting existing walls where adding exterior foam is practical for siding replacement.
Embed idea: The combination "2x4 + 1\" polyiso" often matches R-20 whole-wall performance versus a 2x6 cavity-only wall while reducing thermal bridging.
R-15 vs R-20 Insulation: Spray Foam & Hybrid Assemblies
Closed-cell and Open-cell Options
Spray polyurethane foam comes in two common forms: closed-cell (higher density, higher R/in, acts as a vapor retarder and structural stiffener) and open-cell (lower density, lower R/in, more vapor-permeable). Closed-cell spray foam can deliver R-values competitive with rigid foam in thin assemblies and provides an effective air barrier when applied correctly.
Hybrids combine a thin layer of spray foam (for air sealing and vapor control) with batt or cellulose to reach target R-values while controlling cost.
For lifecycle and carbon comparisons between spray foam and cellulose, see: Spray Foam vs Cellulose Insulation — Pros, Cons and Carbon Impact for Homes.
How Hybrids Reach or Exceed R-20
- Closed-cell spray foam: at typical 2–3" thickness it can supply R close to or above R-20 depending on formulation.
- Hybrid: 1–2" closed-cell spray foam + R-13 / R-15 batt can reach R-20 whole-cavity performance while achieving airtightness.
- Dense-pack cellulose combined with interior foam sheathing can also meet R-20-equivalent goals in retrofit situations.
Strengths
- High R per inch useful for tiny homes, mobile homes, and rim-joists.
- Spray foam creates a continuous air barrier, improving actual installed R by reducing convection losses.
- Hybrids reduce the total amount of expensive spray foam needed.
Weaknesses
- Higher upfront cost and greater embodied carbon compared with cellulose or fiberglass.
- Closed-cell spray foam is typically a professional install due to safety and application risks; DIY kits exist but carry exposure risk.
- Vapor profile and moisture management must be planned; closed-cell foam can trap moisture if used incorrectly.
Best For
- Tiny homes, mobile homes, and cabins where wall thickness is constrained — see mobile-home guidance: best insulation for mobile home materials and r values.
- Rim-joists, irregular cavities, and high-performance retrofit pockets.
- Projects where airtightness is a high priority and budget allows professional application.
Also consider low-toxicity alternatives such as cork for small builds: using cork as insulation.
R-15 vs R-20 Insulation: How Climate, Code, and Wall Type Change the Choice
Climate Zone Decision Guide
Climate should be the first filter. In cold, heating-dominated zones, incremental R-value in walls yields more heating energy savings than in warm climates. Energy Star’s recommended R-values by climate can help weigh this: Recommended home insulation R–values - Energy Star. Local building code (IECC or state code) sets minimums; always confirm with your jurisdiction.
Building Code and Minimums
Building codes reference cavity and continuous insulation minimums depending on climate and assembly. For example, prescriptive paths often allow combinations of cavity and continuous insulation to meet the same whole-wall thermal requirement — see the California prescriptive approach documentation for details: 2019 Energy Code Insulation and QII Requirements (PDF). Check local adoption of IECC tables for precise minimums.
Wall Assemblies and Thermal Bridging
Thermal bridging through studs reduces whole-wall performance. Continuous exterior insulation mitigates this. To visualize trade-offs and detailing (air-sealing sequences, flashing, and staging), watch a practical installation video comparing 2x6 batt and exterior rigid foam. The video shows how to detail windows, stack insulation layers, and reduce thermal bridging:
For a visual demonstration, check out this video on choosing the right type of exterior insulation (what:
For glazing upgrades that complement wall insulation decisions, consult our guide on window upgrades: triple-pane window cost guide.
R-15 vs R-20 Insulation: Installation Tips, Common Mistakes, and Cost Considerations
Top Installation Tips for Diyers
- Measure cavity depth and buy batts sized to match; do not compress R-15 batts into smaller cavities.
- Seal top plates, electrical boxes, and penetrations before insulating to prevent bypass airflow; see common air leakage points in our common air leakage points article.
- Install continuous exterior insulation with a proper WRB and flashings; see passive-house roof strategies in our exterior roof insulation guide.
- For spray foam, hire a certified applicator for closed-cell work; for open-cell, ensure you understand the vapor profile in your climate.
- For retrofits, consider dense-pack cellulose to fill old cavities without removing exterior cladding.
Also review attic-specific material trade-offs in our attic material comparison.
Five Common Mistakes That Reduce R-value
- Compressing batts into narrower cavities.
- Leaving gaps at top plates, around windows, and behind wiring.
- Skipping an air barrier or failing to tape/mask joints in continuous foam.
- Using polyiso exterior without accounting for low-temperature R-value loss in cold climates.
- Neglecting flashings and drainage planes when adding exterior foam.
Payback and Cost Factors
Material costs vary; use qualitative ranges: R-15 batt is low–moderate cost, R-20 cavity batts are moderate–higher, rigid foam and spray foam are moderate–higher to higher. Labor and complexity increase cost: exterior foam needs siding removal or staging; spray foam often requires pros. Run the insulation savings calculator to compare incremental savings, and review labor trade-offs in our labor cost comparison.
For small builds like sheds or tiny cabins, the shed insulation calculator can help size material and budget.
R-15 vs R-20 Insulation: Which Should You Choose? Scenario-based Recommendations
New Build — 2x4 vs 2x6 Wall Decision
- If framing with 2x6 and building in a cold or mixed climate, choose R-20 cavity batts or a hybrid with continuous insulation to reduce bridging.
- If constrained to 2x4 and targeting higher performance, add continuous rigid foam or use high R/in systems like closed-cell spray foam.
Retrofit — Constrained Cavity Walls
- For existing 2x4 walls, add continuous exterior foam when siding needs replacement — this can reach R-20 whole-wall equivalence without re-framing.
- If exterior work isn’t possible, dense-pack cellulose can raise effective cavity performance and improve air sealing.
Tiny Homes, Sheds, and Mobile Homes
- Prioritize high R/in materials: closed-cell spray foam or rigid foam are common choices. See our best insulation for sheds and mobile-home insulation tips for tailored guidance.
Budget-first vs Performance-first Pathways
- Budget-first: accept R-15 in mild climates, focus on airtightness, and consider incremental exterior foam later.
- Performance-first: invest in R-20 cavity or continuous foam upfront; this reduces future heating loads and may allow smaller mechanical systems.
Action steps to take now:
- Measure cavity depth and inventory existing cladding and window conditions.
- Run the insulation savings calculator with local energy prices and heating fuel.
- Choose a material that matches cavity depth, moisture risk, and installation skill — if unsure, consult the spray foam vs cellulose analysis for embodied carbon and cost trade-offs.
For a full small-cabin build perspective that applies these choices, see our cabin build complete guide.
The Bottom Line
R-15 is fine for 2x4 walls in mild climates or budget retrofits, but R-20 (via 2x6 cavities, dense-pack, or combined continuous foam strategies) delivers noticeably better thermal performance in cold and mixed climates. Choose based on climate zone, cavity depth, and whether you can add continuous insulation; always prioritize airtightness alongside R-value for the best real-world results.
Frequently Asked Questions
Can you compress R-20 into a 2x4 cavity?
Short answer: no. Compressing higher-R batts into a shallower cavity reduces their rated R-value; the insulation becomes denser but loses performance due to reduced trapped air. To achieve R-20 in a 2x4 wall, use continuous exterior rigid foam or high-R/in spray foam rather than compressing batts.
Is continuous exterior foam better than thicker batts?
Continuous exterior foam reduces thermal bridging by covering studs and sheathing, improving whole-wall U-factor even if cavity R is lower. This often yields better whole-wall performance than cavity-only increases and can allow a 2x4 wall to match a 2x6 cavity's thermal performance with less total thickness. Proper WRB and flashing detailing are required for durability; see the California code guidance on prescriptive approaches for examples: https://www.energy.ca.gov/sites/default/files/2020-09/2019%20Insulation%20and%20QII%20Requirements_v3_ADA.pdf.
How much energy will I actually save by moving from R-15 to R-20?
Energy savings vary by climate, airtightness, and the rest of the building envelope. Typical modeled reductions in heat flow are roughly 15–25% moving from R-15 to R-20 in the wall cavity, but actual annual energy savings depend on heating degree days and existing air leakage. Use the insulation savings calculator with local weather data to estimate payback for your project.
Are there moisture risks with rigid foam or spray foam?
Yes—moisture management depends on climate, assembly, and material. Closed-cell spray foam can act as a vapor retarder and is appropriate in some conditions, while polyiso exterior foam can trap moisture if not detailed with a proper drainage plane. For detailed design, consult code guidance and manufacturer technical data sheets and consider vapor-permeability in your climate zone when selecting materials.
Which option is best for a tiny cabin?
Tiny cabins often benefit most from high R-per-inch systems: closed-cell spray foam or rigid foam plus batt/hybrid approaches because wall depth is limited. For many tiny builds, a thin layer of closed-cell spray for air sealing plus cavity fill with fiberglass or cellulose balances cost, thickness, and thermal performance; see our tiny-structure insulation notes in the best insulation for sheds guide.