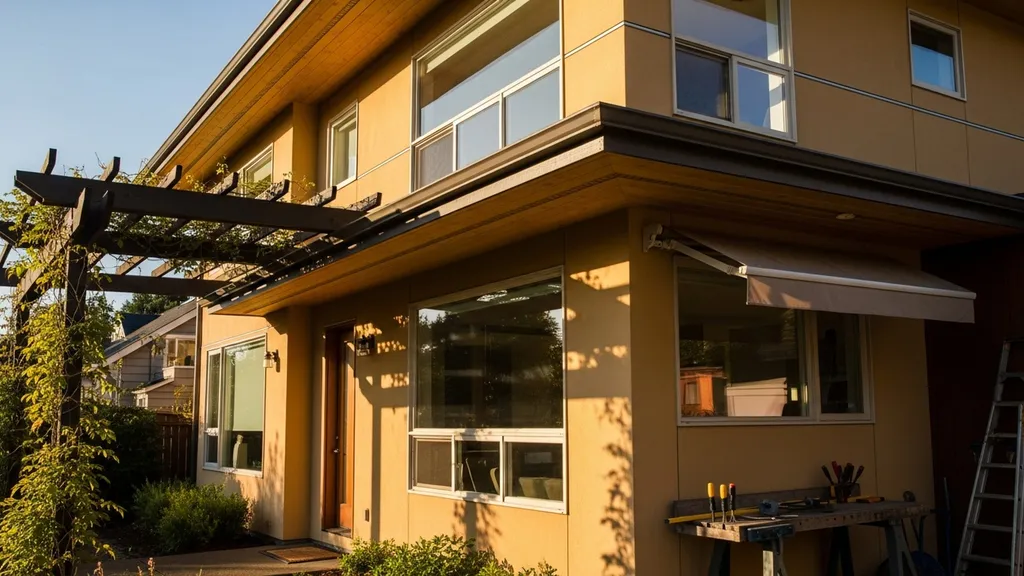
Practical guide to designing and installing window shading and overhangs to control solar heat gain and improve passive solar performance for DIY builders.
Window Shading and Overhangs: Passive Solar Design
Window shading is one of the simplest, highest-impact strategies to control solar heat gain and improve comfort in a passive solar house. This guide explains how window shading and overhangs work, gives step-by-step sizing instructions, compares common shading devices, and shows climate-specific approaches so a DIYer can cut cooling loads and keep winter solar gains where they matter. Expect practical numbers (percent reductions, depth-to-height rules of thumb), material options, and retrofit tips that fit a tight budget.
TL;DR:
- Properly sized overhangs can reduce summer solar heat gain on south windows by 30–60% and lower peak cooling demand by a similar margin.
- Use sun-angle trig (tan of solar altitude) to size a fixed overhang; a quick rule-of-thumb is overhang depth ≈ 0.5–0.8 × window head height for mid-latitudes.
- Match shading type to climate: deep fixed overhangs and low SHGC windows for hot climates; adjustable shading or minimal overhangs plus high-SHGC south glazing in cold climates.
How Window Shading and Overhangs Control Solar Heat Gain
Understanding how window shading reduces solar heat gain starts with two basic window metrics: U-value (thermal transmittance) and SHGC (solar heat gain coefficient). SHGC measures the fraction of incident solar radiation that enters through the glazing as heat. Lower SHGC means less solar gain.
Solar geometry is the mechanism: summer sun follows a higher path (higher altitude) than winter sun. A horizontal overhang sized to intercept high summer angles can block most direct irradiation while allowing low winter sun to enter for passive heat. Orientation matters: south-facing windows are ideal for fixed overhangs; east and west face low-angle sun that bypasses shallow horizontal shading.
Research and guidance from the Department of Energy and the Building America Solution Center show typical summer cooling reductions of 30–60% for well-shaded south windows compared with unshaded glazing. For comparison, upgrading from single-pane to double-pane low-e glass might reduce annual heat transfer by similar orders, but shading targets short-term peak solar loads more efficiently. See the Department of Energy–style guidance at the Building America Solution Center's shading guide.
Simple numeric example: a south-facing 4' × 6' window without shading receives roughly 2,000–2,500 W at peak solar noon on a clear summer day (varies by latitude and time). A correctly sized overhang that blocks direct summer sun can cut that direct solar gain by ~50–60%, turning 2,000 W into ~1,000–1,200 W of reduced peak input. That shifts cooling loads, lowers peak demand, and can reduce HVAC capacity needs in many small homes.
For basic background on how glazing properties change performance and why shading matters, see our primer on window energy basics.
Solar Geometry Basics: Sun Angle and Window Orientation
- Solar altitude: Angle above the horizon; higher in summer.
- Solar azimuth: Compass direction of the sun; affects east/west exposure.
- Orientation rule: Fixed horizontal overhangs perform best on true south exposures in the Northern Hemisphere.
How Shading Affects Summer Cooling vs Winter Heating
- Summer: Blocks direct beam radiation, cutting peak cooling loads.
- Winter: Properly sized shading allows low-angle sunlight to enter, aiding passive heating.
Measured Impacts: Shading vs Glazing Performance (kwh and % Reductions)
- Typical ranges: Well-shaded south glazing can reduce summer cooling load 30–60%.
- Compare to glazing: Upgrading glazing improves baseline but doesn’t eliminate peak direct radiation—shading complements glazing upgrades.
Designing Fixed Overhangs for Passive Solar Design
Sizing a fixed overhang is a straightforward geometry problem once you know the sun altitude for cutoff dates. The goal: choose an overhang depth that blocks high summer sun while admitting lower winter sun on the same window.
Measuring Sun Angles and Calculating Overhang Depth
Steps:
- Determine your latitude and the design cutoff date (commonly summer solstice or a midpoint like May–August for your cooling season).
- Look up solar altitude for that date and solar noon (NREL sun-path tools or NOAA solar calculators help).
- Measure window head height above the reference plane (top of glazing to horizontal overhang line).
- Use tangent: overhang depth = window head height × tan(90° − solar altitude). Alternate form: depth = height / tan(solar altitude).
- Allow for glazing sill height, exterior trim, and projection from the façade.
Worked example below shows the math.
Worked Example: Sizing a South-facing Overhang Step-by-step
Example inputs:
- Latitude: 40°N.
- Summer design day: June 21 (solar altitude at solar noon ≈ 73°).
- Window head height: 6 ft above the reference plane.
Calculation:
- Tan(73°) ≈ 3.27.
- Depth = head height / tan(altitude) = 6 ft / 3.27 ≈ 1.83 ft (≈ 22 inches).
- For broader summer coverage (late spring/fall), pick the lower altitude of the chosen cutoff date; depth increases slightly.
Rules of thumb table:
| Latitude | Overhang depth : window height |
|---|---|
| 20°–30° | 0.3–0.5 × height |
| 30°–40° | 0.5–0.8 × height |
| 40°–50° | 0.7–1.0 × height |
Embed this sizing approach with a short video demonstration: viewers will see sun-angle measurement, simple trig, and a live example. The video covers measuring, drawing the sun path, and checking results. Watch the practical tutorial here:
Structural and Permit Considerations
Fixed overhangs attach to roof or wall framing and must handle dead load and wind uplift. For passive-house-grade assemblies, coordinate overhang details with the roof assembly and continuous insulation. See guidance on roof insulation impact when detailing cantilevered soffits over exterior insulation. Reduced cooling/heating loads also affect equipment sizing; shading reductions can influence your HVAC selection—reference our note on HVAC sizing effects. Always check local building codes; larger overhangs or new roof projections commonly require a permit and structural calcs. Consult an engineer when spans or cantilevers exceed common DIY practice.
Comparing Window Shading Options: Overhangs, Awnings, Louvers, and Screens
Choosing a shading device balances cost, performance, maintenance, and appearance. Below is a concise pros-and-cons overview, followed by a compact comparison table.
Quick Pros and Cons for Each Shading Type
- Fixed overhangs: Low maintenance, passive, durable; limited adjustability; best on true south.
- Retractable awnings: High summertime shading, roll away in winter; mechanical or manual operation; fabric replacement may be needed.
- Adjustable louvers (manual or motorized): Precise solar control year-round; higher upfront cost and complexity.
- Screens and external blinds: Good glare control, breathable for airflow; variable aesthetics and lifespan.
- Pergolas and planting: Lower cost option; deciduous trees add seasonal shading but need maintenance and space.
Comparison/specs Table: Performance, Cost, Best Uses
| Device type | Typical cost (DIY est.) | Summer performance | Winter performance | Maintenance | Best orientation |
|---|---|---|---|---|---|
| Fixed overhang | $20–$60/ft | High for south | Allows winter sun if sized | Low (paint/seal) | South |
| Retractable awning | $150–$800/unit | High when deployed | Retract to allow sun | Fabric/drive repairs | South, west |
| Adjustable louvers | $200–$1,200+ | Very high (adjustable) | Can admit winter sun | Mechanical upkeep | South, all |
| Exterior screen/blind | $30–$200/unit | Moderate | Blocks some winter sun | Fabric repair | East, west |
| Pergola/trees | $500+ | Moderate increasing over time | Allows winter sun | Plant care | South, west |
Cost ranges are estimates for DIY or small-contract installs and vary by material, local labor, and hardware. For material sustainability and embodied impact, review options in the material choices. Also consider how deep shading integrates with cladding and a rain screen design when protecting walls and window openings. Roof reflectance and whole-roof strategies influence the building-level result—see cool roof planning at cool roofing strategies.
When to Choose Adjustable vs Fixed Shading
- Pick fixed overhangs for budget-conscious south-facing designs where winter access to sun matters.
- Choose adjustable shading for east/west facades or mixed climates where seasonal or daily control is needed.
- For off-grid systems, weigh the power needs of motorized louvers against the fuel or battery cost; manual options often give similar energy outcomes at lower cost.
Window Shading and Overhang Strategies by Climate Zone
Climate dictates shading priorities. Use local climate data (NREL or NOAA) and adapt the overhang depth and shading type to your heating and cooling balance.
Cold Climates: Maximizing Winter Sun While Limiting Summer Gain
In cold climates (e.g., Climate Zone 6), winter heating demand dominates. Strategy:
- Favor high winter solar admission: smaller overhangs or adjustable shading.
- South glazing can have higher SHGC to harvest winter heat; pair with tight airtightness and high insulation.
- See our cold-climate guide for passive-house-specific trade-offs.
Mixed Climates: Balance and Adjustable Strategies
Mixed-humid regions benefit from flexible control:
- Use moderate fixed overhangs sized for peak summer cutoff and add adjustable shades for shoulder seasons.
- Consider deciduous trees where lot layout allows; they provide low-cost seasonal shading.
- For localized guidance, consult the mixed-humid guide for wall and envelope recommendations.
Hot Climates: Prioritize Shading and Solar Exclusion
Hot-humid and hot-dry climates require aggressive shading:
- Use deep fixed overhangs on south facades, full shading or vertical fins for low-angle east/west sun.
- Low SHGC glazing plus exterior shading minimizes cooling loads.
- For off-grid homes, remember that shading affects PV siting and available roof area—refer to off-grid effects in off-grid heating issues.
Research indicates movable shading often outperforms fixed devices in annual energy balance for certain climates, but complexity and cost rise. For rigorous projects, use energy modeling (PHPP for passive-house) to quantify trade-offs.
Integrating Shading with Energy-efficient Windows and Passive-house Standards
Shading is not a standalone measure. It interacts with glazing selection, airtightness, and mechanical ventilation to determine overall performance.
Orientation, Window Selection, and Combined Effects on Loads
- Use low SHGC for east/west windows where morning and afternoon sun drive peak loads.
- For south windows in cold regions, a higher SHGC glass combined with an overhang can boost winter gains while limiting summer solar input.
- There are crossover points where adding shading is more cost-effective than upgrading glazing; a simple rule: if most summer heat is direct-beam, shading yields faster returns.
Airtightness and Sealing Details to Pair with Shading
Shading reduces solar input but does not fix infiltration losses. For passive-house targets, seal windows per established air-barrier practice. Practical step-by-step sealing techniques appear in window sealing tips. Combining shading with proper sealing and continuous insulation (see exterior insulation methods) yields predictable annual performance.
Performance Modeling and When to Consult an Energy Modeler
- For simple south-facing windows, rules-of-thumb and overhang trig are often sufficient.
- For full-house passive-house certification or complex facades with mixed orientations, run PHPP or an hourly energy model. Industry studies and a university study on automated shades show up to ~25% energy reductions when optimized; see the Illinois Tech reporting on automated shades for context.
- Engage a modeler when you need accurate HVAC sizing, passive-house compliance, or to compare shading vs glazing upgrade economics.
DIY Installation and Retrofit Tips for Overhangs and Exterior Shading
Practical installations vary from simple attachment overhangs to freestanding pergolas and retractable awnings. Prioritize weatherproofing and structural anchorage.
Simple Overhang Builds: Plans, Attachments, and Flashing
DIY approaches:
- Attach a soffit overhang to rafter tails or install a ledger strapped to wall framing; use corrosion-resistant fasteners.
- Flash the intersection of overhang and wall with step flashing and a continuous head flashing to prevent water intrusion.
- Coordinate with roof assembly and insulation details—see roof insulation impact for integration tips.
Retrofit Options: Add-on Awnings, Pergolas, and Shade Sails
- Retractable awnings can be added without major carpentry but require solid anchorage.
- Free-standing pergolas avoid structural penetrations but need footings—consult concrete guidance in foundation and supports for pads and anchoring.
- Shade sails are low-cost and temporary; they work well for patios but have shorter lifespans.
When planning PV, account for shading losses. Use the site's solar sizing tool to estimate production impacts and check solar hardware specs at solar equipment notes.
Maintenance and Seasonal Adjustments
- Inspect fasteners and flashing annually.
- Clean fabric awnings and treat wood overhangs every 3–7 years depending on exposure.
- Retractable systems need occasional lubrication and cable/roller checks.
When to call a pro: if you face complex roof penetrations, large cantilevers, or local code questions. Structural engineers resolve load paths and wind uplift concerns faster than guesswork.
Materials, Durability, and Maintenance for Window Shading and Overhangs
Material choice affects lifespan, maintenance frequency, appearance, and embodied environmental impact. Here’s a practical comparison.
Wood, Metal, and Fabric: Life Expectancy and Pros/cons
- Wood: Common, affordable, easy to work with. Lifespan 10–30 years with proper finish; susceptible to rot without good detailing.
- Metal (aluminum/steel): Longer life (20–50 years), low maintenance; aluminum resists corrosion better than untreated steel.
- Fabric (awnings, sails): 5–15 years depending on UV exposure and quality; easy to replace.
Corrosion, Finishes, and Environmental Considerations
- Use stainless or galvanized fasteners in coastal areas to resist salt corrosion.
- High-quality finishes (factory-applied powder coat for metal, penetrating oils or paint for wood) extend life.
- For sustainability, consider reclaimed wood, FSC-certified lumber, or recycled aluminum; raw embodied carbon varies by material—see our sustainable materials guide at material choices.
Seasonal Inspection Checklist
- Inspect flashings and sealants for cracks.
- Check fasteners and braces for movement.
- Refinish wood every 3–7 years; replace fabrics as needed.
- Trim nearby trees to avoid damage and shade control drift.
Key Points Checklist for DIY Self-builders
- Measure orientation: Note true south, east, and west facing façades.
- Check sun angles: Use NREL tools or local NOAA data for solar altitude on design dates.
- Pick shading type: Fixed overhang for south; adjustable devices for east/west.
- Size overhang: Calculate with tan(solar altitude) or use rule-of-thumb ratios by latitude.
- Consider glazing: Pair shading with appropriate SHGC and U-value choices.
- Seal windows: Follow airtightness best practices—see window sealing tips.
- Review structure and permits: Get structural advice for large cantilevers and check local codes.
- Plan flashings: Use step flashings and head flashings to prevent leaks.
- Account for PV & HVAC: Use solar sizing tool and consider shading impacts on system sizing.
- Maintenance schedule: Annual inspection, repaint/seal wood every 3–7 years, replace fabrics per manufacturer.
- When to get help: Hire an engineer for long spans, a modeler for passive-house certification, or a contractor for complex retrofits.
The Bottom Line
Window shading and properly sized overhangs are effective, low-cost ways to reduce summer solar heat gain while preserving winter passive solar opportunities. Use simple sun-angle calculations, match shading type to orientation and climate, and combine shading with the right glazing and airtightness measures for the best results. Start with the checklist above, run a basic sizing for south windows, and consult energy modeling or an engineer when projects exceed DIY scope.
Video: How to Design a Solar Shading Overhang for a Window.
For a visual walkthrough of these concepts, check out this helpful video:
Frequently Asked Questions
Can a fixed overhang ever block winter sun?
Yes — if sized too deep relative to your latitude and the winter solar altitude, a fixed overhang can reduce desired winter solar gain. Use sun-angle calculations (or an energy model) to pick a cutoff date and depth that admits winter sun while blocking summer sun. For passive-house projects or high-latitude sites, consider adjustable shading to preserve winter access.
Are adjustable louvers worth the extra cost for a DIYer?
Adjustable louvers provide the greatest control and can improve year-round comfort, but they cost more and may require maintenance or power. For mixed climates or facades with heavy east/west exposure, adjustable shading often pays back in reduced cooling costs and comfort. For straightforward south-only designs, fixed overhangs are usually a better budget choice.
How do I size an overhang if my windows face east or west?
East and west sun has low angles in the morning and afternoon, so horizontal overhangs are less effective. Use vertical fins, full-height screens, adjustable blinds, or exterior roller shades instead. If you still prefer an overhang, combine it with vertical elements or deep porch structures to block low-angle rays.
Will shading reduce passive solar heating in winter?
It can, if shading devices are non-adjustable and sized without accounting for winter sun angles. To avoid that outcome, size overhangs to the correct cutoff angle, use deciduous plantings, or install adjustable shading so you can expose glazing in winter and shade in summer.
Do shading devices affect passive-house certification?
Yes. Shading changes heating and cooling loads and can be modeled in PHPP or other certification tools. Passive-house certifiers expect accurate accounting of solar gains and shading when calculating heat load. Consult a PHPP modeler early if certification is a goal, and document shading geometry and materials.