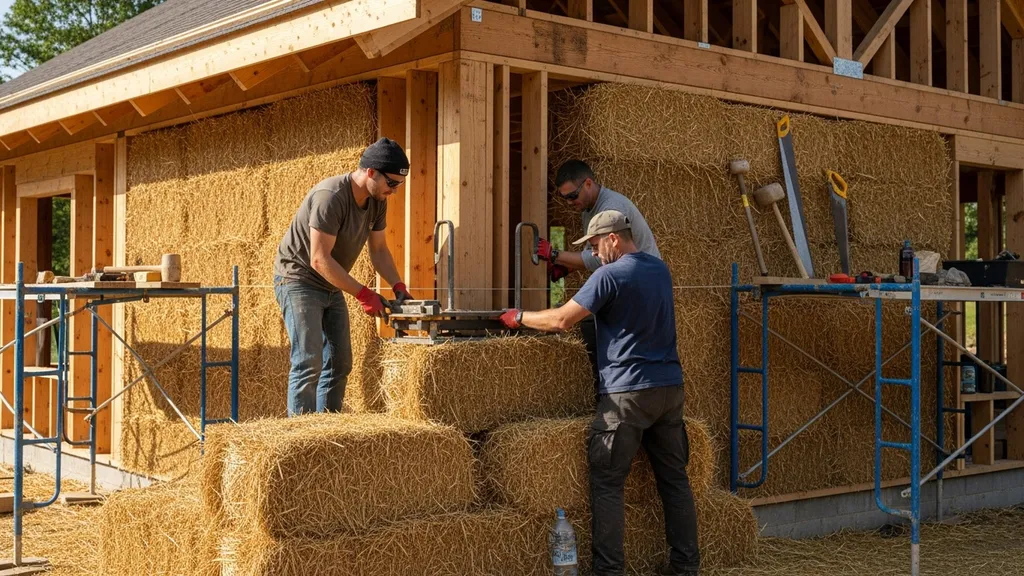
A practical, step-by-step guide to planning, building, and finishing durable straw bale walls for budget-conscious DIY self-builders.
Straw Bale Construction: Step-by-Step Building Guide
Straw bale construction offers an affordable, high-performance wall system for budget-conscious DIY self-builders. This guide on straw bale construction explains how to plan, source and test bales, design foundations, stack and tie walls, apply breathable plasters, and commission a durable finished wall — with specific numbers, material choices, and troubleshooting tips you can use on a small self-build. Read on to learn how to avoid common moisture problems, meet basic code pathways, and get airtight, high-insulation walls (approx R-30 to R-45) using straw and natural plasters.
TL;DR:
- Aim for bale moisture under 15% and a 450–600 mm (18–24 in) roof overhang to protect walls from rain.
- Choose load-bearing bales for simple single-storey builds or post-and-beam infill for multi-storey/seismic sites; expect bale walls to deliver roughly R-30–R-45 depending on compaction and plaster.
- Use a breathable lime or earthen plaster system (scratch 8–12 mm, brown 12–25 mm) and check moisture with probes before plastering.
Step 1: Planning, Permits, and Site Preparation for Straw Bale Construction
Planning starts with code review and site priorities. Many jurisdictions accept straw bale work either under a prescriptive path or via engineered approval; the International Code Council includes guidance in Appendix as and some local building departments publish technical bulletins for straw bale houses — check your local code official early. For wider reading, a practical collection of designs and experience is available in the Straw-bale building books collection.
Site Selection and Drainage:
- Choose a well-drained, gently sloped site where surface runoff routes away from the wall base.
- Respect the frost line in cold climates; coordinate foundation depth with local frost requirements.
- Roof overhangs: Target 450–600 mm (18–24 in) minimum to shed rain away from bale faces.
- Passive solar: Situate glazing per passive gains; see our guide on passive solar orientation.
Permits and pathways:
- Prescriptive: Follow a jurisdiction that has accepted straw bale details.
- Engineered: Hire or consult a structural engineer for post-and-beam or load-bearing designs in seismic/windy zones.
- Documentation: Submit bale specs (sizes, densities), foundation drawings, and plaster system descriptions.
Basic materials and tools:
- Common bale sizes: 14–18 in high by about 36 in long (36" ≈ 91 cm); densities vary by crop and baler.
- Tools: bale hook, level, plumb bob, rebar or threaded rods, ratchet straps, masonry lath/mesh, mixing tubs, trowels, scaffold, moisture meter, PPE.
- Plaster options: lime, clay/earthen, or cement-lime mixes (choose breathable finishes for durability).
- Waste planning: Include a recycling plan for straw offcuts and packaging; see the recycling materials checklist.
Pre-build checklist:
- Confirm permitting pathway with building official.
- Source bales and test a sample for moisture (<15% target).
- Arrange scaffold, temporary cover, and storage to keep bales dry.
- Prepare erosion and sediment controls for the site.
For off-grid projects that pair well with straw walls, consider earth-sheltered and water systems in parallel planning; see the earthship basics for larger off-grid integration.
Step 2: Choosing a System and Designing the Foundation and Wall Structure
Choose between two main systems: load-bearing (Nebraska-style) or post-and-beam/frame infill. Each has trade-offs.
Load-bearing (Nebraska/straw-bale):
- Pros: Low-cost, simple stack-and-plaster process, fewer framing materials.
- Cons: Limited span, typically single-storey unless engineered, sensitive to point loads and roof tie-down.
- Best for: Small single-storey homes and outbuildings with simple roof spans.
Post-and-beam / framed infill:
- Pros: Easier multi-storey or wide-span roofs, better performance in seismic/windy zones when engineered, simplified window and door detailing.
- Cons: Higher material and labor cost; requires careful integration of bale infill.
- Best for: Multi-storey builds, irregular plans, or stricter code areas.
Thermal and structural notes:
- R-values: Compacted straw bale walls generally provide R‑30 to R‑45 depending on bale size and plaster. This is comparable to thick fiberglass or cellulose walls and exceeds many standard 2x6 wall assemblies.
- Compressive strength: Bales handle substantial vertical load when properly compressed and tied; always confirm compressive loads for header/roof points and use lintels for openings.
Foundation choices and moisture protection:
- Raised stem wall on footing: Keeps bales 150–300 mm (6–12 in) off grade; a common and reliable detail.
- Rubble trench with frost-protected shallow foundation: Can work where soil and frost allow; coordinate with engineer.
- Frost-protected shallow foundations are another option in colder climates.
- Sill details: Use stainless-steel or treated sill plates, and include a capillary break and through-wall flashing or a breathable moisture barrier between foundation and bale.
Design checks:
- Verify compressive loads and roof point loads with a structural engineer when in doubt.
- Include tie-downs for uplift in high wind or seismic regions; use corrosion-resistant fixings (galvanized or stainless).
- Coordinate window and door lintels: timber lintel, steel angle, or engineered lintel depending on load.
If you want a side-by-side comparison with other natural and hybrid walls, read about hempcrete vs ICF comparison and consider how bale insulation contrasts with high thermal-mass systems like cob; our cob building primer explains mass vs insulation trade-offs. For flood-prone sites, review elevated foundation tips.
Step 3: Preparing Bales, Framing, and Mechanical Planning
Selecting and Testing Bales:
- Straw types: Wheat, rye, oat, and rice straw are common. Wheat and rice often bale tightly; qualities vary by region.
- Moisture check: Target under 15% before sealing in walls. Use a grain moisture meter or probe to sample multiple bales from different parts of the stack.
- Visual inspection: Avoid bales with staining, mold, or foreign material. The ICC guidance suggests construction-grade straw be free of visible decay — see the ICC Appendix AS link in Step 2 for criteria.
- Density: Denser bales compress less and provide stable dimensions; know the bale density so you can predict final wall thickness.
Framing for openings and penetrations:
- Full timber frame with infill simplifies openings: build a continuous frame, then pack bales as infill around windows/doors.
- Plate-and-stud hybrid: Use a top plate and intermittent studs to support lintels and interior finishes.
- Lintels: Timber or steel lintels are common. Provide temporary shoring while installing lintels over openings.
Mechanical routing and service chases:
- Strategy: Run major mechanicals (plumbing stacks, electrical panels, HVAC) before stacking where possible. Use shallow chase blocks or conduit routed in framed sections to avoid cutting bales later.
- Electrical: Use surface-mounted conduit or chase blocks set into bales before plastering. Avoid burying junction boxes where long-term access is required.
- Heat sources: Position woodstoves and their flues so heat and moisture sources aren’t near unprotected bale faces. Keep stove clearances as per manufacturer and local code.
- Materials sourcing: For low-embodied-carbon options, consult the sustainable materials guide. For framing techniques, see the advanced wall framing.
Record all mechanical paths on the as-built drawings so future owners or contractors can find hidden services without cutting through plaster.
Step 4: Stacking, Compressing, and Securing Straw Bale Walls
Layout and first course:
- Sill and leveling: Place the first course on the prepared sill plate, checking level in two directions. Keep bales dry during this stage with a temporary canopy if needed.
- Orientation: Use stretcher orientation for long walls and header orientation at corners or ends where appropriate. Stagger seams like brickwork to avoid continuous vertical joints.
- Corners: Build tight, square corners and check diagonals frequently to maintain plan accuracy.
Compression and tie systems:
- Compression: Compress each course to create a tight bearing between bales and reduce settlement. Use ratchet straps or mechanical compression jacks during build.
- Tie options:
- Vertical rebar driven through bale stacks with galvanized or stainless for corrosion resistance.
- Threaded rod anchors with washers and nuts at top and bottom plates provide positive compression.
- Horizontal straps anchored to plates can also stabilize walls.
- Choose corrosion-resistant fixings rated for exterior use.
Working Around Openings and Lintels:
- Temporary shoring: Use temporary posts or supports while installing lintels over openings.
- Lintel integration: Place timber or steel lintels on plates or shear-blocking points; ensure loads bypass the bale where required.
- Window bucks: Build window bucks from treated timber framed into posts or plates, then pack bales tight around them.
Practical tips:
- Keep bales covered and off wet soil.
- Check plumb and level frequently; fix errors early.
- Expect modest settlement — allow for compression in design and consider tightening straps once walls settle.
A practical, hands-on demonstration helps clarify these movements; viewers can learn stacking, tying, and compression techniques in this demo:
For additional technical notes on stacking tolerances and bale specifications, see the guidance at The NBS guide to straw bale construction.
Step 5: Plastering, Weatherproofing, and Finishing Straw Bale Walls
Start with water management:
- First line of defense: Keep moisture off plastered bales. Confirm roof overhangs (450–600 mm) and install flashing at roof-wall intersections and window sills.
- Foundation break: Provide a clear capillary break between foundation and bale (through-wall flashing or breathable membrane) and keep bales 150–300 mm (6–12 in) above finished grade.
- For differences between vapor control strategies, consult vapor barrier steps.
Choosing plaster:
- Earthen (clay) plaster: Highly breathable and low-embodied energy; best for interior walls or sheltered exteriors with strong overhangs.
- Hydraulic lime plaster: Breathable, durable, and more water-resistant than pure clay — preferred for exterior coats in many climates.
- Cement-lime mixes: Strong but lower breathability; use cautiously on bales and only where detailing prevents moisture trapping. Sonoma County technical bulletin offers local guidance on mixes and detailing: B 312020residentialstrawbaleconstruction
Plaster application steps:
- Prepare lath/mesh: Attach metal lath or mesh to provide mechanical key for base coat. Use corner reinforcement and plaster stops at sill details.
- Scratch coat: 8–12 mm to create the key and adhere to lath.
- Brown coat: 12–25 mm to build strength and even the surface; allow proper curing time.
- Finish coat: Thin final coat, smoothing and texturing as desired.
- Curing: Keep sheltered and moist-cure lime plasters per product guidance; allow 7–28 days depending on climate and mix.
Thickness and permeability:
- Recommended thickness: Scratch 8–12 mm; brown 12–25 mm. Avoid overly thick cement-rich coats that block vapor transmission.
- Permeability: Lime and earthen plasters have higher perm ratings than cement mixes; that breathability is critical for bale longevity.
Finishing choices and maintenance:
- Paints and finishes: Use mineral or silicate paints on exterior lime plasters to maintain breathability.
- Interior finishes: Natural oil finishes and clay paint work well with earthen plasters — see natural oil finishing steps for interior options.
- Maintenance: Recoat and repair small areas as needed; inspect flashing and overhangs yearly.
For product recommendations compatible with breathable systems, consult the materials products guide.
Step 6: Final Installations, Commissioning, and Long-term Maintenance
Install Windows, Doors and Roof Interfaces:
- Flashing sequence: Integrate window sills and jamb flashing into plaster details. Use continuous sill pans and through-wall flashings terminating over the foundation cap.
- Plaster junctions: Create drip edges and plaster stops at sills; avoid burying trim that prevents drying.
- For heavy roofing systems where flashing is critical, see clay tile roofing steps.
Airtightness and commissioning:
- Moisture probe checks: Use a moisture meter to confirm bale moisture readings under 15% at base and mid-height before sealing major coats.
- Airtightness testing: Consider a blower-door test after primary finishes to check for large penetrations in service chases. See our guide on blower door testing for test methods and interpreting results.
- Visual inspection: Walk perimeter checking flashing, siding interfaces, and base clearances.
Routine maintenance:
- Seasonal checks: Inspect roof gutters, overhangs, and flashing each spring and fall.
- Plaster repairs: Address cracks or delaminations quickly; small hairline cracks in lime finishes can be repaired locally with a thin slurry coat.
- Moisture vigilance: If you detect rising moisture levels, isolate the problem (roof leaks, splashback, blocked drainage) and repair before replastering.
Long-term indicators:
- Good signs: Consistently low moisture readings, tight plaster adhesion, and no bulging.
- Warning signs: Localized rot at the base, persistent wetting, or large delaminated plaster areas; consult a preservation or structural specialist if these appear.
Modern practitioners and case studies, including engineered post-and-beam implementations, are documented at Desert Straw House for additional operational insight: Strawbale construction
Step 7: Common Mistakes, Troubleshooting, and FAQ
Top 7 Common Mistakes and Fixes:
- Poor moisture detailing: Missing flashing or insufficient overhangs leads to damp bales. Fix by adding roof extensions, installing through-wall flashing, and correcting drainage.
- Using high-moisture bales: Bales with >15% moisture invite mold. Remove suspect bales, dry replacements, and test before stacking.
- Insufficient compression: Loose stacks settle unevenly. Re-compress with straps or threaded rods and re-tie vertical pins.
- Improper plaster mix or thickness: Heavy cement-rich coats can trap vapor. Replace with lime or earthen mixes; remove delaminated cement where possible.
- Poorly detailed openings: Windows without proper sills and flashing are common leak points. Retrofit flashing and add drip edges; use removable trim for future access.
- Routing services through bales without chases: Cutting bales post-plaster risks gaps and pests. Use chase blocks or conduit during framing to allow future access.
- Ignoring local codes early: Unapproved details can require costly rework. Engage the building department and, if needed, an engineer early.
Quick Troubleshooting Flow (moisture, Cracking, Settlement):
- Step A: If you find dampness, stop plastering, locate the water source (roof, splashback, groundwater).
- Step B: Probe moisture at base, mid, and top. If readings exceed 15% internally, ventilate and dry; consider replacing affected bales.
- Step C: If plaster cracks, determine movement vs shrinkage. Hairline hair cracks: monitor and touch up. Wide cracks or bulging: remove and investigate structure.
- Step D: Settlement: tighten ties, add compression plates, and re-level where feasible.
Common small repairs:
- Plaster chip: Clean edges, dampen, and apply matching lime/cob patch.
- Bulge in wall: Open a small port to inspect bale condition; consult an engineer if structural.
The Bottom Line
Straw bale construction can deliver very high insulation (approx R-30 to R-45), low material cost, and comfortable indoor environments when moisture control, proper foundations, and breathable plasters are prioritized. Start with code checks, keep bales dry (<15% moisture), choose the system that fits your site (load-bearing vs framed), and use lime or earthen plasters paired with good detailing for long-lasting walls.
Video: Step-by-step Guide to Straw Bale House Construction, Planning, and Plastering
For a visual walkthrough of these concepts, check out this helpful video:
Frequently Asked Questions
How can I tell if my straw bale wall is too wet?
Use a calibrated moisture meter or probe to sample multiple bales at the base, mid-height, and near the roof line. Readings consistently above 15% indicate elevated risk. Visually inspect for staining, musty odour, or mold; these are signs that you must stop work, identify the water source (roof, splash, ground), and dry or replace affected bales before plastering.
Short-term drying can be aided by increasing ventilation, temporary tarps to prevent further wetting, and removing internal finishes that trap moisture. If in doubt, treat suspect areas as compromised and consult a specialist.
What should I do if plaster cracks?
First, determine the cause. Hairline shrinkage cracks in lime or clay finishes are common and often cosmetic; repair with a thin recoat. Wider cracks, delamination, or repeating cracks over the same line suggest movement or moisture problems. In those cases, remove the damaged plaster, inspect the bale behind it for moisture or movement, fix the underlying issue (re-tie or re-compress bales, repair flashing), then reapply a compatible plaster system.
How do I fix settlement or bulging in a bale wall?
Small settlement is normal; larger settlement or bulging requires investigation. Tighten or add tie-downs (threaded rods or rebar with plates) to re-compress the wall. If a local area has softened bales, carefully remove plaster, inspect, and replace damaged bales. For structural concerns or large bulges, stop work and consult a structural engineer experienced with natural building methods.
Can I retrofit insulation or services later?
Minor service upgrades are possible if chase channels or conduit were planned. Retrofitting additional insulation on the exterior can work but requires careful detailing to maintain drying paths and flashing continuity. Interior retrofits that require cutting into plaster should be done sparingly and followed by proper patching using compatible breathable materials.