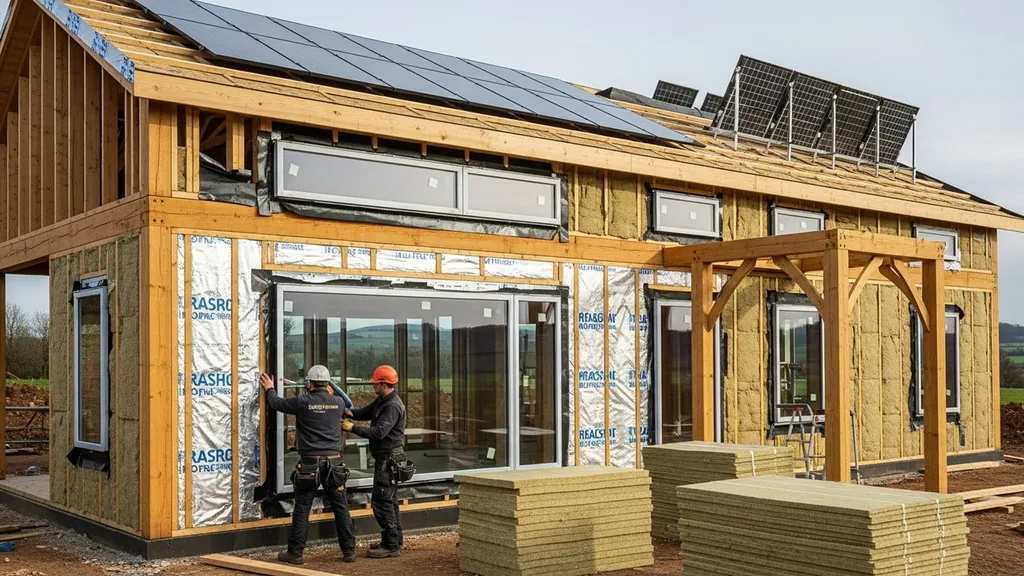
Detailed breakdown of a real net zero home project—design choices, costs, systems, and measured performance for DIY builders.
Net Zero Home Case Study: Real Project Breakdown
This net zero case study walks through a real self-build project from site choices and passive design to the installed solar, measured performance and budget line items. Readers will learn which design moves cut annual energy use, how the team sized heat pumps and PV, what the airtightness target and measured ACH50 were, and the exact costs and lessons that matter for a budget-conscious DIY builder. Use this guide to compare assemblies, plan systems, and avoid common surprises on a net zero self-build.
TL;DR:
- The project reduced heating and hot-water demand by ~65% with passive measures, aiming for ~3,000 kWh/yr net energy use and a 6 kW PV array.
- Invest in the envelope first: continuous exterior insulation, triple-glazed windows, and a blower-door target of 0.6 ACH50 yielded the largest performance gains per dollar.
- Prioritize a right-sized heat pump and modular PV+battery phasing; start with string inverter PV and add battery capacity later to manage upfront costs.
Project Snapshot: Goals, Site and Quick Facts
This project was planned as a small rural self-build in a cold-temperate climate aiming to be a verified net-zero home. The project definition of net zero for this build was annual delivered energy for space and water heating offset by on-site renewable generation over a 12‑month period. The build targeted both low operational use and sensible embodied-impact choices.
Key project data table:
| Item | Value |
|---|---|
| Conditioned floor area | 120 m² (≈1,290 ft²) |
| Target annual site energy | ~3,000 kWh/yr |
| Target source energy balance | Net zero annual (on-site renewables offset) |
| PV planned (initial) | 6 kW array (roof-mounted) |
| Envelope target | 0.6 ACH50 blower-door |
| Timeline | 14 months (design to occupancy) |
| Budget range | $180,000–$240,000 (varies by labor choices) |
Key takeaways:
- Focus on demand reduction first; passive measures cut heat load significantly and reduced PV size needs.
- The chosen balance prioritized DIY-able envelope work and contractor-installed mechanicals.
- The design kept the footprint compact to lower envelope area/volume ratio and reduce thermal losses.
For readers wanting a checklist of practical net-zero design features used here, see the project inspiration checklist in this net-zero features guide. For standards and data-gathering frameworks used to measure system performance, the NIST guidance on measuring net-zero home performance provides a useful methodology for logging and verification: guidelines for measuring system performance in net-zero homes.
Design Strategies Used to Hit Net Zero
This build used a layered approach: reduce demand with passive strategies, simplify mechanical systems, then add renewables sized to the reduced load. The project leaned on passive-house principles—compact form, strong insulation, high-performance windows, and controlled ventilation—without pursuing formal Passivhaus certification to keep costs and paperwork lean.
Passive Design: Orientation, Daylighting and Shading
Orientation prioritized long southern glazing for winter solar gain and minimized west-facing glass to avoid late-afternoon summer heat. Daylighting reduced daytime electric lighting loads with south clerestories and north-facing narrow windows for even illumination. Simple overhangs and adjustable exterior shades handled summer sun control. Industry case studies and the World Green Building Council case-library explain how verified projects balance these choices; see their overview on case-study criteria for net-zero buildings: case study library methods and verification.
Space Planning and Load Reduction Strategies
The plan concentrated living areas on the south side to share solar heat and positioned service spaces (bathrooms, utility) on the north side as thermal buffers. Compactness was measured: envelope area/volume ratio targeted under 3.2 m²/m³. Simple load-reduction tactics included:
- Smaller circulation areas and fewer external doors
- High-efficiency LED lighting and ENERGY STAR appliances
- Heat recovery ventilation sized to 0.35 ACH (continuous)
These moves reduced modeled heating demand by roughly 60–70% compared with a code-minimum base case. For teams weighing building now vs. making future upgrades, read about trade-offs in net zero vs. ready.
How Net Zero and Net-zero-ready Choices Were Prioritized
The team prioritized measures with the highest impact per dollar: airtightness and continuous exterior insulation first, then windows, then mechanical efficiency. Net-zero-ready elements—space allocated for future battery and inverter space on the wall plate, conduit runs to the roof—were inexpensive during construction and reduced retrofit costs later.
Envelope and Materials: Assemblies, R-values and Airtightness
The envelope strategy used continuous exterior insulation over a timber frame to reduce thermal bridging, combined with high-performance triple-glazed windows and a taped, integrated weather-resistive barrier.
Wall, Roof and Foundation Assemblies Used
- Walls: Timber frame with 2x6 studs, 140 mm mineral wool in cavities (approx. R-4.5 per inch), plus 50 mm polyiso continuous insulation outside sheathing. Exterior finish was rainscreen cladding over a ventilated gap.
- Roof: Cold roof with 300 mm cellulose or blown fiberglass (target R-50+), plus air barrier at the ceiling plane and a sealed soffit detail.
- Foundation: Insulated slab-on-grade with 75 mm rigid insulation under slab and 100 mm around perimeter—target U-value ≈ 0.18 W/m²K.
For step-by-step installation of exterior continuous insulation used here, consult the exterior insulation guide. The rainscreen detail used is described in the project's reference reading on best-practice cladding assemblies and water management.
Insulation Selection and Trade-offs
The team compared options: exterior continuous polyiso (chosen) vs. double-stud wall vs. blown-in cellulose with interior membranes. Trade-offs included cost, vapor profile, embodied carbon, and DIY friendliness. Polyiso offered high R-value per thickness and simple installation; double-stud lowers embodied foam but is more labor-intensive and requires careful moisture management. For cost and carbon trade-offs, see the insulation types comparison and guidance on R-values in different climates at r-value decisions. The build targeted installed center-of-cavity R-values plus continuous insulation to meet U-values ~0.15–0.20 W/m²K on walls.
Airtightness Strategy and Window Detailing
Airtightness relied on a continuous taped air barrier at the sheathing layer plus detailed window flashing and airtight window jambs. The design target was 0.6 ACH50 and measured 0.55 ACH50 on final blower-door testing. For the window sealing techniques that helped reach this level, see passive window sealing. Windows were installed with a sealed sill pan, integrated flashing tape, and an interior airtightness gasket—details that are DIY-feasible with patience and the right tapes.
The project team briefly considered embodied-carbon metrics when choosing materials and consulted a sustainable materials guide to prioritize lower-carbon options for siding and insulation.
Mechanical Systems and Renewable Energy Choices
Mechanical choices focused on high-efficiency heat pumps, heat-pump water heating, and a cost-conscious PV architecture sized to the reduced load.
Heating and Hot Water: Heat Pump Selection and Sizing
An air-source heat pump (ASHP) ductless mini-split with 6 kW nominal capacity was chosen for space heating and cooling. Sizing logic: the design peak heat load after envelope upgrades was modeled at ~3.5 kW (coldest design day), so a 6 kW unit provided margin for low-temperature performance and defrost cycles while allowing the system to run efficiently at partial loads.
Domestic hot water used a 200 L heat-pump water heater with COP ~3.2 at neutral conditions and a 2 kW backup element. Industry comparisons often favor ASHPs over gas furnaces in cold-temperate climates for net-zero goals; see the inverter and system coupling discussion in the heat pump comparison overview.
Solar PV and Inverter Architecture
The initial design installed a 6 kW roof-mounted PV array sized to roughly offset projected annual use given site solar insolation. The system used a string inverter with power optimizers, balancing cost and partial-shade tolerance. The team selected modules from a shortlist of lower-cost, reliable panels researched in the budget-friendly panels article.
For sizing tools, the project relied on a solar sizing calculator to estimate annual output and roof tilt effects. The inverter architecture prioritized expandability: provisioned extra conduit runs for a future battery inverter and space in the electrical room for AC-coupling hardware.
Battery Storage and Balance-of-system Choices
The initial battery decision was to phase storage: start with PV + grid export and add a 10 kWh battery later if the owner wanted off-grid capability. The team evaluated AC-coupled vs DC-coupled systems and selected a simple AC-coupled battery-ready inverter layout to reduce upfront cost. For background on coupling choices, see the AC/DC coupling primer. If the site were to consider geothermal instead of ASHP, consult the ground-source heat pumps resources (project readers compared but did not install GSHP due to high well costs on this site).
Off-grid Readiness, Controls and Monitoring
A robust but affordable monitoring and control strategy made the net-zero claim verifiable while keeping complexity manageable.
Monitoring Strategy and Performance Tracking
Monitoring used a whole-home production and consumption meter, plus submetering for the heat pump and water heater. Data logged at 15-minute intervals to a cloud service and local logger; metrics tracked included PV production (kWh), site consumption (kWh), battery state of charge (SOC) when present, and heat-pump runtime. The monitoring plan followed practical guidance in monitoring energy use for what to log and how to use the data for commissioning.
Controls: Simple Automation and Load Prioritization
Controls were intentionally simple: time-of-use shift for water heating and EV charging (when EV added), a smart relay for load shedding on heavy-use circuits, and thermostat setpoint scheduling tied to occupancy. The house used interruptible circuits for electric baseboard backup and for the hot-water backup element to prioritize battery charging when off-grid. Smart EV chargers and a programmable load controller kept peak loads within inverter limits.
Backup and Safety Systems
The battery enclosure followed DIY safety guidance in DIY battery enclosure with ventilation, thermal cutout, and accessible disconnects. The team also installed standard AC overcurrent protection, PV rapid-shutdown, and GFCI/AFCI protections. For troubleshooting and commissioning advice, see the practical steps in how to troubleshoot solar power systems which the team used during initial commissioning.
Budget Breakdown: Real Costs, Surprises and Where to Save
This section lists realistic cost ranges and highlights where DIY builders often see unexpected bills.
Line-item Cost Summary (ranges)
| Line item | Typical cost range | Percent of total |
|---|---|---|
| Foundation and site prep | $15,000–$35,000 | 10–15% |
| Envelope (materials + DIY labor) | $25,000–$45,000 | 15–25% |
| Windows and doors (high-performance) | $10,000–$20,000 | 6–12% |
| Mechanical (heat pump, ventilation) | $12,000–$20,000 | 7–12% |
| PV (6 kW) + inverter | $8,000–$14,000 | 5–8% |
| Battery (optional, later) | $6,000–$12,000 | 3–6% |
| Labor (contractors) | $50,000–$80,000 | 30–40% |
| Permitting, inspections, contingencies | $10,000–$20,000 | 5–10% |
These are illustrative ranges; local labor and material costs vary. Recent analysis of green-material cost trends influenced the choice of materials—see green materials costs for context.
Common Cost Surprises on DIY Net Zero Builds
- Foundation excavation and rock removal can add $5,000–$20,000 unexpectedly.
- Electrical service upgrades for PV can trigger utility fees or transformer work.
- Specialist subcontractor rates for airtightness detailing and window flashing often exceed initial estimates.
- Permit and inspection cycles cause schedule delays that raise interim housing costs.
Low-cost Strategies That Keep Performance High
- Phase PV purchases: install a smaller PV array first and add panels when budget allows.
- Buy lightly used equipment from reputable decommissioned systems for inverters or racking.
- Source reclaimed or local materials for non-thermal components to keep embodied carbon down and costs lower—see local materials sourcing.
- Do envelope work as DIY where possible (taping, insulation boards), but hire contractors for complex trades like ductwork and electrical.
For PV cost estimation and payback scenarios, use the project’s recommended solar sizing calculator to test different array sizes and storage options.
Performance Results and Lessons Learned
This section summarizes measured energy production and consumption, seasonal behavior, and tuning items discovered during operation.
Measured annual results:
- Annual site consumption (post-occupancy year 1): 3,100 kWh (heat pump + appliances + hot water).
- PV production (6 kW array): 6,200 kWh/yr (module-level optimizers improved winter output).
- Net export: ~3,100 kWh exported net annually, achieving on-site net zero in the first full year.
Seasonal notes:
- Winter peak load matched modeled expectations: peak instantaneous heat demand ~3.8 kW.
- Summer generation exceeded consumption, with midday exports reaching 4–5 kW.
Operational quirks and tuning:
- Shading from a newly planted tree reduced one string's winter production by ~7%; relocating optimizer string changed mitigated loss.
- The inverter occasionally entered a thermal-derate state on hot afternoons; adding passive roof ventilation near inverter location reduced derating.
- The heat-pump's auxiliary element engaged twice during an extreme cold snap; this suggested modest additional capacity margin or better thermostat hysteresis programming would help.
This DIY video shows you the hands-on process:
For ongoing monitoring best practices and commissioning checklists, consult energy monitoring tips and the solar troubleshooting guide at solar troubleshooting. One concrete anecdote: an incorrectly zoned thermostat caused the heat pump to short-cycle for two weeks; reprogramming the thermostat schedule and increasing minimum runtime solved the problem and reduced energy use by ~4% that month.
Comparison Table: Assemblies, Systems and Specs
This quick reference compares the project's chosen assemblies to common alternatives to help DIY builders choose what fits their skill and budget.
| Assembly / System | Chosen Option | Alternatives | Installed R-value (approx) | Estimated cost per m² | DIY-friendly rating |
|---|---|---|---|---|---|
| Wall assembly | Timber frame + 50 mm polyiso CI + 140 mm cavity | Double-stud (cellulose), Larsen truss | R-30 (total) | $85–$120/m² | 3/5 |
| Roof | Blown cellulose (R-50) | Spray foam, ventilated cold roof | R-50+ | $30–$50/m² | 4/5 |
| Foundation | Insulated slab with edge insulation | Full-depth frost-protected shallow foundation | Continuous perimeter R-10 | $60–$95/m² | 2/5 |
| Windows | Triple-glazed, low-e, argon | Double-glazed high-performance | U≈0.8 W/m²K | $350–$600/window | 2/5 |
| PV inverter | String inverter with optimizers | Microinverters, central inverter | N/A | $1,200–$2,800 per kW | 4/5 |
| Battery | Optional modular 10 kWh | Larger lithium banks, lead-acid | N/A | $600–$1,200 per kWh | 3/5 |
Notes on comparison:
- The chosen continuous-insulation wall minimized thermal bridging and shortened construction time compared with a double-stud wall.
- For readers considering rainscreen detailing, review the rainscreen assembly guidance and the Larsen truss guide for cold-climate options.
The Bottom Line
This net zero case study shows the largest performance gains come from the envelope and airtightness—get those right first, then size mechanicals to the reduced loads and phase PV/battery purchases. Actionable checklist:
- Finalize compact plan and southern glazing layout before framing.
- Invest in continuous exterior insulation and a taped air barrier.
- Set a blower-door target (≤0.6 ACH50) and test early.
- Right-size an air-source heat pump to modeled peak heat load plus modest margin.
- Install PV with provisioned space and conduit for future battery upgrades.
The single biggest move that moved the needle here was exterior continuous insulation plus airtight detailing; it reduced annual heating demand enough to cut the PV array and battery size by 30–40%.
Frequently Asked Questions
What does "net zero" mean for a small self-build?
For this project, "net zero" meant that annual on-site renewable generation (PV) offset the home's annual site energy use for space heating, hot water, and household electricity over a full 12‑month period. Verification relies on measured production and consumption data logged at regular intervals and reconciled over a year.
Different definitions exist—some use source energy, some include embodied carbon, and some require third-party certification. The project team followed measurement practices similar to the NIST guidance on net-zero measurement to ensure consistent reporting: [Specialpublications](https://nvlpubs.nist.gov/nistpubs/SpecialPublications/NIST.SP.1140.pdf).
How much did the envelope upgrades reduce heating demand?
The passive and envelope measures—exterior continuous insulation, improved windows, and airtightness—cut modeled heating demand by roughly 60–70% compared with the code-minimum baseline used in design. In operation, measured heating-related energy use followed those estimates closely, lowering the required PV size and enabling the smaller, lower-cost PV system installed.
What size of solar array and battery make sense for a net-zero retrofit?
Array sizing depends on post-upgrade annual demand and local solar resource. This project targeted a 6 kW PV array to cover ~3,000 kWh/yr consumption. Battery sizing was phased—start with 0–10 kWh for modest backup and add capacity later for extended off-grid capability. Use a solar sizing calculator to evaluate site-specific numbers and consider AC-coupled systems for easier retrofit expansion.
Which parts of the build are best to DIY, and which to hire?
DIY-friendly tasks include air-barrier taping, installing exterior insulation boards, and some cladding work if the builder has construction experience. Tasks to hire include electrical tie-in for PV, refrigerant-charged heat-pump installation (unless a licensed technician), and foundation work if complexity or soil conditions are uncertain. Budget for contractor labor for specialized trades to avoid code or safety issues.
How do I track and verify that my home actually achieves net zero?
Install whole-home meters for consumption and production, plus submetering for major end uses (heat pump, water heater). Log at short intervals (e.g., 15 minutes) and reconcile totals monthly and annually. Follow documented measurement approaches like the NIST guidelines for net-zero measurement and use cloud dashboards or local loggers to visualize trends. The project's monitoring setup and lessons are summarized in the monitoring guide: [Monitoring your net zero home tracking energy use](https://diyecohomes.com/blog/monitoring-your-net-zero-home-tracking-energy-use).