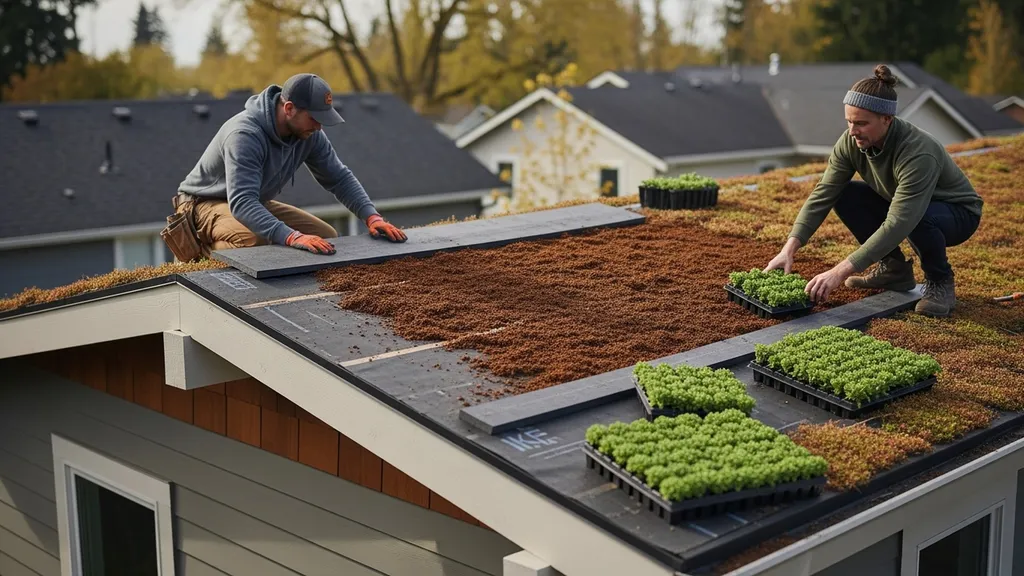
Practical guide to green roof installation, costs, types, and environmental benefits for DIY eco-builders.
Green Roofs: Installation and Benefits
A green roof is a planted roof system that replaces part of a conventional roof cover with vegetation, growing medium, drainage, and protective layers. For DIY builders, a green roof can cut summer cooling loads, retain stormwater on site, extend roof life by decades, and create habitat — all while adding usable amenity space on larger roofs. This guide shows what a green roof is, how it works, the main system types, step-by-step DIY installation guidance, budget and structural checks, plant choices by climate, and how green roofs work with solar and high-performance building standards like Passive House.
TL;DR:
- A green roof can retain 40–90% of a single-storm rainfall event and cut roof surface temps by 20–50°F.
- Extensive systems typically add 10–50 lb/ft² (saturated) at 1–6 in. substrate and cost roughly $8–$25/ft² DIY; intensive roofs can exceed 80–200+ lb/ft² and $25–$100+/ft².
- Before you start: confirm structural capacity, select a proven waterproofing/root barrier, design drainage, and plan a 5–10 year maintenance schedule.
What is a Green Roof and How It Works
Definition and Basic Components
A green roof is a roof assembly that intentionally supports vegetation. The five core components are:
- Waterproofing membrane: the primary water barrier over the roof deck.
- Root barrier: a layer to stop roots from penetrating the membrane.
- Drainage layer: moves excess water off the roof and prevents saturation.
- Growing medium (substrate): engineered lightweight soil.
- Vegetation: sedums, grasses, perennials, or shrubs depending on system depth.
Research and government guides describe these layers and their functions in detail; for example, the Philadelphia Water Department provides guidance on green roofs as stormwater controls and installation contexts (green roof guidance from Philadelphia Water Department).
How Green Roofs Affect Building Performance
Green roofs work by three main physical processes:
- Thermal mass and insulation: The substrate and plant layer add thermal resistance and reduce roof surface temperatures.
- Evapotranspiration: Plants evapotranspire water, cooling the roof and nearby air.
- Stormwater capture: The substrate and retention media hold rainfall, releasing it slowly to drains and reducing peak flows.
Typical performance metrics cited in academic and government studies include percent stormwater retained (40–90% for extensive systems depending on storm size and substrate) and measured reductions in roof surface temperature (commonly 20–50°F lower on hot days). Studies from universities and agencies (for example, Rutgers and the EPA) back these ranges.
Extensive vs Intensive Systems — Quick Comparison
- Extensive: Shallow substrate (1–6 in.), low plant height (sedums), saturated weight ~10–50 lb/ft², low maintenance, suitable for retrofits and low-sloped roofs.
- Intensive: Deep substrate (6 in.–several feet), includes shrubs/trees, saturated weight 80–200+ lb/ft², higher maintenance, better for roofs intended as gardens or social spaces.
For technical background reading, see the recommended green building books for systems, and expect to consult local codes before committing.
Types of Green Roofs and Materials (comparison Table)
Extensive: Characteristics and Use Cases
Extensive green roofs are the most DIY-friendly: low substrate depth, drought-tolerant plants like sedums, and light ongoing maintenance. They work well on small houses, garages, or sheds where structural loads are limited. Ideal roof slopes are generally flat up to about 30° (approx. 6:12), with slope-specific erosion control measures on steeper pitches.
Semi-intensive and Intensive: When to Choose Them
Semi-intensive systems sit between the two extremes — deeper substrate for grasses and perennials with periodic irrigation. Intensive systems are for rooftop gardens, terraces, and public roofs; they require full structural design, irrigation, and frequent access for care.
Materials Checklist: Membranes, Drainage, and Growing Media
Common waterproofing and root barrier options:
- EPDM: flexible, long-lasting rubber membrane; popular for retrofit work.
- PVC: weldable, lightweight, but can be more puncture-prone at seams.
- Liquid-applied membranes: seamless option for complex details; requires skilled installation.
Lightweight growing media include engineered mineral mixes and porous expanded shale or perlite blends. For eco-friendly choices and recycled components, consult the sustainable materials guide.
| System type | Substrate depth | Saturated weight (lb/ft²) | Typical plants | Maintenance | Typical DIY cost/ft² |
|---|---|---|---|---|---|
| Extensive | 1–6 in. | 10–50 | Sedums, mosses, small grasses | Annual to biannual | $8–$25 |
| Semi-intensive | 6–8 in. | 40–80 | Perennials, grasses | Quarterly to annual | $20–$40 |
| Intensive | 8 in.–3+ ft | 80–200+ | Shrubs, trees, lawns | Monthly to seasonal | $25–$100+ |
See university guidance on layer design and media selection for details (Penn State extension green roof design).
Also review how green roof layers interact with standard roof insulation choices in our article on roof insulation methods.
Benefits of Green Roofs: Energy, Water, and Ecology
Energy and Insulation Benefits
Green roofs reduce peak summer roof temperatures and can lower building cooling loads. Typical measured reductions in roof surface temperature are 20–50°F on sunny days; annual building energy savings vary widely with climate but commonly fall in the 5–15% range for cooling in warm climates and smaller but measurable benefits in heating months due to added thermal mass. For high-performance homes, integrate green roof design with insulation strategy discussed in roof insulation for passive performance.
Stormwater Management and Drainage
Green roofs are effective at reducing runoff volume and delaying peak flows. Research and municipal guidance indicate stormwater retention ranges from 40% to 90% depending on substrate depth and storm size. Municipal manuals, such as the New Jersey BMP manual, document expected retention and provide design guidance for using green roofs as stormwater best management practices (NJ BMP manual on green roofs).
Biodiversity, Urban Heat Island Reduction, and Lifespan Gains
Vegetated roofs provide habitat for pollinators and birds when native species are included. They also lower urban air temperatures by shading and evapotranspiration, helping reduce the urban heat island effect. Importantly for homeowners, green roofs commonly extend the life of the underlying roof membrane by shielding it from UV and thermal cycling — sometimes adding 20–40 years compared with an exposed membrane.
Financial Incentives and Indirect Savings
Grants, rebates, and stormwater fee credits are often available at the municipal or state level and can offset installation costs. Check current programs in your area via our incentives and tax credits guide. Indirect savings include reduced HVAC sizing, lower stormwater fees, and deferred roof replacement costs.
Remember: actual energy and water performance depends on local climate, roof orientation, and building use. The phrase "living roof benefits" is used in many municipal guides to summarize these combined environmental and financial effects.
Installing a Green Roof: Step-by-step for Diyers
Planning: Structural Assessment, Permits, and Weight Calculations
Start with a structural check. Calculate the design load:
- Dead load: roof deck + waterproofing + substrate and plants at saturated weight.
- Live load: people and maintenance equipment (often 20–40 psf for walkable roofs).
Use saturated weight figures from the Types table above for estimates. If your roof framing isn't rated for the required load, consult a structural engineer. Permits are often required when roof loads change or drainage patterns are altered; check local codes.
Layer-by-layer Installation: Membrane, Root Barrier, Drainage, Filter, Substrate, Planting
A typical sequence for an extensive roof:
- Inspect and prepare deck; repair any rot.
- Install primary waterproofing membrane per manufacturer instructions. For best practice on airtight/waterproof roof assemblies, follow our airtight membrane installation guide.
- Add a root barrier over the membrane if not integrated.
- Lay a structured drainage board or mats to create a free-draining layer.
- Cover drainage with a filter fleece to stop fines from moving into drains.
- Spread engineered substrate to design depth, compact lightly.
- Plant with plugs, mats, or seed; water in and install temporary irrigation if needed.
For sequencing nuances and overlap details that match wall and roof vapor barrier practice, review vapor barrier steps.
Irrigation and Temporary Establishment Techniques
Extensive roofs often aim for low or no irrigation after establishment by using drought-tolerant mixes and native sedums. During the first 6–12 months, temporary irrigation or drip zones help plugs establish. For automated options, our smart irrigation guide covers low-flow controllers and moisture sensors suitable for rooftops.
Common Troubleshooting During Installation (leaks, Drainage Issues)
- Leak testing: perform a flood test or electronic leak detection before adding substrate.
- Clogged drains: install accessible scuppers and inspection ports; add gravel reservoirs only where specified.
- Poor drainage: check that drainage mats are continuous and slopes lead to overflow scuppers.
For tools and equipment used during installation, refer to the installation tools checklist.
Safety, Tools, and When to Hire a Pro
Wear PPE (fall protection, gloves, eye protection). Use edge protection and consider hiring professionals for roofs with steep slopes, complex penetrations, or where structural reinforcement is needed. If you are unsure about the membrane seam detailing or penetrations around vents, hire a certified roofer — a single membrane failure can void warranties and cause significant damage.
Watch this step-by-step guide on installing a modular green roof:
Cost, Weight, and Structural Considerations
Estimating Upfront and Lifecycle Costs
DIY extensive green roofs typically range from about $8 to $25 per ft² for materials and modest tool rental; contractor-installed extensive systems commonly run $20–$50/ft². Intensive systems can exceed $25–$100+/ft² depending on irrigation, landscaping, and access needs. Lifecycle costs include periodic maintenance, irrigation, and eventual topping-up of substrate; these are often offset by extended membrane life and lower stormwater fees.
For local pricing nuances, consult the regional cost guide.
Saturated Load and Roof Framing Checks
Use these example saturated weight ranges:
- Extensive (1–6 in.): 10–50 lb/ft²
- Semi-intensive (6–8 in.): 40–80 lb/ft²
- Intensive (8 in.–3+ ft): 80–200+ lb/ft²
Compare these loads to your roof design live-load and snow-load requirements. If retrofit reinforcement is necessary, options include adding joist sistering, structural blocking, or creating lightweight modular tray systems to distribute loads. For small roofs or sheds, see related reading on foundation options.
Retrofit Strategies and Reinforcement Options
If the existing roof cannot carry the required saturated load:
- Reduce substrate depth and plant type (choose extensive rather than intensive).
- Use lightweight substrates that incorporate expanded shale, perlite, or recycled aggregates.
- Install modular trays that locate heavier zones over load-bearing elements.
- Reinforce framing with additional joists or engineered beams — have a structural engineer produce calculations and scope.
Design trade-offs: lighter systems may hold less stormwater and have narrower plant palettes, but they can be installed safely on many existing roofs.
Plant Selection and Maintenance for Different Climates
Choosing Plants: Sedums, Grasses, Perennials, and Natives
- Cold climates: Hardy sedums, alpine grasses, and native bunchgrasses that tolerate freeze-thaw cycles.
- Hot/dry climates: Drought-tolerant succulents, local xeric perennials, and reflective mulch covers to reduce heat.
- Temperate climates: Mixed sedum mats with native wildflowers for pollinators.
Depth guidelines:
- Sedums: 1–4 in. substrate
- Perennials and grasses: 4–8 in.
- Shrubs/trees (intensive): 12 in.–3+ ft
For plant palettes that support pollinators and local species, consult native plant lists from your regional extension service and the Green Roof Organisation's code (GRO code of best practice).
Establishment Care, Seasonal Tasks, and Irrigation Strategies
Establishment schedule:
- First 6–12 months: regular watering and plug replacement as needed.
- Annual: inspect drainage, remove weeds, clear debris from scuppers.
- Every 5–10 years: top up substrate to replace losses and settle.
Irrigation options: drip lines, capillary mats, or no supplemental irrigation for well-chosen extensive systems. For automated control, see the smart irrigation guide. For cost-sensitive projects, our budget-friendly materials guide lists economical substrate blends and planting strategies.
Design Tips for Pollinators and Biodiversity
- Use a mix of flowering plants with staggered bloom times.
- Create microhabitats: rock piles, shallow sheltered zones for insects.
- Prefer native species where possible to support local pollinators.
Green Roofs, Solar, and Passive House Integration
How Green Roofs Interact with Insulation and Airtightness
A vegetated roof adds thermal mass and reduces surface temperatures, which can lower cooling loads. However, roof airtightness remains essential for Passive House performance. Keep the airtight/vapor control plane continuous below the green roof membrane; reference blower door strategies and whole-building airtightness methods in our blower door testing article. For Passive House projects, coordinate insulation placement and green roof assembly with the whole-envelope strategy described in roof insulation for passive performance.
Combining PV and Green Roofs: Spacing, Mounting, and Cooling Synergies
Solar PV can coexist with green roofs, but plan for:
- Maintenance access for both the panels and plants.
- Mounting systems that avoid penetrating the waterproofing membrane or that use engineered point-load supports.
- Cooling synergies: vegetation can lower ambient roof temperatures and slightly increase PV efficiency on hot days.
Practical advice on panel choices and mounting for vegetated roofs is in our guide on matching solar panels.
Design Trade-offs for Net-zero and Passive House Goals
Trade-offs include increased structural cost for intensive systems versus better stormwater retention and amenity value. For net-zero targets, prioritize solar and airtightness first, then layer in a green roof where structure and budget allow.
Permits, Warranties, and Long-term Maintenance
Permits and Code Considerations
Common permit triggers include changes to roof drainage, substantial increases in roof dead load, or converting a non-accessible roof to an occupiable space. Ask building officials about required engineering stamps and stormwater credits when submitting plans.
Warranties, Manufacturer Limits, and Inspection Schedules
Manufacturers often limit membrane warranties if non-approved materials or unauthorized penetrations are used. Keep records of installation photos, as-built drawings, and the membrane manufacturer’s certification. Schedule inspections:
- Visual check after major storms
- Annual maintenance inspection
- Membrane inspection every 5–10 years depending on system
Common Long-term Problems and How to Prevent Them
Frequent long-term issues:
- Membrane puncture — prevent by using protection boards and clear installation of root barriers.
- Drainage clogging — mitigate with accessible scuppers and filter fleece.
- Substrate compaction and nutrient depletion — plan for top-up and occasional substrate replacement.
For sustainable disposal and recycling of materials removed during repairs, follow our recycling checklist.
The Bottom Line
Green roofs deliver measurable energy, stormwater, and biodiversity benefits and can extend roof life — but the two biggest DIY risks are insufficient structural capacity and imperfect waterproofing. Before building, perform a structural check, pick a proven membrane and root barrier, design reliable drainage, choose a plant palette suited to your climate, decide on irrigation, and prepare a maintenance plan.
Quick DIY checklist:
- Confirm roof framing capacity and get engineering sign-off if loads exceed code thresholds.
- Select a membrane and root barrier with documented performance.
- Design drainage and overflow paths; add inspection ports.
- Choose substrate depth and plant palette for your climate.
- Decide on irrigation during establishment.
- Schedule annual inspections and top-up substrate every 5–10 years.
Frequently Asked Questions
How heavy is a green roof and will my house support it?
Green roof loads vary by system: an extensive system typically adds about 10–50 lb/ft² when saturated, while intensive systems can exceed 80–200+ lb/ft². Use these ranges to estimate your roof dead load and compare it to the original design loads.
If your calculations show the roof may be overloaded, consult a structural engineer. Simple retrofit options include reducing substrate depth, using lightweight engineered media, or installing modular trays that distribute loads over strong points.
How much maintenance does a green roof need?
Maintenance depends on system type: extensive roofs need low maintenance (annual to biannual checks, occasional weeding), semi-intensive systems need quarterly attention during establishment, and intensive roofs require monthly or seasonal gardening. Common tasks are clearing drains, removing invasive plants, and topping up substrate every 5–10 years.
During the first year expect more frequent watering and plug replacement. For automated control and monitoring, consider a low-flow drip system with moisture sensors discussed in the smart irrigation guide.
Can I add solar panels to a green roof?
Yes — but design carefully. Coordinate mounting systems to avoid membrane penetrations, keep clearances for maintenance, and allow for plant access and shading effects. Vegetation can lower panel temperatures slightly, improving efficiency on hot days.
Work with your solar installer and a structural engineer to confirm combined loads and choose compatible mounting hardware; see guidance on matching solar panels for vegetated roofs.
What plants work best on an extensive green roof?
Extensive roofs commonly use low-growing, drought-tolerant plants like sedums, mosses, and certain grasses. Sedum species are popular because they survive shallow substrates (1–4 in.), handle heat and drought, and establish quickly from mats or plugs.
Choose plants suited to your USDA zone and local conditions — native mixes support pollinators and lower long-term maintenance. For specifics by climate, consult the plant selection section above and regional extension resources.
How long do green roofs last compared with conventional roofs?
Green roofs often extend the service life of the roof membrane by protecting it from UV exposure and extreme temperature swings. It's common to see membrane life extended by 20–40 years compared with an exposed membrane, depending on membrane type and installation quality.
Longevity depends on correct installation, proper drainage, and maintenance. Document installation details and follow inspection schedules to preserve warranty coverage and maximize lifespan.