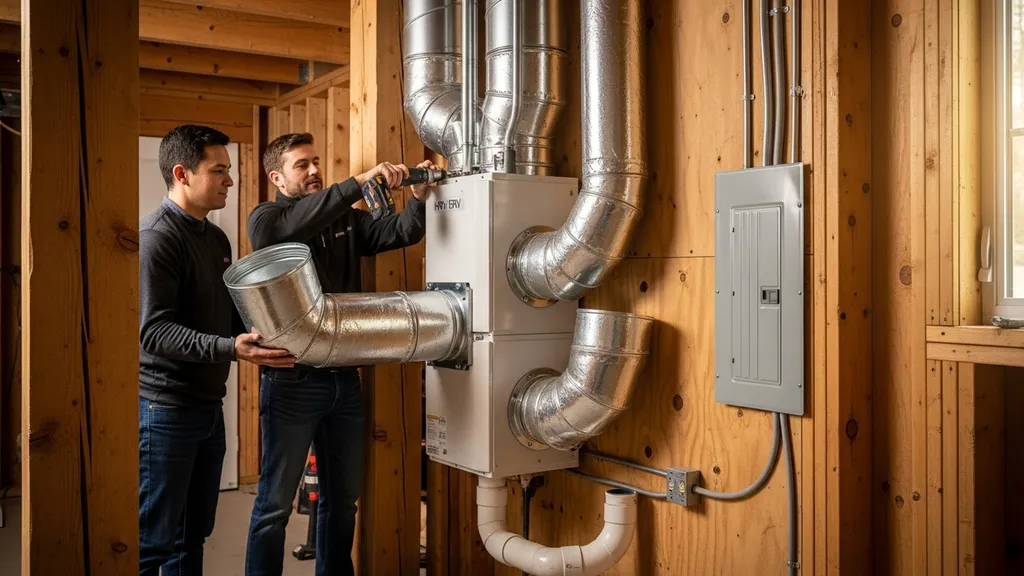
Practical guide to designing and installing balanced ventilation (HRV/ERV) for DIY eco homes — sizing, costs, commissioning and maintenance.
Balanced Ventilation: Design and Installation
A balanced ventilation system brings controlled fresh air into a home while exhausting stale air at the same rate, and it is essential for healthy, energy-efficient eco homes. This guide to balanced ventilation explains how to choose between HRV and ERV, how to size a system to ASHRAE 62.2, step-by-step installation tips for DIYers and small contractors, commissioning checks, and realistic lifecycle costs. Readers will learn concrete sizing examples, component specifications, and retrofit strategies to add balanced ventilation without blowing the budget.
TL;DR:
- Aim for heat-recovery efficiency of 60–95% and select a unit sized to ASHRAE 62.2; a typical 3‑bed, 120 m² house needs ~73 m³/h (choose 10–20% larger).
- Expect unit costs $800–$3,500 and DIY install savings but budget $300–$2,000 for accessories and ducting; running power typically 20–60 W continuous.
- Plan ducts before finishing walls, commission flows within ±5–10% balance, and schedule filter/core checks annually with filter changes every 3–12 months.
Related guides: Ultimate guide to ventilation for small eco homes, Erv vs hrv ventilation system better home, DIY ventilation for off grid cabins, DIY mini split installation step by step guide, Vapor barrier installation for walls step by step guide, and Ultimate guide to solar installation safety.
Why balanced ventilation matters for DIY eco homes
A tightly sealed eco home reduces uncontrolled heat loss but traps pollutants and moisture if it has no controlled ventilation. Balanced ventilation with heat recovery is the standard way to provide fresh air without losing all the heat you paid to retain.
Indoor air quality, moisture and health
Indoor air commonly contains elevated CO2, volatile organic compounds (VOCs) from finishes, and excess moisture from cooking and showering. High relative humidity (RH) above 60% raises condensation and mold risk; balanced systems dilute pollutants and reduce RH spikes. Research shows mechanical ventilation improves measured IAQ and can reduce respiratory symptoms in some studies — see the Illinois Institute of Technology study on ventilation and asthma for results linking ventilation to health benefits.
Energy savings and heat recovery basics
Heat-recovery ventilators (HRVs) transfer sensible heat only; energy-recovery ventilators (ERVs) also transfer moisture. Heat-exchange effectiveness (sensible recovery efficiency, or SRE) ranges roughly 60–95% depending on core type and flow — higher SRE reduces heating and cooling loads. Fan power varies widely; many modern units use 20–60 W average continuous power, while high flows or poor SFPs can push higher. The U.S. Department of Energy provides a clear overview of whole-house ventilation strategies and trade-offs at the Department of Energy's whole-house ventilation guide.
Key points for DIYers
- Ensure airtightness: design ventilation after reasonable air sealing; poor sealing undermines heat recovery benefits.
- Choose HRV vs ERV by climate and internal moisture loads.
- Size to ASHRAE 62.2 or local code requirements; use bedrooms + floor area in calculations.
- Plan duct layout early to avoid long runs and short-circuiting.
- Commission with measured flows and adjust to balance supply and exhaust.
- Include condensate management and insulation for ducts in cold climates.
- Budget for filters, core cleaning, and replacement parts.
Balanced ventilation system types and components
Choosing the right system starts with understanding the main types and each component's role.
HRV vs ERV: side-by-side comparison (table)
| Feature | HRV (heat recovery ventilator) | ERV (energy recovery ventilator) |
|---|---|---|
| Sensible recovery efficiency (SRE) | Typically 60–95% | Typically 60–90% |
| Latent (moisture) transfer | No significant moisture transfer | Transfers moisture (partial) |
| Best climates | Cold/dry climates | Humid climates or mixed climates |
| Typical unit cost | $800–$3,000 | $1,000–$3,500 |
| Maintenance differences | Core cleaning, filters | Same + possible condensate care with moisture transfer |
| Common use case | Cold winters where humidity control is separate | Hot-humid or mixed climates where latent control reduces load |
Core components: fans, heat exchanger, filters, controls
- Fans: Two fans (supply and exhaust) or a single dual-flow assembly; check specific fan power (SFP) expressed W/L/s — lower is better. Aim for SFP < 1.5 W/L/s if possible.
- Heat exchanger/core: Plate (counterflow) cores give high sensible efficiency; rotary cores can be efficient but require maintenance and may transfer some odor; cross-flow cores are simpler and lower cost.
- Filters: Look at MERV ratings; common DIY choices are MERV 6–8 for comfort; higher MERV (≥11) filters increase pressure drop and may require stronger fans.
- Controls and sensors: Timers, boost switches (bath/kitchen), CO2 and RH demand-control options, frost protection and bypass modes.
Define spec terms on first use:
- SFP: Specific fan power, W per L/s; lower means more efficient fan.
- SRE: Sensible recovery efficiency, percent of sensible heat recovered.
- cfm / L/s / m³/h: Common flow units; 1 cfm ≈ 1.699 m³/h.
- MERV: Filter efficiency rating; higher number removes finer particles.
Typical DIY-appropriate unit capacities range from 60–300 m³/h (roughly 35–175 cfm). A small 25 m² tiny house may use a 60–80 m³/h unit; a 120 m² family home commonly uses 80–150 m³/h depending on occupancy and airtightness.
Ducting strategies and terminal devices
Design ducts to deliver supply air to living spaces and bedrooms and to draw exhaust from kitchens, bathrooms, and utility rooms to avoid short-circuiting. Use supply grilles with adjustable diffusers and exhaust grilles in wet rooms. Consider transfer air paths or transfer grills for rooms without direct ducts. Terminal devices include boost switches in bathrooms, run-on timers for kitchen hoods tied to the system, and humidity-triggered boost modes.
PHIUS guidance on balanced ventilation design gives practical balancing tolerances and register-level considerations; see the PHIUS mechanical summit design principles PDF for detailed rules on register balancing and core selection.
Sizing and design principles for balanced ventilation
Sizing should follow ASHRAE 62.2 or local code while considering real-world patterns and airtightness.
Calculating ventilation rates (ACH, L/s per person, and ASHRAE 62.2)
ASHRAE 62.2 (common U.S. code reference) uses a simple formula: ventilation (cfm) = 7.5 × (bedrooms + 1) + 0.01 × floor area(ft²). Worked example: a 3‑bedroom, 120 m² house.
- Convert area: 120 m² ≈ 1,292 ft².
- Bedrooms + 1 = 4 → 7.5 × 4 = 30 cfm.
- Area term = 0.01 × 1,292 = 12.92 cfm.
- Total = 42.9 cfm ≈ 72.9 m³/h (42.9 × 1.699).
Assuming a 2.4 m ceiling height, house volume ≈ 288 m³; ventilation rate ≈ 72.9/288 = 0.25 ACH. Select a unit with 10–20% margin — choose ~80–90 m³/h rated capacity. This method ensures compliance and avoids undersizing.
Balancing supply and exhaust — fan curves and static pressure
Design for supply ≈ exhaust within ±5% ideally; ±10% is acceptable in many practical installs. Read manufacturer fan curves to find flow at expected total external static pressure (ESP), including filters and duct losses. Find the operating point where the curve intersects your system pressure. Keep target ESP moderate — many residential systems aim for <150 Pa total; lower is better for fan efficiency and noise control.
Zoning, duct runs and placement to avoid short-circuiting
Place supplies in bedrooms and living areas; place exhausts in kitchens, baths, and laundry. Avoid locating a supply and exhaust within the same small room to prevent immediate short-circuit. Keep main ducts short and straight, avoid excessive fittings, and use gradual transitions. Recommended maximum single-run lengths depend on duct size but keep typical 100 mm (4") ducts under 7–10 m for balanced flow unless upsized.
For bathroom exhaust obligations and local code guidance, consult the building code checklist for toilet ventilation.
Also consider roof and attic insulation when assessing condensation and frost control in ducts; see our attic insulation guidance and roof insulation details for thermal strategies that affect ventilation frost protection.
Installation step-by-step for homeowners and small contractors
A methodical install reduces callbacks and performance issues. The following checklist and tips assume basic electrical and carpentry competence.
Preparing the airtight envelope and planning penetrations
- Plan ventilation runs during the framing stages so you can route ducts inside service cavities — see our framing stages for best practice on chases and service walls.
- Choose a unit location with access for maintenance, electrical supply, condensate routing, and service clearances.
- Mark penetrations and detail airtight seals with compatible tapes and gaskets. Seal around ducts with mastic or polyurethane jointing tape.
Mounting the unit and running ducts (practical tips)
- Verify electrical supply and breaker sizing; many units require 120/230 V and a dedicated circuit.
- Mount unit on vibration isolators to reduce noise transfer.
- Use rigid duct where possible for balanced systems; flexible duct increases pressure drop and makes balancing harder.
- Insulate ducts running through unconditioned spaces with at least 25 mm (1") insulation and vapor control to prevent condensation.
- Fit a condensate drain with a trap where required; slope drain lines and use an inline condensate pump if gravity drain not available.
- Seal all duct joints with mastic and test with smoke or pressurization.
Tools list: manometer or differential pressure gauge, balometer (or flow hood) if available, drill, silicone, mastic, duct insulation, sheet metal screws, vibration isolators and a condensate pump if needed.
Before finishing walls, confirm grill locations and access panels; plan for future core removal and filter changes.
For a visual demonstration, check out this video on lunos hrv air exchanger installation:
Commissioning: airflow balancing, controls and sensors
- Measure flows with a balometer or hood; if not available, read fan curves and verify with a manometer while measuring pressure drop across duct selectors.
- Adjust dampers and grille inserts until supply and exhaust match within ±5–10%. Industry guidance in many cases sets a balancing tolerance of 20% or 5 cfm; PHIUS guidance gives register-level targets and balancing protocols — see the PHIUS balanced ventilation design principles.
- Set boost timers for kitchens and bathrooms; program demand-control ventilation to increase flows based on CO2 or humidity sensors if installed.
- Place CO2 sensors in living spaces and RH sensors near wet rooms to verify system responsiveness.
Common installation mistakes to avoid
- Undersized ducts and excessive use of flexible duct.
- Uninsulated ducts in cold spaces causing frost or condensate.
- No condensate trap or incorrect drain slope.
- Not balancing supply and exhaust, causing pressurization or depressurization.
- Locating unit in inaccessible places that prevent core cleaning and filter changes.
NREL research highlights the benefits of drawing outside air from controlled locations and the performance difference between supply and balanced systems; see the NREL ventilation system effectiveness study for measured impacts.
Energy, cost and maintenance: lifecycle considerations
Understanding lifecycle costs helps homeowners budget and choose the right product.
Typical costs and payback estimates
- Unit cost: $800–$3,500 depending on capacity, brand and features (Zehnder ComfoAir and Panasonic WhisperComfort represent higher-end and mid-range lines).
- Installation and accessories: $300–$2,000 if DIY-friendly; pros charge more for complex ducting and balancing.
- Running cost example: a unit using 50 W continuous averages 0.05 kW × 8,760 h = 438 kWh/year. At $0.15/kWh that's about $66/year.
Illustrative payback: if heat-recovery reduces ventilation heating losses by 30–50% and a household saves $150–$300/year in heating, the system payback (unit + install ~$2,300) is roughly 8–15 years, depending on fuel prices and climate. These are illustrative; calculate using local rates and your heating profile. Use our material cost calculator to estimate unit, ducting and accessory costs for your build.
Maintenance schedule: filters, drains and sensors
- Filters: Replace or clean every 3–12 months depending on MERV rating and indoor pollutant loads.
- Core: Inspect and clean annually; washable cores reduce replacement cost but require drying.
- Condensate drain: Inspect seasonally for blockages; clean trap and check pump operation if used.
- Sensors and controls: Calibrate CO2/RH sensors yearly; check boost switches and timers.
Red flags: increased noise, frosting on the core in winter, persistent humidity above 60%, or pressure imbalances.
Running costs and ways to reduce energy use
- Use low SFP units and oversized ducts to reduce fan energy.
- Run at lower continuous flow with periodic boosts for occupancy peaks (demand-control ventilation).
- Combine with efficient heating (air source heat pumps) to lower net seasonal energy use — see integration tips in our air source heat pump systems guide.
Evidence from building studies shows ventilation improves IAQ and can reduce health-related costs; see the Illinois Institute of Technology article and other studies for quantified IAQ improvements (links above).
Choosing the right equipment and product specs
Selection depends on climate, occupancy, and integration with heating/cooling.
Select by climate: when to choose HRV vs ERV
- Choose HRV in cold, dry climates where transferring moisture to the supply would raise indoor humidity.
- Choose ERV in hot-humid or mixed climates to manage latent loads and reduce cooling latent load.
Research comparing ventilation effectiveness across building types can help decide; see the comparative ventilation study at PMC NCBI ventilation analysis.
Key specs to compare (SRE, SFP, sound levels, controls)
- Sensible recovery efficiency (SRE): Target >70% for good performance in heating climates.
- SFP: Aim for <1.5 W/L/s for energy-efficient fans.
- Sound levels: Look for <35 dB(A) in living spaces at rated flow.
- Controls: Prefer units with demand-control options (CO2/humidity), frost protection, boost modes, and easy filter access.
- Certifications: Check AHRI listings, ENERGY STAR where present, and manufacturer performance tests.
Short shopping comparison table:
| Spec | Good target |
|---|---|
| SRE | >70% |
| SFP | <1.5 W/L/s |
| Sound | <35 dB(A) at design flow |
| Filters | MERV 6–8 for low pressure drop |
Features and accessories that matter for DIY installs
- Washable or easily replaced filters and cores.
- Integrated condensate trays and drain fittings.
- Simple control interfaces and external boost switch terminals.
- Pre-punched duct collars and mounting brackets to speed installation.
- Acoustic options like inlet silencers or flexible acoustic ducts for quiet homes.
When integrating ventilation with heating systems such as heat pumps, consult guidance in the air source heat pump systems guide.
Retrofitting balanced ventilation into existing builds
Retrofitting requires creativity to minimize invasive work while achieving balanced airflow.
Low-cost retrofit strategies and duct options
Options include:
- Centralized unit with short runs using attic or basement chases.
- Decentralized HRV/ERV modules in exterior walls for rooms with limited access.
- Through-partition wall HRV units for tiny or modular homes.
Use rigid duct where possible; if flexible duct is unavoidable, increase diameter to reduce pressure drop.
Sequence advice: airtightness vs ventilation first
Improve airtightness in stages. Seal obvious large leaks first (windows, major penetrations). But do not make a home very tight without installing ventilation — ensure mechanical ventilation is in place immediately after significant air-sealing work. For a full retrofit checklist and sequencing guidance, consult our retrofit checklist.
Case study: tiny house retrofit example
Tiny house: 25 m² (≈270 ft²), single-occupant, high internal moisture from cooking and showering.
- Unit choice: decentralized ERV or small central HRV rated 60–80 m³/h.
- Ducting: single short supply to living/sleep area and exhaust from bathroom; use wall-mounted exterior grills and a condensate-free design if ERV is through-wall with integrated condensation management.
- Maintenance access: pick an external wall module or an interior unit with front access for filter changes.
This approach limits invasive work and keeps costs down while ensuring acceptable IAQ.
The Bottom Line
Balanced ventilation is essential in airtight eco homes: assess airtightness, pick HRV or ERV based on climate and moisture loads, and size systems to ASHRAE 62.2 with a 10–20% margin. Plan ducts early, install with sealed, insulated runs, and commission to achieve supply/exhaust balance within ±5–10%. Hire a pro for complex multi-zone balancing or when accurate flow measurement tools are needed.
Frequently Asked Questions
What is the difference between an HRV and an ERV?
An HRV (heat recovery ventilator) transfers sensible heat between outgoing and incoming air and is best for cold, dry climates. An ERV (energy recovery ventilator) transfers both sensible heat and some moisture, which helps in hot-humid or mixed climates to reduce latent loads. The choice affects indoor humidity control, winter frost management, and overall energy recovery; see the HRV vs ERV comparison table above for typical efficiencies and use cases.
Will a balanced ventilation system reduce mold and condensation?
Yes. By providing controlled fresh air and removing humid exhaust air from bathrooms and kitchens, balanced ventilation reduces peak relative humidity and the frequency of condensation events. Maintaining balanced flows and placing exhausts in wet rooms is key. If RH remains >60% after installation, check for under-ventilated areas, improper balancing, or sources of moisture that need mitigation.
How often should I change filters and service the unit?
Filter replacement intervals vary by filter type and indoor conditions: expect 3–12 months for disposable filters, and cleaning intervals for washable filters and cores roughly annually. Inspect the condensate drain and trap seasonally. Annual checks on fans, controls, and core condition are a good practice to maintain efficiency and IAQ.
Will a balanced system make my home noisy?
Noise is manageable with correct selection and installation. Target units rated under 35 dB(A) in living spaces at design flow, mount units on vibration isolators, use insulated ducting or acoustic ducts for long runs, and avoid locating grilles where they blow directly at seating areas. Simple measures often reduce perceived noise significantly.
Is balanced ventilation required when retrofitting an older home?
Requirements vary by jurisdiction and the extent of air-sealing work. Major air-sealing that increases airtightness should be matched with mechanical ventilation to maintain IAQ. Consult local codes and building officials; our retrofit checklist covers sequencing and when to add ventilation during retrofit projects.