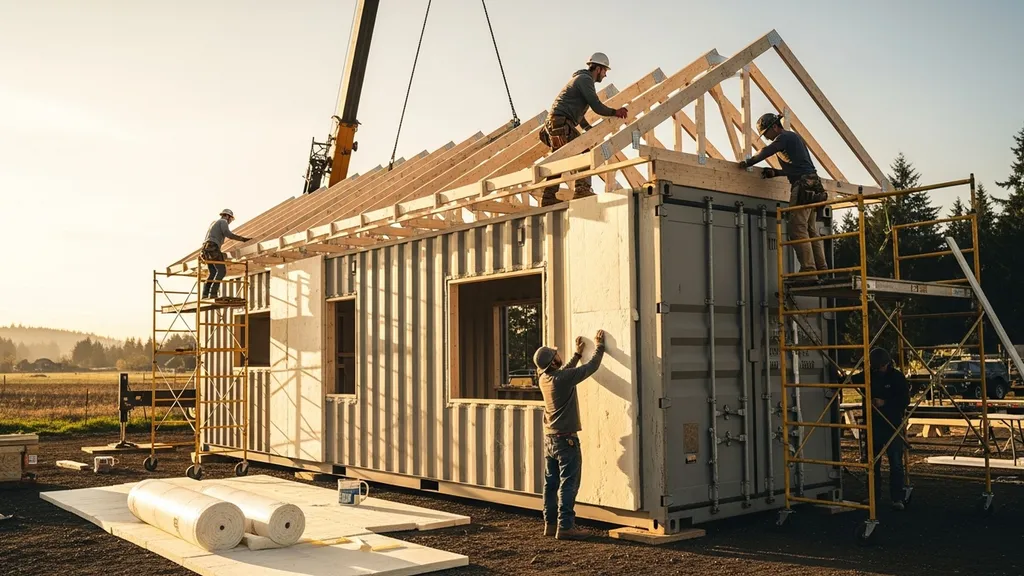
Step-by-step guide to planning, building, insulating, and outfitting a shipping container home for budget-conscious DIYers.
Shipping Container Homes: Conversion Guide
Shipping container home conversions offer a fast, affordable route to a compact, durable dwelling. This guide explains how to plan, site, insulate, and outfit a shipping container home so budget-conscious DIYers can estimate costs, avoid common pitfalls, and decide when to hire professionals. Readers will learn typical container sizes and shell costs, foundation and permit realities, layout strategies (single, stacked, or combined), structural reinforcement for large openings, insulation approaches to handle thermal bridging, and sensible off-grid systems for small-scale living.
TL;DR:
- Choose the right shell: a 20' container ≈ 160 sq ft and a 40' ≈ 320 sq ft; used shells commonly cost $1,500–$5,000 depending on condition and region.
- Insulate smart: continuous exterior rigid insulation or closed-cell spray foam plus interior framing reduces condensation risk—plan for target wall R-values of R-10 to R-20 (mild to cold climates).
- Budget and permits: expect 4–12+ weeks for permitting, allocate 15–25% contingency for transport, engineering, and major openings, and hire certified welders for structural work.
Why Choose a Shipping Container Home? Pros, Limits, and Use Cases
Shipping container homes appeal to homesteaders and first-time self-builders who want a low-cost shell with high durability. A standard 20-foot container provides roughly 160 sq ft of floor area; a 40-foot container gives about 320 sq ft. Used "one-trip" or cargo-worn containers typically list between $1,500 and $5,000 for the shell, though prices vary by port, season, and local demand. Research from university case studies has examined feasibility and structural behavior of modified containers, useful for planning and risk assessment (case study on container feasibility at Cal Poly).
Who Benefits Most
- Small households and couples seeking a compact, low-footprint primary or secondary dwelling.
- Backyard ADUs and remote cabins where fast delivery of a weatherproof shell speeds build schedules.
- Tiny container home projects and off-grid retreats where modularity and transportability matter.
Major Advantages vs Conventional and Modular Builds
- Shell speed: a container is immediately weatherproof and structurally sound, reducing initial enclosure time.
- Durability: Corten steel resists corrosion when properly detailed and coated, giving a strong base for reuse.
- Cost control: For many DIYers, reusing a container shell can reduce early capital outlay compared with stick-built shells.
Common Limitations and Realistic Expectations
- Thermal bridging: the steel shell creates continuous conductive paths; insulating strategies must address this.
- Interior space constraints: wall cavities are shallow and require creative framing or exterior insulation to meet comfort targets.
- Structural changes: large openings or stacking containers change load paths and usually require engineered reinforcement.
- Regulatory uncertainty: some jurisdictions classify container homes as custom-built, others as manufactured—permit outcomes differ.
Alternate options include conventional tiny houses and modular panel systems. Compared to tiny trailers, containers have more embodied steel and higher thermal bridging risk but offer faster shell delivery and heavier load capacity for stacking or rooftop systems. For readers weighing options, industry guides and up-to-date feasibility studies provide comparative data.
Planning, Site Selection, and Permits for Container Conversions
Proper planning reduces costly surprises. Site selection determines foundation type, transport logistics, and permit pathways.
Site and Foundation Options
- Pier foundations: Concrete piers or screw piles keep the steel shell off wet ground and are cost-effective for uneven sites. They work well for single-container placements.
- Slab: Concrete slab foundations are common where frost depth is manageable and a continuous floor is preferred. Slabs add cost but simplify interior finishing and thermal mass.
- Screw piles: Fast to install and minimal excavation; good for remote sites with limited heavy equipment access.
Transport and crane access
- A 40' container requires roughly a 75–100 ft turning radius for delivery and a clear vertical work area for crane lifts. Confirm road access, overhead lines, and local traffic rules before purchase.
- Budget for offloading: crane or forklift fees vary by region; crane lifts for a 40' container can run several hundred to a few thousand dollars depending on site complexity.
Zoning, Building Codes, and Inspections
- Start with local planning departments to confirm allowable uses and setbacks; container homes may fall under accessory dwelling unit (ADU) rules or custom builds.
- Expect typical permit timelines of 4–12+ weeks for plan review; complex structural changes often trigger engineering stamp requirements and structural inspections.
- Inspectors commonly request engineered foundation drawings, structural calculations for major openings or stacking, and smoke/safety system plans for habitability.
Hazard Checks and Pre-conversion Surveys
- Test used containers for chemical residues, lead paint, and other contaminants. Industry sellers often provide clean certificates; if uncertain, order surface testing.
- When using used containers, a pre-purchase survey that documents dents, corrosion, and floor condition informs negotiation and planning.
- For lead hazard awareness and abatement requirements in renovation projects, consult EPA/RRP guidance when demolition or sanding old coatings is anticipated.
For permit checklists and examples, review region-specific guides like the permit requirements for off-grid homes in Canada and state examples such as California permits and Massachusetts permits. These pages illustrate common documentation and municipal inspections required in regulated jurisdictions.
Designing the Layout: Single, Stacked, and Modular Combinations
Design begins by treating each container as a module. A 20' unit is about 160 sq ft; a 40' unit about 320 sq ft. Combining modules creates flexible footprints.
Layout Principles for Small Footprints
- Plan circulation first: allocate about 20–30% of floor area to circulation and storage in very small plans to avoid cramped rooms.
- Use linear or L-shaped kitchens and wet walls to cluster plumbing for cost savings.
- Maximize daylight with long-side glazing; aim for balanced window placement to enable cross-ventilation.
Connecting Containers and Circulation
- Back-to-back placement of containers widens living spaces; join along long edges for a broader room without complex structural changes.
- Splice connections with overlap plates, welded seams, or bolted splice plates. When creating interior corridors between units, ensure continuous air barriers if the assembly is treated as one thermal zone.
When to Stack or Splice: Structural and Thermal Trade-offs
- Stacking creates a compact vertical home but transfers loads through corner posts; adding openings near corners may require engineered columns or sleeve reinforcements.
- Stacking increases thermal bridging where containers touch; continuous exterior insulation or thermal break framing can reduce heat loss.
- Large openings for sliding doors or wide windows change moment distribution and need lintels or welded box sections—consult a structural engineer for spans wider than about 6–8 feet.
For deeper exterior insulation strategies consider a Larsen truss assembly which allows thicker insulation outside the steel shell while preserving interior space. For general tiny home design principles and foundation comparisons, see the tiny-house construction guide. Design sketches should show module footprints, plumbing stacks, and daylight paths—keep iterations simple and test one furniture layout per room.
Step-by-step Conversion Timeline & Build Checklist (youtube Embed)
A realistic timeline helps owners plan permits, labor, and cashflow. For many owner-builders: part-time builds take 3–6 months; full-time builds take 6–12 months depending on complexity.
Pre-build checklist (site, containers, permits, materials)
- Site survey: Access, soil bearing capacity, utilities location.
- Container selection: New, one-trip, or used; request COC (condition) report.
- Permits and engineering: Foundation drawings, structural details for major cuts.
- Materials and tools: Welding kit (if licensed), grinder, saws, framing studs, insulation, windows/doors, roofing materials.
- Subcontractors: Certified welder for structural joins, licensed electrician/plumber for inspections.
Shell Work: Cutting, Reinforcing, and Weatherproofing
- Sequence: mark openings, cut with plasma or abrasive saw, tack reinforce around the opening, then fully weld or attach engineered lintels.
- Weatherproofing: primer and high-build coatings on cut edges, seam flashing, and proper drip edges where water can pond.
- Safety: use respirators and ventilation when burning or grinding; hire certified welders for structural work.
Interior Systems Rough-in and Finishing Stages
- Rough-in order: foundation inspection → structural modifications → roof and exterior envelope → MEP rough-in → insulation and air barrier → finishes.
- Typical inspection milestones: foundation, framing/structural, electrical/plumbing rough, insulation/air barrier, final occupancy.
- Expect iterative cycles: insulation choices may affect interior finish decisions and window schedules.
This DIY video shows you the hands-on process:
The embedded walkthrough above shows cutting, reinforcing, insulating, and finishing sequencing—watch to visualize typical workflows and safety practices. For material estimating and planning, use the material takeoff checklist. Industry guides and conversion case studies provide practical sequencing tips and common time sinks; plan conservative schedules and allow contingency for bad weather and permit delays.
Structural Modifications, Openings, and Roofing Solutions
Cutting into a container alters load paths carried by the C-section perimeter and roof. Understand how to preserve structural integrity.
How Cutting Affects Load Paths and Reinforcement Options
- The container's corner posts and perimeter box-beam distribute bending and shear. Major openings in walls or roofs reduce stiffness and require reinforcement.
- Common reinforcement methods: welded steel lintels, added C-channels, boxed frames, or bolted splice plates. For large spans (greater than ~6–8 feet), an engineer should specify section sizes and weld details.
- Use secondary framing (steel or wood studs) attached to a reinforced perimeter for interior finishes and to transfer loads to the primary steel shell.
Roofing and Overhang Strategies to Reduce Thermal Load
- Simple single-ply membrane roofing can sit on the container roof but adds little insulation and requires careful flashing.
- Adding a pitched roof provides attic space for insulation, improves drainage, and creates convenient solar mounting surfaces. A lightweight timber or metal-framed pitched roof also reduces heat gain on hot days.
- Consider a green roof only with engineered reinforcement and waterproofing; live loads increase significantly and require extra structure.
Connecting Multiple Containers: Welds, Plates, and Fasteners
- For permanent joins, full-penetration welds at seams and corner connections are common. For reversible assemblies, bolted splice plates provide mechanical joining without welding.
- Ensure corrosion protection: prepare surfaces, apply zinc-rich primers, and coat welds to prevent rusting at cut edges. Flashing details around seams prevent water ingress at joins.
- For interior sheathing and substrate choices, review material compatibility—see understanding oriented strand board strengths and weaknesses for guidance on sheathing and substrate selection. For pitched roof installation on containers, consult the step-by-step how to install recycled metal roofing.
Industry steel design guides such as AISC handbooks provide steel section properties and design rules; local engineers will reference these standards when specifying reinforcements.
Thermal Performance and Moisture Control: Insulation Strategies
Thermal bridging is the primary challenge in container homes. The steel shell conducts heat and can create condensation risk if assemblies are not detailed correctly.
Insulation Options — Interior, Exterior, and Hybrid
- Interior spray foam (closed-cell): Provides high R-value per inch (about R-6 to R-7 per inch), acts as air and vapor retarder when applied correctly, and limits condensation on the cold steel surface. Cost and embodied carbon are higher.
- Open-cell spray foam: Lower density and lower R-value per inch, more vapor-open; cheaper but can allow moisture migration.
- Exterior rigid insulation (polyiso, XPS): Creates a continuous thermal break and is effective at cutting thermal bridging. Polyiso has high R-value per inch in warm conditions; XPS handles moisture better.
- Mineral wool and natural fiber batts: Suitable within added exterior framed walls or thick interior frames (Larsen truss), but require careful vapor control.
- Cellulose: Good for breathability and embodied carbon; typically used in thicker framed assemblies outside the steel shell.
Managing Thermal Bridging and Vapor Control
- Continuous exterior insulation is the most effective strategy to interrupt thermal bridges. When adding exterior sheathing and a framed wall outboard of the container, detail a continuous air barrier and drainage plane (see the zip sheathing air barrier guide for planning).
- Vapor control depends on climate: in cold climates, keep the vapor retarder inward of insulation; in hot-humid climates, designs favor vapor-permeable and well-ventilated exteriors. Refer to local code and climate-zone guides.
- Use mechanical ventilation with controlled heat recovery in tighter assemblies to manage indoor humidity and IAQ.
Comparison Table: Insulation Materials and Trade-offs
| Insulation Type | Typical R/inch | Installed cost range (est) | DIY friendliness | Breathability / Carbon notes |
|---|---|---|---|---|
| Closed-cell spray foam | 6–7 | $–$$ | Low (requires pro) | Low permeability; higher embodied carbon |
| Open-cell spray foam | 3.5–4 | $ | Low | Vapor-open; less R/inch |
| Polyiso rigid board | 5.5–6.5 | $ | Medium | Higher R/inch; sensitive to cold |
| XPS rigid board | 4.5–5.0 | $ | Medium | Moisture-resistant, higher embodied foam |
| Mineral wool batts | 3.0–3.3 | $–$ | High | Breathable; good fire performance |
| Cellulose (dense pack) | 3.2–3.8 | $ | Medium | Lower carbon if recycled; needs cavity depth |
| Natural fiber (hemp/wool) | 3.5–3.8 | $ | Medium | Low embodied carbon; breathable |
For an extended comparison of spray foam and cellulose, see spray foam vs cellulose insulation. For low-carbon, breathable options, consult the natural fiber insulation guide.
Target R-values by climate (guideline)
- Mild climates (IECC zones 2–3): Wall R-10 to R-15; roof R-20 to R-30.
- Mixed climates (zones 4–5): Wall R-15 to R-20; roof R-30 to R-40.
- Cold climates (zones 6–8): Wall R-20+ with continuous exterior insulation; roof R-40+.
Interior cavity depth in containers is narrow (about 1.75 inches between corrugations), so exterior insulation or building out with a Larsen truss is often necessary to meet these targets.
Systems: Power, Water, Ventilation, and Off-grid Options
Small container homes pair well with modest renewable systems. Sizing and simplicity keep costs predictable.
Solar, Batteries, and Small Wind — Sizing Basics
- Estimate loads: a modest tiny container home with LED lighting, a small refrigerator, efficient induction cooktop, and basic pumps often draws 2–6 kWh/day.
- A starting point: a 2–4 kW PV array paired with 5–10 kWh battery capacity can support a low-energy household. Use the 7 kW solar sizing guide as a model to scale down for daily consumption.
- Balance continuous loads (fridge, pumps) with battery capacity and inverter sizing; include surge capacity for motors.
Water Collection, Filtration, and Storage for Containers
- A 40' container with a pitched roof can collect several hundred gallons per 1,000 sq ft of roof per inch of rain; calculate cistern sizing based on local rainfall and daily use.
- Use first-flush diverters, sediment pre-filters, and UV or membrane filtration for potable uses. For non-potable uses, basic settling and filtration are acceptable.
- Practical resources: follow steps in the rainwater collection guide and the off-grid water systems guide for filtration and storage sizing.
Ventilation, HVAC, and Sanitation Choices
- For airtight assemblies, install a mechanical ventilation system. A small heat-recovery ventilator (HRV/MVHR) preserves heat while providing fresh air—valuable in cold climates to manage moisture.
- Heating options: mini-split heat pumps offer efficient heating and cooling with modest electrical draw. Wood stoves remain an option for remote, off-grid heat with propane backup.
- Sanitation: composting toilets or septic systems are common off-grid choices; compare options in off-grid toilet options. Check local code: some areas restrict composting or non-sewer sanitation solutions.
Prioritize efficient appliances and LED lighting to lower PV and battery sizing. When aiming for low energy use, pair high-quality insulation and airtight detailing with modest renewables.
Cost Estimates, Budgeting, and Material Takeoff for Container Projects
Budget broadly and expect variation. These ranges are examples, not guarantees.
Typical Budget Line Items and Cost Ranges (estimates)
- Shell purchase (20'–40'): $1,500–$8,000
- Transport and crane: $500–$5,000+
- Foundation (piers/screw piles/slab): $2,000–$15,000
- Reinforcement and structural engineering: $1,000–$10,000
- Insulation and cladding: $2,000–$12,000
- Windows and doors: $1,500–$8,000
- MEP (electrical, plumbing, HVAC): $3,000–$15,000
- Finishes (flooring, cabinets, paint): $2,000–$12,000
- Permits, inspections, engineering: $500–$5,000
- Contingency: 15–25%
Material Takeoff Checklist and Estimating Tips
- Start with a room-by-room list: framing lumber or steel studs, sheathing, insulation board quantities, tape and fasteners, windows, doors, roofing, and interior finishes.
- For accurate quantities, measure container linear feet and plan overlap details. Use the material takeoff checklist for step-by-step quantities and unit costs.
- Get multiple bids for specialized work (welding, roof install, solar) and buy common materials in bulk when possible.
Cost comparison table: per-sq-ft ranges (estimates)
| Build Type | Typical cost per sq ft (DIY basis) | Notes |
|---|---|---|
| Basic DIY container conversion | $75–$200 | Lower finish level, owner labor, off-grid basics |
| Professionally completed container home | $150–$350 | Higher finish, contractor labor, permits included |
| Conventional tiny house (stick-built) | $125–$300 | Varies with site work and systems |
Key Points List: Where to Save and Where to Hire Pros
- Save: Interior finishes, painting, basic carpentry, and passive systems if skilled.
- Hire pros: Structural welding and large reinforcements, electrical and plumbing hook-ups requiring permits, engineered roof additions, and HVAC sizing/installation.
- High-risk cost drivers: Transport and crane, unexpected corrosion or contamination on used shells, large glazed openings, and off-grid systems sizing errors.
For comparing efficiency upgrade costs and payback considerations, the cost breakdown for passive houses provides useful benchmarks when investing in higher R-value assemblies.
The Bottom Line
Shipping container home conversions make practical sense for DIYers seeking a fast, durable shell and modular flexibility. The main technical challenges are thermal bridging, structural reinforcement for cuts and stacking, and moisture control—budget for engineering, quality insulation, and skilled welders. Use checklists, conservative time estimates for permits, and internal links above to plan next steps like permits, insulation choices, and solar sizing.
How much does a DIY container conversion cost?
Costs vary widely by region and scope. Expect a basic DIY conversion to range roughly $75–$200 per sq ft including shell, insulation, MEP, and basic finishes; professionally finished container homes often fall in the $150–$350 per sq ft range. Major cost drivers include transport/crane fees, structural reinforcements for large openings, glazing, and off-grid systems.
Use a detailed material takeoff and add 15–25% contingency to account for unknowns like retrofits or permit changes. For help with estimating quantities, see the material takeoff checklist linked above.
Do containers need special foundations?
Containers do not require full basements; common foundations include concrete piers, screw piles, and concrete slabs. Choose based on soil, frost depth, and whether the container will be stacked or permanently joined to other units. Piers and screw piles minimize excavation and are common for seasonal or remote sites.
Engineered foundation drawings may be required by local inspectors, especially for stacked units or sites with poor soil. Factor foundation inspection milestones into the permitting timeline.
What's the best way to insulate a container home?
There is no single best method; choices depend on climate and budget. Continuous exterior rigid insulation (polyiso or XPS) or building a Larsen truss to create a thick exterior framing layer performs well because it interrupts the steel thermal bridge. Closed-cell spray foam applied to the interior can also work, providing air sealing and high R-value per inch but at higher cost and embodied carbon.
Consider vapor control and ventilation strategy with your insulation choice—tight assemblies need mechanical ventilation such as an HRV to control humidity and maintain indoor air quality.
Are container homes legal in residential zones?
Legality depends on local zoning and building codes. Some jurisdictions treat container homes like conventional dwellings and require full plan review and permits; others treat them as accessory or temporary structures. Always check with the local planning department early and prepare for typical documentation requests like structural calculations and foundation plans.
Regional permit examples are provided above for California and Massachusetts to illustrate common requirements, but local rules vary—plan at least 4–12 weeks for permit approval in many jurisdictions.
Can I run a container home off-grid?
Yes. Many container homes operate off-grid with modest PV arrays, battery storage, water catchment, and composting or septic-based sanitation. Use an energy budget to size PV and batteries—small container homes often need 2–6 kWh/day; a 2–4 kW PV system with 5–10 kWh battery storage is a reasonable starting point for low-energy use.
For water, pair roof catchment with filtration and appropriately sized cisterns; see the rainwater collection and off-grid water systems guides above. Check local codes for allowable sanitation systems before installing off-grid toilets or composting systems.