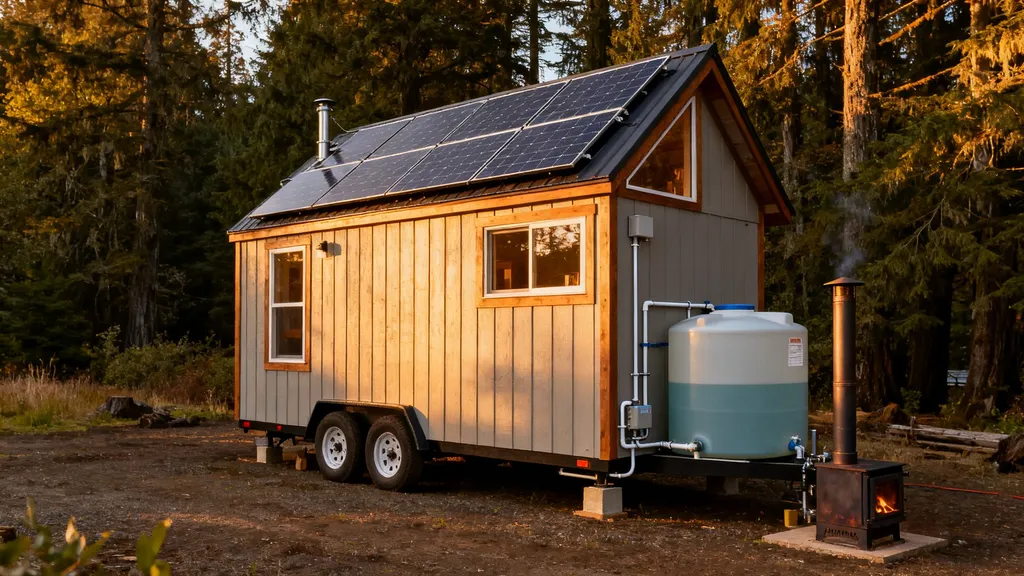
A practical guide to designing and integrating power, water, waste, HVAC and controls for an off-grid tiny house.
Off-Grid Tiny House: Systems Integration Guide
An off-grid tiny house requires more than a pile of components; it needs systems that work together so a small footprint still delivers year-round comfort and safety. This guide explains how to design and integrate energy, water, waste, HVAC and control systems for an off-grid tiny house so that costs and failure points are minimized. Readers will learn practical sizing methods, component choices, safety checkpoints, and a phased build plan aimed at budget-conscious owner-builders. The article uses practical example numbers (clearly labeled) and points to deeper resources for each subsystem.
For external source context, review Expert Guide: How to Setup Your Off Grid Tiny House.
TL;DR:
- Prioritize passive measures (insulation, airtightness) to cut heating and cooling loads before sizing equipment.
- Size electrical and water systems to realistic daily use; stage batteries and panels as budget allows.
- Use maintainable sanitation (composting or appropriately sized septic), monitor systems constantly, and phase expensive components.
Overview: Integrating Systems in an Off-grid Tiny House
What Systems Integration Means for a Tiny House
Systems integration means planning electrical, water, waste, heating/cooling, and controls together so parts share capacity and avoid duplication. For an owner-builder on a tight budget, integration reduces overspecification (and wasted cost), avoids incompatible equipment, and improves reliability during long absences.
Primary design priorities: energy, water, waste, comfort, communications
- Energy: Match appliance choices and behaviour to a realistic energy budget, then size PV and storage to that budget.
- Water: Choose a primary water source (rainwater, hauled, or shallow well) and size storage to cover dry spells.
- Waste: Pick a sanitation strategy that fits the lot, maintenance willingness, and local codes.
- Comfort: Use passive measures — insulation, airtightness, and solar gains — before adding mechanical heating or cooling.
- Communications: Plan for internet and remote monitoring for safety and firmware updates.
Key numbers and examples (illustrative only)
- Typical tiny-house floor area: 100–400 sq ft.
- Energy-use ranges: Minimal (2–4 kWh/day); Average (6–12 kWh/day); Heavy (15–25 kWh/day). These are example ranges to guide sizing.
- Water use per person: Roughly 20–80 liters/day (5–21 gallons/day) depending on conservation practices and laundry frequency — example figures only.
Key points
- System choices should match lifestyle: full off-grid living needs bigger storage and redundancy than occasional weekend use.
- Passive measures such as airtightness and high R-values reduce equipment size and lifecycle costs; the Passive House Institute (PHI) framework is a useful reference for airtight and low-load design.
- Plan monitoring and simple automations early; they allow load-shedding and remote alerts that prevent costly failures.
Electrical System for an Off-grid Tiny House: Sizing, Components, Layout
Load Calculation and Realistic Use-case Examples
Begin with a load audit listing each appliance, its wattage, and expected hours per day. Example appliance list (illustrative):
- LED lighting: 5 W × 8 hours → 0.04 kWh/day
- 12V refrigerator: 40–60 W average → 1.0–1.4 kWh/day
- Water pump (intermittent): 60–200 W → 0.2–1.0 kWh/day
- Mini-split heat pump (when needed): 600–1,200 W runtime variable → 2–8 kWh/day
- Phone/laptop charging and small appliances: 0.5–2 kWh/day
Example calculation for a 2-person tiny house (illustrative):
- Lighting + devices: 1.0 kWh/day
- Refrigerator: 1.2 kWh/day
- Water pump: 0.5 kWh/day
- Cooking (propane majority): 0.0–0.5 kWh/day electric
- Heating (passive-first, electric backup): 2.0 kWh/day
- Total example daily load: ~6.2 kWh/day
From a daily load, determine PV and battery needs. If the site averages 4 peak sun hours/day usable, a rough PV array = daily kWh ÷ peak sun. For the example: 6.2 kWh ÷ 4 = 1.55 kW PV (round to 1.6–2 kW to allow losses). Battery capacity should support autonomy; a 2-day autonomy with 50% usable depth-of-discharge implies battery bank = 6.2 kWh × 2 ÷ 0.5 = ~24.8 kWh usable capacity target (illustrative; many tiny houses will size smaller and rely on generator or behaviour).
Solar Array, Charge Controllers and Inverter Choices
Choose components to match system voltage and loads. For small systems, common choices are 12V, 24V, or 48V battery banks; 48V systems reduce conductor sizes and inverter stress at larger kW levels.
Comparison: inverter types
| Inverter type | Efficiency | Typical use-case |
|---|---|---|
| Pure sine wave | 90–96% | Sensitive electronics, appliances, mini-splits |
| Modified sine wave | 80–90% | Basic motors, incandescent loads (avoid for electronics) |
| Hybrid inverter (PV + battery + grid genset integration) | 90–96% | Integrated systems with built-in PV charge control and automatic transfer |
Hybrid inverters simplify installation but may cost more. For very small arrays, microinverters are an option when panels are roof-mounted in mixed-shade conditions; string inverters are more cost-effective for uniform arrays.
Battery Types, Capacity Planning and Safe Enclosure Options
Battery chemistry comparison
| Chemistry | Pros | Cons | Typical cycle life (general) |
|---|---|---|---|
| Lead-acid flooded | Lower upfront cost | Heavy, needs ventilation, maintenance | 300–1,000 cycles |
| AGM (sealed lead-acid) | Low maintenance | Lower cycles, heavier | 400–1,200 cycles |
| LiFePO4 (lithium) | High cycle life, high usable DoD, compact | Higher upfront cost | 2,000–5,000 cycles |
For an "off-grid battery system" choose chemistry based on budget, maintenance willingness, weight limits (tiny houses on trailers), and expected cycle life. Lithium offers long life and deeper usable capacity but needs compatible BMS and charging parameters.
Safety and enclosure
- Use a dedicated, ventilated battery enclosure for lead-acid to manage off-gassing; for LiFePO4, temperature-controlled enclosure is important.
- Follow local electrical codes and manufacturer's safety instructions. See the site's DIY battery enclosure guide for construction and ventilation tips.
Other electrical notes
- Include grounding and bonding, surge protection, and a labeled main disconnect.
- For small arrays, MPPT charge controllers are more efficient than PWM, especially when panel voltage significantly exceeds battery voltage.
- Plan DC distribution for lights, pumps, and USB-charging to avoid inverter losses.
Water Systems for an Off-grid Tiny House: Sourcing, Storage and Treatment
Rainwater Harvesting Design and Storage Sizing
Common water sources: rainwater from roof catchment, hauled water (trucked), and shallow wells. A simple storage-sizing method: Storage needed = roof area × average annual rainfall × runoff coefficient × safety factor.
Illustrative example (not a design spec): 200 sq ft roof, 30 inches annual rainfall (2.5 ft), runoff coefficient 0.85, safety factor 0.5 for dry months:
- Collected = 200 ft² × 2.5 ft × 0.85 = 425 gallons/year
- Multiply by usage (e.g., 2 people × 20 gallons/day × 365 = 14,600 gallons/year) shows rain alone may be insufficient in many climates; use example only to show method.
Refer to the site's rainwater harvesting setup for detailed collection, first-flush diverters, and tank sizing strategies.
Pumping and Delivery: Solar, DC and Manual Options
Pump options comparison (bulleted for clarity)
- 12V DC submersible: Good for shallow sources and direct DC systems; efficient and common in tiny houses.
- Solar direct (diaphragm) pump: Runs only when sun is available; simple but needs storage to ensure supply at night.
- Hand pump: Low-cost, reliable backup but labor-intensive.
Also consider pressure tanks or accumulator alternatives to smooth pump cycles and reduce power draw. The site article on solar water pump options gives installation tips and typical duty cycles.
Filtration, Treatment, and Whole-house Protection
A tiered approach protects health and equipment:
- Sediment filter: 50–5 micron to remove particulates first.
- Activated carbon: Removes taste, chlorine, and some organics.
- Disinfection: UV sterilizer or chlorination for microbiological safety. Reverse osmosis is for high-salinity or low-TDS needs and is energy-intensive.
For whole-house guidance, see the site's whole-house water filter. Test harvested water for bacteria, nitrate, heavy metals, and organics based on known local risks. Label potable vs non-potable lines clearly.
Heating, Cooling and Ventilation for an Off-grid Tiny House
Passive-first Design: Insulation, Airtightness and Thermal Mass
Passive measures reduce system size and energy use. Suggested R-value ranges (examples):
- Cold climates: Aim for high R-values (walls R-25 to R-40 equivalent, roof R-40+).
- Mixed climates: Moderate R-values (walls R-15 to R-25, roof R-30).
- Warm climates: Insulate to limit heat gain (continuous shading and reflective roofing).
Airtightness and controlled ventilation are high-impact. The Passive House Institute (PHI) has methodologies for low-load designs; in practice, simple air-sealing around penetrations and continuous insulation makes a big difference. See the site's insulation choices for material trade-offs.
Off-grid Heating Options: Wood, Propane, Electric Heat Pumps
Compare small heating systems
- Wood stove: Highly effective in cold climates, off-grid fuel, but requires storage space and safe clearances. Consider pellet stoves for automated feed if electricity is available.
- Propane heaters: Compact and reliable; require safe storage, ventilation, and fuel logistics.
- Ductless mini-split heat pumps: High coefficient of performance (COP) and can both heat and cool; require sufficient electrical capacity and sometimes defrost cycles in extreme cold.
Choose based on access to fuel, electrical capacity, space and noise. For more on wood and propane, the site's cabin heating options offers pros and cons.
Ventilation Strategies and Indoor Air Quality Controls
Ventilation must balance airtightness with fresh air. Options:
- ERV/HRV units: Recover heat or coolness while providing continuous ventilation; best for cold or variable climates when electricity is available.
- Simple exhaust fans: Low-cost and effective when combined with on-demand fresh-air inlets.
- Combustion-safety: Install CO and CO2 detectors, and ensure combustion appliances exhaust correctly.
Plan ventilation controls tied to occupancy and humidity sensors to reduce heating/cooling losses.
Waste, Sanitation and Greywater for an Off-grid Tiny House
Composting Toilets Versus Septic: Pros, Cons and Site Suitability
Decision framework
- Composting toilets: Small footprint, little or no water use, and minimal excavation. They require regular maintenance and attention to composting process and winter performance in cold climates.
- Small septic systems: Better for full-flush plumbing and guests but need soil percolation, excavation, and sometimes higher upfront costs and maintenance.
See the site's composting toilets for models, maintenance routines, and siting guidance.
Managing and Reusing Greywater Safely
Greywater options range from simple diversion for subsurface irrigation to treatment systems. Reuse best practices:
- Use low-phosphate, biodegradable soaps.
- Divert greywater for subsurface irrigation only; avoid spray irrigation over edible plants.
- Keep plumbing separate for blackwater and greywater lines to prevent contamination.
Greywater systems reduce potable water demand but must comply with local requirements.
Permitting, Setbacks and Code Considerations
Permitting is highly local. Check setbacks for septic drainfields, winter frost-lines for tanks, and approvals for rainwater harvesting where relevant. Engage the local authority early — it avoids redesign cost later. Include a simple site checklist when choosing a toilet type: soil test, access for pump truck, proximity to building, and neighbor setbacks.
Appliances and Daily Systems: Refrigeration, Cooking, Laundry and Connectivity
Off-grid Refrigeration Choices and Sizing
Refrigeration options
- 12V DC refrigerators: Designed for off-grid use; efficient and suitable for small spaces.
- Propane refrigerators: Low electrical use but lower cooling capacity and more expensive to buy.
- Solar-friendly AC refrigerators: Standard AC units that run off inverter; require larger inverters and battery capacity.
For help choosing models to match an energy budget, see the site's off-grid refrigeration options.
Cooking and Hot Water Strategies for Low-energy Living
Cooking choices
- Propane stove: Common choice for reliable, high-BTU cooking with minimal electricity.
- Induction cooktop: Highly efficient electrically but requires a strong inverter and battery bank to run at full power.
- Wood/rocket stove: Useful where wood is abundant and mains fuel unavailable.
Hot water
- Tankless propane: Provides on-demand hot water with low standby loss.
- Small electric tankless or 20–30L tank: Possible with load-shedding strategies; pair with priority controls.
Laundry and Connectivity: Low-cost Options for Off-grid Living
Laundry
- Manual or semi-manual washers: Very low energy, good for occasional loads.
- 12V or low-power compact washer: Useful if energy budget allows; otherwise, consider a shared laundry day or laundromat for heavy loads. See the site's off-grid laundry solutions.
Connectivity
- Satellite/Starlink: High-bandwidth options in remote areas but need adequate mounting and power budgeting.
- Cellular boosters and hotspot routers: Cost-effective where cellular coverage exists. See off-grid internet options for a comparison.
Appliance prioritization Implement load-shedding relays to protect the battery bank during low SOC. Prioritize refrigeration and essential lighting over high-power loads like induction or heating.
Control, Monitoring and Safety: Wiring, Automation and Backup Integration
Energy Monitoring, System Dashboards and Alerts
Integrated monitoring provides production, consumption, battery SOC, and tank levels. Useful hardware includes shunt-based battery monitors, inverter telemetry, and smart metering. Monitoring enables automated load shedding and alerting when tanks or batteries reach critical levels.
For a visual demonstration, check out this video on super high tech off-grid tiny house for sustainable:
This video walkthrough shows meter locations, battery enclosures, and practical wiring layouts that help visualize panel placement and control devices.
Electrical Protection, Grounding and Safe Wiring Practices
Follow these checkpoints:
- Install appropriately sized overcurrent protection and labeled breakers.
- Ground and bond the PV array, inverter, and AC mains per NEC/NFPA 70 where applicable.
- Use the correct conductor sizes for DC runs to minimize voltage drop.
- Place disconnects at array, battery, and inverter locations for safe maintenance.
Include a high-level wiring-diagram checklist:
- PV array → DC combiner → charge controller (if separate) → battery bank → inverter → AC and DC distribution panels.
- Safety devices: DC fuses near batteries, AC breakers, surge protection, and emergency shutoff.
Backup Strategies: Generators, Automatic Transfer and Manual Methods
Backup options include small portable generators sized to cover critical loads and automatic transfer switches for hands-off switching. See the site's backup generator sizing for guidance on generator sizing and integration. For budget builds, manual start portable generators are common; for unattended properties, consider automatic transfer with remote start capability.
Quick Checklist: Key Decisions and a Phased DIY-friendly Build Plan
Essential Systems to Install First (phase-based)
- Phase 1 (core shell and basics): Build shell, airtight insulation, basic potable water (tank and simple filtration), composting toilet or temporary sanitation, small PV for lighting and phone charging.
- Phase 2 (comfort and appliances): Add battery bank, refrigerator, improved filtration, hot water solution.
- Phase 3 (full capacity and automation): Install larger PV, mini-split heat pump, ERV/HRV, full monitoring and automatic transfer for backup generator.
Where to Spend and Where to Save: High-impact Upgrades
- Spend: insulation and airtightness, good windows, and a reliable battery chemistry if winter reliability matters.
- Save: buy used or mid-range panels, stagger battery purchases, consider propane for cooking to avoid oversized inverters.
Sample Phased Schedule for an Owner-builder (illustrative)
- Month 0–3: site prep, permits, foundation or trailer upgrade.
- Month 4–6: shell framing, roof, windows, insulation, air-sealing.
- Month 7–9: install water tanks, basic plumbing, composting toilet, small PV and basic electrics.
- Month 10–15: install battery bank, refrigerator, filtration, hot water.
- Month 16–24: upgrade PV, add heat pump, ERV/HRV, advanced controls.
Cost-driver callouts
- Batteries and heat pumps are typical high-cost items. Septic excavation can be expensive depending on soil. Save by staging battery purchases, sourcing used panels, and reusing tanks.
Quick tips for saving
- Buy good used panels when available.
- Use off-the-shelf 12V appliances where practical.
- Stage purchases: start with essentials and add capacity as needs and budget evolve.
The Bottom Line
An off-grid tiny house works best when passive performance is the starting point, systems are sized to realistic loads, sanitation choices match the site and maintenance willingness, and expensive components are phased in. Next steps: perform a detailed load audit, check local codes, and build a phased budget and timeline. Planning integration upfront reduces cost and increases reliability for any owner-builder planning an off-grid tiny house.
Frequently Asked Questions
How do I size a tiny house solar system?
Start with a realistic daily load audit listing each appliance, wattage, and hours of use. Convert daily watt-hours to kWh, then divide by average peak sun hours at your site to estimate required PV capacity. Add inverter and system losses (commonly 10–25% depending on components and wiring). For storage, choose days of autonomy and allowable depth-of-discharge to calculate battery bank size. All numbers above are illustrative; collect local solar insolation data and consult vendor specs for precise design.
Will an off-grid tiny house work in winter?
Yes, if the design prioritizes insulation, airtightness, and appropriate heating fuel. Passive-first measures reduce heating loads so smaller heating systems and smaller battery banks are sufficient. In cold climates, combine a reliable heating source (wood, propane, or heat pump sized to the reduced load), plenty of water tank freeze protection, and a plan for snow and access. Winter performance varies by climate; model loads using conservative assumptions before finalizing equipment.
Is rainwater safe to drink in a tiny house?
Rainwater can be made safe with proper collection, storage, and treatment. Use first-flush diverters, sediment prefiltration, activated carbon, and a disinfection step such as UV. Test water periodically for bacteria, nitrates, heavy metals, and other local contaminants. Label potable and non-potable lines and maintain filters and UV lamps per manufacturers' schedules. See the site's whole-house filtration guidance for full treatment tiers.
How much maintenance do composting toilets need?
Maintenance varies by model and usage. Many household-scale composting toilets require periodic emptying of compost, monitoring moisture levels, and occasional bulking material addition (sawdust). Some electric or self-contained models reduce hands-on work but still need periodic attention. Winter performance can require insulation or alternative composting methods. Refer to product manuals and the site's composting toilet overview when choosing a unit.
Do I need a generator for an off-grid tiny house?
A generator is not strictly required, but it is a common and practical backup. Generators cover extended cloudy periods, heavy loads, or system failures. For unattended sites, an automatic transfer switch with remote start provides reliability; for occasional use, a portable inverter-generator sized to critical loads is more affordable. Evaluate generator fuel logistics, noise, and maintenance when deciding.