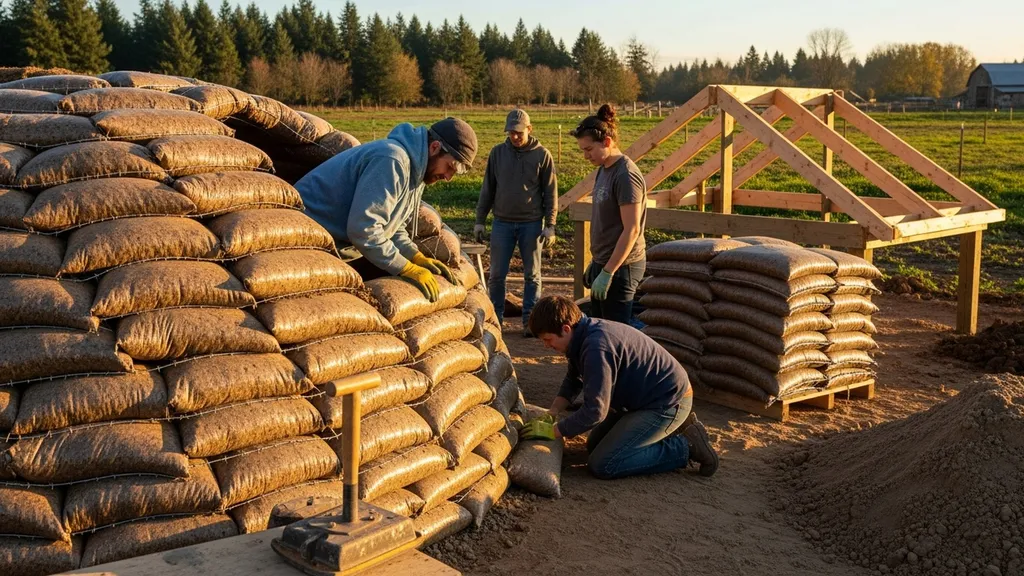
Practical guide to earth bag building for budget-conscious DIY builders — materials, costs, step-by-step process, and code considerations.
Earth Bag Building: Low-Cost Construction Method
Earth bag building is a low-cost construction method that uses soil-filled sacks stacked and tamped to form durable walls. For budget-conscious DIYers, earth bag (also called earthbag or Superadobe) offers dramatic savings on materials and embodied energy — studies and builders report 20–50% lower cost than conventional stick-frame shells depending on finishes and labor. This guide explains why earth bag works, what materials and tools you need, realistic budgets, the step-by-step build process from foundation to roof, thermal and moisture strategies, permitting tips, common mistakes to avoid, and a quick checklist to plan a first small project.
TL;DR:
- Earth bag can save 20–50% vs conventional framing on material costs for small builds; expect 10–20% of budget on bags/barbed wire and 30–50% on roof and finishes.
- Use a loam soil or add 5–10% Portland cement for stabilization; test with jar and ribbon tests and confirm with local extension or lab.
- Plan drainage, a simple bond beam, and roof overhangs; get an engineered detail for permits and allow a 10–20% contingency.
Related guides: Green building materials cost trends and forecasts, Earthquake resistant design seismic zones, Flood resistant building elevated construction, Solar cost calculators for DIY projects, Living building challenge beyond LEED, and What is a net zero building.
What is earth bag building and why it’s a low-cost construction method?
Basic concept and common names (earth bag, earthbag, superadobe)
Earth bag construction stacks polypropylene or natural-fiber bags filled with compactable soil to build load-bearing or non-load-bearing walls. Courses are tied with barbed wire for shear resistance and tamped to achieve high compaction. Variants include linear wall systems, domes, bermed walls, and Superadobe — the latter popularized by Nader Khalili and CalEarth as a dome-focused technique. The term "earth bag" will be used here for clarity; "earthbag" and "Superadobe" are common synonyms.
Historical examples and modern revival
Earth-filled bags date back to sandbag defense works and quick shelters. Modern revival stems from CalEarth's Superadobe work and community projects that lower-cost housing NGOs adopted. For engineering guidance and seismic details, see the practical manual at Engineering for Change: how to build for earthquake resistance. Community builds demonstrate quick assembly with unskilled volunteers; completed tiny domes and cabins exist worldwide, from low-income settlements to experimental homesteads.
Low-cost factors: materials, labor, and reduced waste
Cost savings come from three main areas:
- Materials: Primary material is local soil; bags and barbed wire are low-cost inputs. Local fill cuts haul costs and embodied carbon.
- Labor: Simple tasks like filling and tamping can be done by volunteers or a small crew; no expensive specialized trades are required for walls.
- Waste reduction: Minimal offcuts and recyclable bags reduce disposal fees. For broader strategies to cut jobsite waste, consult 10 ways to reduce construction waste.
Typical DIY project sizes suited to earth bag include tiny houses, 1–2 room cabins (200–400 sq ft), accessory buildings, and garages. Expect material-plus-labor savings of 20–50% compared to a similar stick-frame structure; final savings depend on roof system, finishes, and whether cement stabilization is used.
Cost breakdown and budgeting for an earth bag project
Typical budget categories (bags, fill, barbed wire, stabilization, roof, labor)
Budget line items to plan for:
- Bags: woven polypropylene sacks, typically 14–18 oz (per 100 costs vary by supplier)
- Fill: on-site soil (preferred) or hauled-in soil/aggregate
- Barbed wire: rolls between courses to prevent slippage
- Stabilizer: Portland cement or lime if using stabilized earth
- Roof: framing, sheathing, waterproofing (often largest single cost)
- Openings: lintels, window units, doors
- Plaster/finish: earthen plaster, cement-lime plaster, or breathable lime renders
- Tools and equipment rental: tampers, mixers, scaffolding
- Labor: volunteer vs paid crew
- Permits/engineering and contingencies (10–20%)
Where to save: recycled bags, local fill, volunteer labor
Savings tactics:
- Source reclaimed woven polypropylene bags or bulk feed bags from industrial suppliers; check strength and repair tears.
- Use local fill to eliminate hauling; rent a trommel or soil screener if you have variable soils.
- Organize volunteer build days for nontechnical tasks; pay a lead builder for quality control.
- Reuse salvaged roofing or metal; see our guide to recycled [materials guide](/blog/ultimate-guide-to-recycled-materials-for-diy-homes) for sources.
Sample budget scenarios (tiny dome, 200–400 sq ft cabin, simple garage)
| Project | Approx. size | Estimated total cost (materials + labor) | Notes |
|---|---|---|---|
| Tiny dome | 120 sq ft | $3,500–$8,000 | Simple dome with earthen finish, volunteer labor; cheap roof is key variable |
| 200–400 sq ft cabin | 250 sq ft | $12,000–$35,000 | Includes roof framing, windows, basic systems; stabilized walls increase cost |
| Simple garage/shed | 300 sq ft | $6,000–$15,000 | Non-conditioned, simpler roof and openings |
Environmental impact and life-cycle comparisons are discussed in a peer-reviewed study comparing earthbag to conventional builds; see the LCA comparison at PMC: life cycle assessment comparison between an earthbag building and a conventional building. Budget percentages often break down roughly: 10–20% bags/barbed wire/stabilizer, 30–50% roof and openings, remainder for labor, finishes, and systems. Always allow 10–20% contingency for soil testing, permit-required engineering, or roof upgrades.
Materials, soil types, and tools: what you need to start
Choosing and testing soil (silt, sand, clay ratios)
Best soils are loams: balanced sand, silt, and clay with enough fines to bind when compacted. Simple field tests:
- Jar test: Mix soil with water in a jar, let settle 24 hours; layer thicknesses give approximate percentages of sand, silt, clay.
- Ribbon test: Squeeze moist soil into a ribbon between thumb and forefinger; long sticky ribbon = high clay.
Aim for soils with 20–30% clay and 30–50% sand for unstabilized builds. If soil is too sandy, add clay or use a stabilizer; if too clayey, add sand or gravel. For engineering certainty, submit samples to a local lab or extension service.
Bag types and alternatives (woven polypropylene vs burlap) — pros & cons
| Bag type | Cost | Durability | Notes |
|---|---|---|---|
| Woven polypropylene | Low–moderate | High | UV-sensitive unless covered; common, strong, cheap |
| Burlap/natural fiber | Moderate | Low | Biodegradable; short service life if exposed to moisture |
| Tubular Superadobe (polyethylene tubing) | Moderate | High | Designed for continuous coils; faster for domes |
Stabilizers: Portland cement (5–10% by dry weight) gives significant strength gains; lime or pozzolans are lower-carbon alternatives but require longer curing. Adding 5–10% cement is typical for exterior walls that need weather resistance; expect material and carbon trade-offs versus unstabilized natural walls.
Essential tools and optional equipment
Essential:
- Shovels, wheelbarrows, buckets
- Hand tamper or 12–30 lb mechanical tamper
- Barbed wire rolls and pliers for tying
- Levels, plumb bob, mason’s line
- Masonry needles or awls to repair holes
Optional:
- Soil screener or trommel
- Portable cement mixer (for stabilized mixes)
- Small excavator (for foundations, if budget allows)
For engineering resources and documented steps, see One Community's engineering notes on earthbag village systems: earthbag village engineering. For reclaimed supplies and sourcing strategies consult our recycled materials guide.
Step-by-step basic build process (foundation through roof)
Preparing the site and foundation for earth bag walls
Site prep starts with a level pad and drainage plan. Common foundations:
- Trench footing with compacted gravel and a rubble-trench drain
- Concrete strip footing for frost protection
- Slab-on-grade with a perimeter stem if desired; see our slab-on-grade foundation tips for details
Install a capillary break (gravel, drain board) and a damp-proof course (bituminous or polyethylene) between foundation and first bag course. Provide at least 12–18" roof overhangs to protect earthen walls.
Laying, filling, tamping bags and tying courses
- Lay the first course of bags on the foundation, aligning the coursing.
- Place barbed wire on the foundation under the first course for anchorage.
- Fill bags to a consistent volume (roughly 1/2 to 3/4 full depending on bag size) and tamp to 4–6" height per course.
- Place barbed wire between courses to lock them together.
- Stagger joints like masonry for bond; use buttresses or stepped walls for load-bearing openings.
Typical time: with a small crew, one competent crew can lay and tamp 6–12 linear feet per hour depending on bag handling and fill method. For a small 250 sq ft cabin expect wall construction over several weekends or 2–4 weeks of part-time work.
This DIY video shows you the hands-on process:
Openings, windows, doors and roof attachment details
Openings need lintels or bond beams. Common practice: cast a bond beam (reinforced concrete or masonry) at a chosen course height for roof loads, or incorporate a rolled rebar/rope beam system. Attach roof rafters to a continuous bond beam. For lightweight roofs, a timber ring beam or steel tie can work. Durable roof options that pair well with earth bag walls include recycled metal roofing; see our recycled metal roofing options guide. For off-grid small builds, consider system integration like composting toilets; learn more in our composting toilet costs article.
For general background on earthbag methods and sequencing, see the Wikipedia overview: earthbag construction explanation.
Thermal performance, insulation strategies, and passive-house compatibility
Thermal mass vs insulation: how earth bag walls behave
Compacted earth walls deliver high thermal mass that smooths indoor temperature swings but have relatively low R-values. A dense 18–24" compacted earth wall might equate to roughly R-2 to R-4 depending on moisture content and density. That means mass alone won't meet modern energy-code insulation targets in cold climates.
Ways to improve envelope R-value (insulated plaster, exterior insulation)
Practical insulation strategies:
- Exterior continuous insulation: Attach rigid foam (XPS, polyiso) to the outside, then plaster or cladding. This preserves thermal mass inside and improves R-value.
- Insulated plaster: Use straw-cement panels or hempcrete as an exterior layer in combination with earthen interior finishes.
- Built-in insulation channels: Some builders leave space or use double-wall bag systems stuffed with insulating material.
Compare cost-effectiveness: exterior rigid foam adds material and detailing costs but is a straightforward retrofit; insulating plaster blends materials and labor but requires skilled application. Aim for IECC-recommended R-values for your climate zone (consult local code or IECC tables).
For passive solar pairing and orientation strategies to make mass work for comfort, see our article on passive solar window orientation. For general natural-building thermal behavior, review Network Earth's natural building notes: earthbags and thermal properties.
Passive solar and orientation strategies for earth bag homes
Use mass on the interior side of south-facing glazing and thermal breaks under floors. Provide thermal breaks at foundation-to-wall junctions if you insulate the exterior. Design simple overhangs for summer shading. Consider mechanical ventilation with heat recovery (ERV/HRV) in tighter assemblies or when exterior insulation is added.
Structural performance, moisture management, and permitting
Load capacity and structural reinforcement options
Compacted earth exhibits respectable compressive strengths when well-made, but allowances vary. Unstabilized walls are best kept moderate in height (often under 10–12 feet) unless reinforced. Reinforcement methods:
- Barbed-wire between courses for shear
- Vertical rebar pinned into foundations at intervals
- Bond beams (reinforced concrete or timber) to carry roof loads
- Buttresses or pilasters for lateral loads
When in doubt for larger spans or multi-story designs, consult a structural engineer familiar with earthen systems and provide soil test results.
Moisture risks, drainage, and waterproofing details
Moisture is the main threat to longevity. Best practices:
- Keep walls off the ground with a damp-proof course and a clear gravel perimeter drain.
- Provide generous roof overhangs (18–36") and gutters to shed water away.
- Use breathable plaster systems (lime or lime-cement mixes) rather than impermeable coatings that trap moisture.
- Avoid direct splash zones and grade the site away from foundations.
ECHOcommunity offers a practical earth bag house guide with moisture-control steps used in tropical field projects: earth bag house construction guide (PDF).
Permits, inspections, and convincing building officials
Permitting is often the trickiest part. Strategies that help:
- Engage local building officials early and present engineered cross-sections and soil test data.
- Use precedent case studies and engineering reports to support seismic and wind designs.
- Submit details for bond beams and foundation connections per ICC or local code requirements; reference FEMA or state guidance when available for earthen systems.
Testing, engineering, and clear documentation greatly increase approval odds. Expect additional cost/time for engineered drawings (budget $1,000–$5,000 depending on scope).
Common mistakes, troubleshooting and long-term maintenance
Top 6 beginner mistakes and how to avoid them
- Poor drainage: Grade and roof overhangs prevent most moisture damage. Fix: install perimeter drains and extend downspouts.
- Wrong soil mix: Test soils before building; adjust with sand or clay and retest.
- Inadequate tamping: Under-tamped bags settle later; use consistent tamping to target heights.
- Skipping barbed wire: Bars add shear resistance; never omit them between courses.
- Improper roof tie-in: Without a continuous bond beam, roofs can shift. Fix: add a ring beam or retrofit straps.
- Using untreated natural bags exposed to UV: Cover walls promptly; use UV-stabilized woven polypropylene if possible.
Signs of trouble: settling, erosion, bulging
Watch for:
- Horizontal cracks or bulging (may indicate poor tamping or foundation movement)
- Erosion at toe of wall (fix with grading, splash blocks, or re-plaster)
- Persistent damp stains (address roof/drainage, avoid impermeable coatings until wall is dry)
Small cracks can often be patched with compatible earthen plaster; structural issues require professional assessment.
Routine maintenance schedule and repair tips
- Annual: Inspect roof, overhangs, gutters, and base of walls.
- Every 3–7 years: Re-plaster exposed surfaces depending on wear and climate.
- As needed: Rake and refill eroded toe areas, re-seal flashings.
Document maintenance actions and keep repair materials on hand (lime or earthen plaster mix) so small issues don’t grow.
Key takeaways, quick checklist, and comparison table
Quick checklist for planning your first earth bag build
- Site survey: Check slope, drainage, sun path and access.
- Soil test: Jar and ribbon tests plus lab confirmation if using stabilized mixes.
- Permits/engineering: Talk to the local building department early.
- Budget: Include bags, barbed wire, roof, finishes, and 10–20% contingency.
- Team: Plan for a lead builder plus volunteers or paid labor.
- Roof plan: Prioritize a durable roof with long overhangs.
Comparison table: earth bag vs rammed earth vs straw bale (cost, speed, insulation, skills)
| System | Typical cost per sq ft | Typical R-value (wall) | Required skills | Weather suitability |
|---|---|---|---|---|
| Earth bag | $10–$50 | R-2 to R-6 (depends on thickness/insulation) | Moderate (bag handling, tamping, plaster) | Good if protected by large overhangs and proper drainage |
| Rammed earth | $30–$80 | R-1.5 to R-3 (mass) | High (formwork, compaction equipment) | Durable in dry climates; requires skilled labor |
| Straw bale | $20–$60 | R-20 to R-40 | Moderate (bale stacking, plastering) | Very good insulation but needs strict moisture control |
When an earth bag is the right choice — and when to choose something else
Choose earth bag if you have suitable on-site soil, a small- to mid-size plan, and want low embodied energy and strong thermal mass. Consider alternatives if you need high R-values without external insulation (straw bale), if local labor has rammed-earth expertise, or if local codes limit unconventional materials. For projects prioritizing quick certification under tight timelines, conventional framing or SIPs may be simpler.
The Bottom Line
Earth bag construction offers an affordable, low-embodied-energy way to build small homes and outbuildings when soil is available and moisture and roof design are well-handled. Budget realistically for roof systems, testing, and permits, and plan for maintenance of earthen finishes. For a downloadable planning checklist and next-step resources, visit DIY Eco Homes' project planning pages.
Frequently Asked Questions
How long does an earth bag build take?
Timeline varies by size, team, and experience. A tiny dome (100–150 sq ft) can be assembled in a few weekends with volunteers for walls and a simple roof; a 250–400 sq ft cabin typically takes several weeks to a few months including foundation, walls, roof, and finishes when using a small paid crew. Stabilized mixes and engineered details add curing and drawing time.
Do earth bag walls need cement or can they be unstabilized?
Unstabilized earth bag walls work well in dry climates if well-protected from water. Adding 5–10% Portland cement by weight creates stabilized earth with higher strength and weather resistance but increases embodied carbon and materials cost. Lime and pozzolans are lower-carbon alternatives but need longer curing and testing. Soil tests should guide this choice.
Will local building departments approve earth bag structures?
Approval depends on jurisdiction. Many departments require engineered details, soil tests, and documented connections for seismic/wind loads. Early outreach, clear drawings, and references to field-tested manuals (for example, engineering guides and ECHOcommunity construction guides) increase approval chances. Budget for engineering fees and expect a review period.
What insulation options work best with earth bag walls?
Exterior continuous insulation (rigid foam) combined with interior thermal mass is the most straightforward for raising R-values while keeping the mass effective. Insulated plasters or a double-wall system with internal insulation channels are other options. Choose a method that keeps moisture control reliable and matches climate-specific R-value targets from IECC tables.
How do I prevent moisture and erosion on earthen walls?
Design for water management: grade away from walls, install perimeter drains, and ensure roof overhangs of 18–36 inches. Use breathable lime or lime-cement plasters rather than impermeable paints, and maintain regular inspections and re-plastering as needed. Small repairs early stop larger problems later.