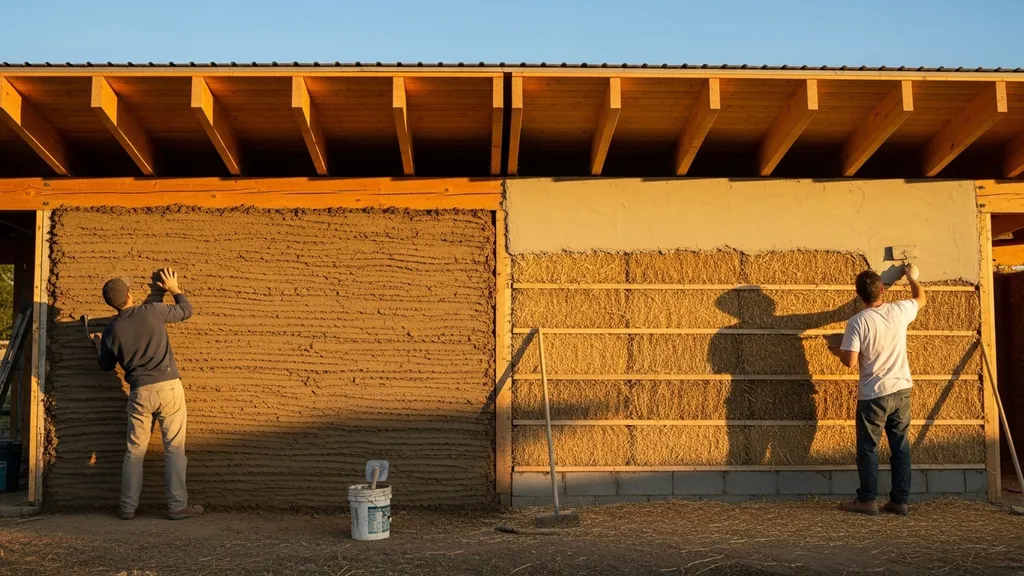
Compare cob and straw-bale building for cost, durability, insulation, and DIY suitability to decide which natural method fits your eco self-build.
Cob vs Straw Bale: Which Natural Building Method?
A homestead owner stands on a cleared lot, tracing two imagined walls: one thick, hand-sculpted earthen wall that promises long-term thermal inertia; the other a neat stack of straw bales with high insulation value. This article compares "cob vs straw bale" directly for budget-conscious DIY self-builders, focusing on cost, labor, climate fit, permitting, thermal performance, longevity, and finish options. Read on to learn which method matches your skills, schedule, and site constraints—and where to start next.
For external source context, review Straw-bale Building Books.
TL;DR:
- Cob offers high thermal mass and sculptural finishes with low material cost but higher labor: expect 12–24 in (30–60 cm) thick walls and 8–20 hours/m² of work.
- Straw-bale delivers high effective R-values (roughly R-30 to R-50 for 18–24 in walls) and faster stacking, but needs strict moisture detailing and raised foundations.
- Choose cob for passive thermal inertia and natural finishes; choose straw-bale when insulation value and speed matter; hybrids combine both benefits in many climates.
Cob vs Straw Bale: Comparison Table (quick Side-by-side)
| Criteria | Cob | Straw-bale |
|---|---|---|
| Typical wall thickness | 12–24+ in (30–60+ cm) | 18–24 in (45–60 cm) |
| Thermal performance | Low R, high thermal mass | High effective R (R-30 to R-50) |
| Thermal mass | Very high — evens indoor swings | Low (bales are light mass) |
| Moisture tolerance | Breathable but needs plinth + wide eaves | Moisture-sensitive; needs raised sills & breathable plaster |
| Breathability/vapor behavior | Highly breathable (earthen plasters) | Breathable with earthen or lime plaster; avoid impermeable finishes |
| Structural approach | Monolithic load-bearing or framed | Load-bearing (Nebraska) or infill with frame |
| Foundation needs | Solid frost-protected plinth, rubble trench options | Raised foundation, sill plate on concrete or stone |
| Ease of DIY | Moderate–high skill and labor | Easier to learn stacking techniques; plastering still skill-heavy |
| Material cost per m² (range) | $15–$80 (local soil reduces costs) | $20–$120 (bale cost + transport + plaster) |
| Typical labor hours | 8–20 hours/m² | 2–8 hours/m² to stack; 6–20 hours/m² including plaster |
| Maintenance | Replaster every 10–30 years depending on exposure | Inspect plinths and plaster; repoint every 10–25 years |
| Expected lifespan | 50–100+ years with care | 50–100 years if kept dry and detailed |
Notes: Ranges vary by region, finish type, and builder skill. For context on how natural insulation compares to synthetics, see our insulation cost comparison. For straw-bale code guidance, see the ICC Appendix AS on strawbale construction (technical guidance and minimum requirements) at Appendix as strawbale construction.
Cob vs Straw Bale: Cob Construction — Overview, Strengths, Weaknesses, Best For
What is Cob? Basic Materials and Wall Build-up
Cob is a sculptable mix of subsoil (clay-rich), sand, and straw fiber, formed wet and built up in lifts to create monolithic walls. Typical assemblies are 12–24+ inches thick, often built as load-bearing walls. A cob wall usually sits on a frost-protected plinth or stone/rubble-trench foundation, then receives an earthen or lime plaster. Builders may use a timber plate or ring beam where roof loads require it.
Strengths of Cob (durability, Thermal Mass, Sculptural Walls)
Cob's large thermal mass stores daytime heat and releases it slowly, smoothing indoor temperature swings and improving comfort in climates with strong diurnal ranges. Material costs are low when suitable soil is on-site; straw fiber is usually inexpensive. Cob allows flowing, custom forms—built-in shelves, rounded corners, and expressive finishes—without expensive formwork. With proper plinths and eaves, cob walls can endure many decades.
Weaknesses of Cob (labor Intensity, Thickness, Frost Risk)
Cob is labor-intensive. Mixing and placing cob ("throws") and allowing proper curing take time. Wall thickness consumes floor area, which can be a disadvantage on small plots. In cold, wet climates, frost and freeze-thaw cycles risk damage unless the foundation, plinth, and roof overhangs are carefully detailed. For guidance on appropriate foundations for earthen walls, see foundation options and read climate-specific adaptations in our very cold design article.
Best-for Use Cases
- Owners who value natural, sculpted interiors and long-term thermal inertia.
- Sites with on-site clay-rich soil and volunteers to help with labor.
- Mild to warm climates with pronounced day/night swings where mass improves comfort.
- Builders wanting to minimize purchased materials and avoid framed walls.
Practical DIY notes: cob mixing can be done by hand or with a small cement mixer for medium batches. Scaffold and weather protection are essential during build and cure stages. Expect 8–20 hours of labor per square meter of wall depending on crew size and experience.
Cob vs Straw Bale: Straw-bale Building — Overview, Strengths, Weaknesses, Best For
What is Straw-bale Construction? Types and Wall Systems
Straw-bale building uses tightly bound straw bales as wall infill or structure. Two main systems are common: load-bearing (Nebraska-style), where bales support roof loads, and timber-frame infill, where bales act mainly as insulation within a structure. Walls are typically 18–24 inches thick. Final finishes are usually breathable plasters (lime or earthen) or inside drywall over a plaster base.
Strengths of Straw-bale (high R-value, Fast Build)
Straw bales offer very high effective insulation per wall depth—commonly R-30 to R-50 for 18–24 in assemblies—making them attractive for cold climates aiming for low heating loads. Stacking bales is intuitive and fast; a small volunteer crew can erect shell walls quickly. For comparison of natural insulation efficiency and costs, see the insulation cost comparison.
Weaknesses of Straw-bale (moisture Sensitivity, Detailing)
The main failure mode for straw-bale walls is moisture. Bales must remain dry during storage and after installation. Key details include a raised sill on a durable foundation, wide roof eaves, breathable plaster, and careful flashing at windows and doors. Roof-to-wall integration is especially important—see our roofing installation tips for details. Also, use straw (agricultural cereal stalks) rather than hay; straw is drier and less likely to contain weed seeds.
Best-for Use Cases
- DIY builders in cold climates needing high insulation without complex framing.
- Projects with access to affordable bales (local farmers, co-ops) and volunteer labor.
- Owners who want predictable energy performance and relatively quick shell erection.
Practical DIY notes: bale moisture should be checked before installation (aim for <20% moisture content). Typical on-site tools are a winch, bale hooks, shears, and long boards for leveling. Plastering adds significant labor and can be the most time-consuming phase.
Finishes and Interior Options
For interior finishes, explore breathable lime or clay plasters or install plasterboard over a wattle-lath if you need a smooth interior surface; see our drywall alternatives for options that preserve breathability.
Cob vs Straw Bale: Hybrid and Combined Approaches (practical Middle Ground)
Examples of Hybrids
- Cob interior plaster over straw-bale infill: Straw offers insulation; a thin cob or earthen plaster on the interior adds thermal mass where it helps.
- Timber frame with cob low walls and straw upper infill: Cob provides durable base and shaping; bales add insulation in upper walls.
- Stabilized cob first lift over bale: Lay a narrow stabilized earthen lift at the base to protect sills from splash and improve durability.
When a Hybrid Makes Sense
Hybrids are useful when you want straw's R-value but also want interior thermal mass to smooth temperature swings. They work when neither pure approach perfectly meets site constraints—such as colder climates where cob alone can't meet insulation targets.
Practical Build Steps and Common Pitfalls
Key steps: design compatible wall interfaces, allow differential shrinkage by leaving soft joints, and choose compatible plasters (earthen interior, lime exterior or vice versa depending on exposure). Pitfalls include bonding failures between materials with different moisture movement, and trapping moisture behind non-breathable finishes. For context on other hybrid natural systems and how they compare, see our hempcrete vs ICF article.
Cob vs Straw Bale: Practical Comparison by Key Criteria
Thermal Performance & Comfort (mass vs Insulation)
Cob offers thermal mass: it stores heat when indoor air or sun warms the wall and releases it slowly. That helps in climates with hot days and cool nights. Straw-bale walls deliver insulation—low heat loss through the envelope—so they're better at keeping heat in during long cold seasons. If your project targets tight energy goals such as Passive House, consult cost and performance trade-offs in our passive house costs analysis before selecting materials.
Moisture Management and Durability
Both systems require careful detailing: elevated, damp-proof foundations; wide eaves; and breathable plasters. Cob requires a robust plinth (stone or stabilized base) to avoid splash-back. Straw bales must be kept dry during storage and installed above the expected splash zone; bales with higher moisture are at risk of rot and pests. For climate-specific ventilation and moisture strategies, read our mixed-humid design guidance.
Cost and Sourcing (materials + Hidden Costs)
Material costs vary. Cob can be cheapest where suitable soil is on-site; otherwise, transporting clay sand and straw adds cost. Straw-bale material cost depends on bale prices, transport, and plaster substrate. Remember hidden costs: scaffolding, mechanical mixers, transport, testing, and permit fees—see our hidden costs list for items DIY teams often miss.
Labor, Skills, and Build Timeline
Straw stacking can be fast; however, plastering both systems is labor-intensive and skill-dependent. Cob requires longer curing times and more skilled throws for sculpted finishes. If volunteer labor is your primary resource, plan for training days and mockup panels to build confidence.
Permits, Codes, and Insurance Considerations
Straw-bale construction has specific code guidance; see the ICC's Appendix AS on strawbale construction for performance-based requirements. Cob is less specifically codified in many jurisdictions and may be treated as alternative construction—expect to provide engineering, test data, or approved examples to building departments. For practical help navigating approvals, consult our DIY permit guide.
Cob vs Straw Bale: Which Should You Choose? Scenario-based Recommendations
If You Want the Lowest Upfront Materials Cost
Choose cob when you have on-site clay-rich soil and want to minimize purchased materials. Budget for higher labor hours but lower material spend.
If You Prioritize Insulation and Cold-climate Performance
Choose straw-bale for high whole-wall R-values. Combine with good airtightness and a mechanical ventilation strategy for best results.
If You Want Sculptural, Natural Finishes and Long Thermal Inertia
Choose cob for sculptural interiors and thermal inertia that smooths indoor temperatures in mixed climates.
If You Have Limited Labor or Need a Fast Build
Choose straw-bale stacked in a framed system for faster shell erection; hire experienced plasterers if you need to finish quickly.
Decision Checklist for Your Project
- Climate: Is long-term insulation (straw) or thermal mass (cob) more valuable?
- Soil and materials: Is clay available on-site?
- Labor: Do you have volunteers or a small paid crew?
- Codes and insurance: Can local authorities accept alternative materials?
- Timeframe: How fast must the shell be weather-tight?
Short next steps: perform a simple percolation and soil texture test; source local bale suppliers and request moisture readings; order and build a 1 m² mockup of both wall types to test finishes. For off-grid coordination and water catchment, review our rainwater collection guide.
Watch this step-by-step guide on building straw bale houses:
Cob vs Straw Bale: Build Planning Checklist and Quick Next Steps for Diyers
Site and Soil Checks (basic Tests)
- Soil test: Perform a ribbon test for clay content and a jar test for texture; if clay is <15%, cob mixes need more clay or binder.
- Drainage: Check slope and seasonal water table depth.
- Bale moisture: Test representative bales with a moisture meter (aim <20%).
Foundation and Moisture-proofing Checklist
- Raised sill: Use a concrete or stone sill with capillary break for bale walls.
- Plinth detail: Build a durable plinth for cob walls to prevent splash damage; see foundation options.
- Eaves and flashing: Plan wide eaves and continuous flashing at roof-wall junctions; consult roofing installation tips.
Sourcing Materials and Volunteers
- Local suppliers: Contact local farmers for bale availability; arrange transport and dry storage.
- Soil testing labs: If in doubt, send samples to a soils lab for composition analysis.
- Volunteer management: Schedule training days, tool lists, and food; mock-up panels shorten learning curves.
Finishes, Insulation Details, and Long-term Maintenance
- Plasters: Use breathable earthen or lime plasters on both systems; avoid impermeable exterior paints.
- Inspections: Inspect plinths and plaster every 5–10 years; repoint and repair promptly.
- Ventilation: Install a simple mechanical ventilation system on tight straw-bale homes—see ventilation for off-grid for low-energy options.
- Sanitation planning: Remote projects should coordinate with local codes—see off-grid toilet options for compliant systems.
For plan preparation and interpreting drawings, consult our reading blueprints guide before committing to a structural approach.
The Bottom Line
Both cob and straw-bale can produce durable, low-carbon homes when detailed correctly. For thermal comfort from mass and expressive finishes, pick cob; for high insulation and quicker shells in cold climates, pick straw-bale. Match your choice to site soils, moisture risks, volunteer time, and local code acceptance.
Frequently Asked Questions
Can cob or straw-bale meet building codes and insurance?
Both can meet codes, but approaches differ. Straw-bale construction has specific code guidance such as the ICC Appendix AS and is already referenced in some jurisdictions; cob often falls under alternative construction and may require engineering, test data, or peer-reviewed precedents to satisfy inspectors. For practical steps on permitting, see our DIY permit guide.
Which is better for tiny houses or mobile foundations?
Straw-bale can be lighter if used as framed infill, but standard bales are bulky for towable tiny homes. Cob is heavy and generally unsuitable for mobile foundations without engineered lightweight alternatives. For tiny or off-grid cabins, consider timber-frame with insulated panels or thin-stabilized earthen finishes instead.
How long do cob and straw-bale walls last?
With correct detailing and maintenance, both systems can last 50–100 years or more. Cob walls in dry-protected conditions have documented lifespans over a century. Straw-bale longevity depends heavily on moisture control and plaster integrity; routine inspections and timely repairs extend service life.
Can I combine cob and straw in the same wall?
Yes. Hybrids—such as straw infill with earthen interior plaster or cob base with straw upper infill—combine insulation and mass. Design interfaces to accommodate differential movement and choose compatible plasters to avoid trapped moisture; see the hybrid examples earlier in this article.
What maintenance should owners expect?
Expect periodic plaster repairs and inspection of plinths, eaves, and flashings. Replastering frequency varies by exposure: interior earthen plasters may last decades; external lime plasters typically need attention every 10–30 years depending on weather. Regular checks after heavy storms catch issues early.