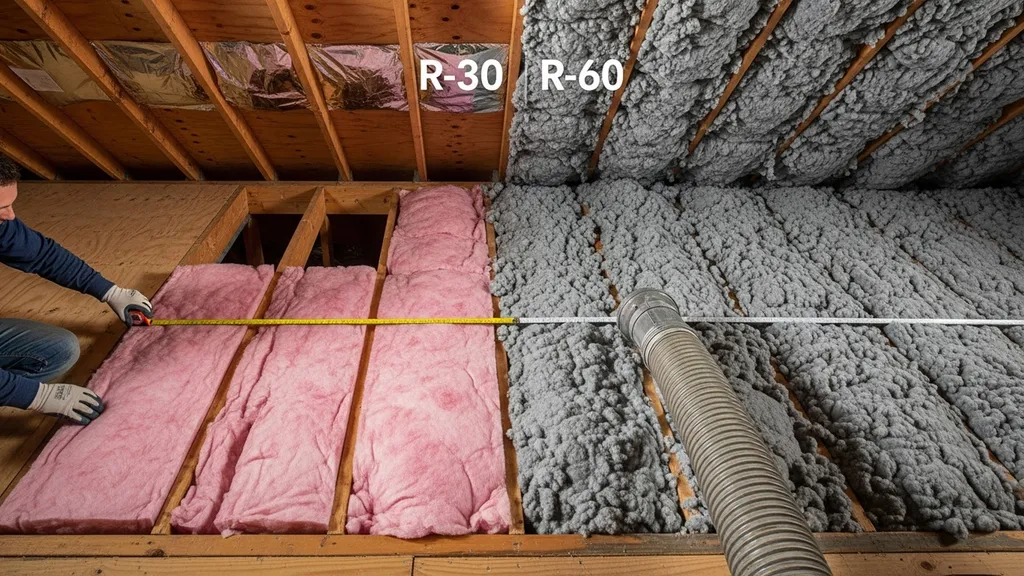
Practical, DIY-friendly guide comparing R-30 and R-60 insulation — performance, costs, climates, materials, and which choice fits common self-build scenarios.
R-30 vs R-60 Insulation: Which Do You Need?
A DIYer standing over an attic hatch faces a simple-sounding question with big consequences: is R-30 enough, or should the project aim for R-60? This article compares r30 vs r60 insulation for attics and common assemblies, showing typical thicknesses by material, installation strategies a DIYer can handle, how climate and code change the math, and which choice fits common self-build scenarios. Read on to learn practical trade-offs—material, cost, comfort, and when to prioritize air sealing or a different assembly altogether.
For external source context, review DOE Releases New R-Value Recommendations.
TL;DR:
- R-30 saves a modest amount of energy and is typically 7–11 in of batt or 7–9 in blown cellulose; best for mild climates or budget attic top-ups.
- R-60 gives much better winter performance (often 14–20 in depending on material) and is recommended in cold zones or for long-term net-zero goals.
- Air sealing and ventilation usually beat extra R-value in payback; prioritize sealing first, then add insulation to the R-target that matches your climate and goals.
| Insulation level | Typical thickness (fiberglass / cellulose / spray foam) | Thermal performance (qualitative) | Typical applications | Installed cost direction | Best for |
|---|---|---|---|---|---|
| R-30 | ~8–11 in (fiberglass batts), ~7–9 in (blown cellulose), ~8–9 in (open-cell foam) — approximate | Moderate winter resistance, decent in mild climates | Standard attic in mild zones, garage ceilings, shallow joist bays | Low–Medium | Budget attic top-up, shallow depth |
| R-60 | ~16–20 in (fiberglass), ~14–18 in (cellulose), layered foam+top-up | High winter resistance, lower peak heating load | Cold-climate attics, net-zero targets, homes keeping long-term energy costs low | Medium–High | Cold climates, deep attics, long-term investment |
Data above are approximate — exact inches and R-per-inch vary by manufacturer and product. For official retrofit targets and regional guidance, see the Department of Energy's guide to home insulation (PDF) for recommended R-values and installation notes: Department of Energy's guide to home insulation.
R-30 vs R-60 Insulation: Quick Overview and TL;DR
What the Headline Question Covers
This comparison looks at two target attic R-values commonly discussed by DIYers: R-30 and R-60. It treats R-values as target thermal resistances, not single products. The article compares typical materials — fiberglass batts, blown cellulose, mineral wool, and spray foam — and shows realistic thicknesses to reach each target, practical installation methods for retrofits and new builds, and the role of air sealing and ventilation. It also links to code and efficiency guidance so readers can confirm local requirements.
TL;DR Recommendation by Climate Band
- In heating-dominated cold zones (IECC zones 5–8), aiming for R-60 in the attic is common and often recommended to reduce heating demand and peak loads.
- In mixed or mild climates (IECC zones 1–4), R-30 or R-38 may be an economical balance when paired with thorough air sealing and a tight thermal envelope.
- For net-zero or passive-house-like goals, R-60 or higher plus continuous exterior insulation and airtightness measures are typical; consult a modeler for HVAC sizing.
For regional and code-specific targets, check the DOE guidance linked above and compare with local code or IECC requirements.
R-30 vs R-60 Insulation: What R-30 Actually Is
Typical Thickness and Materials
R-30 is a target thermal resistance often reached with common insulation products. Approximate examples:
- Fiberglass batts: about 8–11 inches (R-value ~3.0–3.4 per inch).
- Blown cellulose: about 7–9 inches (R-value ~3.2–3.8 per inch, depending on density).
- Open-cell spray foam: about 8–9 inches (R-value ~3.6 per inch).
- Mineral wool batts: similar thickness to fiberglass, often slightly higher R-per-inch.
These are approximate; check product labels. Industry tables from the Insulation Institute summarize typical performance and recommended attic levels for retrofit and new construction and are useful background on typical R targets.
Strengths of Choosing R-30
- Lower upfront material cost and less labor in attics with limited access or shallow joists.
- Easier DIY installation with batts or a single blown-in top-up.
- Often adequate in mild climates, conditioned attic spaces, or when paired with a well-sealed thermal envelope.
- Faster project timeline and lower disruption.
Weaknesses and Common Pitfalls
- Heat loss reduction is nonlinear: doubling from R-30 to R-60 does not halve heat loss. Each added R gives diminishing returns.
- In cold or high-elevation areas, R-30 can leave higher heating bills and larger HVAC cycling.
- R-30 may expose thermal bridges and air leakage issues that limit actual performance unless air sealing is addressed.
- Batts installed poorly (gaps, compression) underperform — correct fit matters.
Best for (use Cases)
- Budget-conscious attic top-ups in mild climates.
- Garage ceilings, accessory spaces, or shallow-joist retrofits where deeper insulation isn't possible.
- Projects where the priority is improving comfort quickly and affordably while planning later upgrades.
For more on batt alternatives and mineral wool performance, see our guide to mineral wool options.
R-30 vs R-60 Insulation: What R-60 Actually Is
Typical Thickness and How to Achieve It
R-60 is a high attic R-value frequently recommended in cold climates. Typical thicknesses:
- Fiberglass batts or rolls: roughly 16–20 inches (varies with product R-per-inch).
- Blown cellulose: roughly 14–18 inches depending on fill density.
- Layered strategy: lay R-30 batts at the ceiling plane, then top up with 6–8 inches of blown cellulose to reach R-60 without compressing batts.
- Spray foam: reaching R-60 with spray foam alone is expensive; common approach is a spray-foam air-seal layer at the roofline or top plate followed by blown insulation.
Strengths of Choosing R-60
- Significantly reduces winter heat loss and peak heating demands.
- Improves temperature stability and reduces indoor drafts when paired with proper air sealing.
- Can allow smaller heating systems and longer equipment life because peak loads fall.
- Helpful when walls are low-performing and attic is the easiest place to add insulation.
Weaknesses and Trade-offs
- Higher material and installation cost; blown-in and professional labor add expense.
- May reduce attic headroom and complicate storage or mechanical access.
- If roof/ventilation or vapor control is inadequate, adding large insulation depth can create moisture risks in some assemblies.
- Diminishing returns: beyond certain R-levels, additional energy savings shrink.
Best for (use Cases)
- Heating-dominated homes in IECC zones 5–8 with long, cold winters.
- Homes pursuing net-zero operational energy or passive-house-like performance.
- Situations where walls are difficult to upgrade and attic is the logical place for major gains.
Energy Star's recommended home insulation R-values provide a quick mapping of recommended attic targets by region; review their table for your climate band: Recommended home insulation R-values (Energy Star).
R-30 vs R-60 Insulation: How Climate, Code, and Goals Affect Your Choice
Match R-value to Climate and Heating/cooling Balance
Climate drives how much attic insulation pays off. In cold climates, each R increment reduces heating load more valueably. In hot, cooling-dominated climates, attic insulation still helps but radiant barriers, roof color, and ventilation can be equally important. For a starting point, compare your IECC climate zone recommendations against your comfort and budget goals.
Check Local Code and Recommended Zone Targets
Local building codes may require minimum attic R-values or reference IECC tables. The Department of Energy guide linked earlier is a solid baseline for retrofit choices; always verify with your local building department. Permits and code requirements can also affect strategies, such as whether ventilation is required for an unconditioned attic.
Performance Goals: Comfort, Payback, or Net-zero
- Short payback (1–5 years): prioritize air sealing, fix insulation gaps, then add modest R (R-30–R-38) depending on climate.
- Long-term investment (10+ years) or net-zero targets: aim for R-60 or higher and combine with continuous exterior insulation on walls and airtight construction practices. For deep energy goals, consult Passive House Institute US (PHIUS) for airtightness and envelope standards.
- If the main goal is cooling comfort and reducing attic heat gain, consider reflective roofs, ventilation improvements, or insulating the roof deck for conditioned attics.
If exterior continuous insulation is an option to reduce thermal bridging, see our guide to exterior insulation methods for how wall-level CI changes whole-assembly performance.
R-30 vs R-60 Insulation: Materials and Systems That Achieve These R-values
Common Materials: Fiberglass, Cellulose, Mineral Wool, Spray Foam
- Fiberglass batts: R ~3.0–3.4 per inch, easy DIY fit, affordable, but performance drops if compressed or gaps exist.
- Blown cellulose: R ~3.2–3.8 per inch at typical densities; fills irregular cavities well and is effective for topping batts.
- Mineral wool: R ~3.0–3.3 per inch, good fire and moisture tolerance, slightly heavier.
- Spray foam: open-cell ~3.6 per inch, closed-cell ~6–7 per inch; spray foam also provides air sealing but is costlier and often done by pros.
For a deeper technical comparison of spray foam and cellulose, consult the full trade-off guide: spray foam vs cellulose and the spray vs cellulose deep dive: spray vs cellulose deep dive.
Layering Strategies and Hybrids
A common approach to reach R-60 without extreme single-product depth:
- Install R-30 batts at the ceiling plane for mechanical clearance and then blow 6–8 inches of cellulose on top to reach R-60.
- Use a thin closed-cell or open-cell foam layer for air sealing at the roofline, then top with blown-in insulation for bulk R.
- Dense-pack wall or attic rafter bays when joist depth is limited.
Layering preserves batt performance and makes future upgrades easier.
Cold-climate Assemblies vs Ventilated Attics
In ventilated attics, insulation is normally at the ceiling plane with continuous soffit-to-ridge airflow; adding depth must avoid blocking soffit vents. For conditioned (unvented) roof assemblies, foam at the roofline plus additional insulation creates a warm attic space but requires careful moisture control and is often more complex.
See our attic insulation guide for recommended attic assemblies and R-targets by use case.
DIY-friendly Methods and Tools
- Blown-in cellulose: rent a blower at many home centers; plan 1–2 days for a typical 1,200–2,000 ft² attic depending on access. Wear a respirator, goggles, and gloves.
- Fiberglass batts: simple hand tools, speed square, utility knife. Work carefully around wiring, fixtures, and recessed cans.
- Spray foam: small DIY kits exist but have safety and quality limitations; large projects are usually best left to trained applicators.
This video compares the options to help you decide:
.For wall-centric options when attic depth is constrained, review our piece on high-R wall strategies.
R-30 vs R-60 Insulation: Retrofit and Installation Considerations for Diyers
Access, Headroom, and Ventilation Constraints
Measure existing insulation depth at multiple locations to identify cold spots. If headroom is limited, R-60 by adding bulk may not be practical—consider insulating the roof deck or upgrading walls. Never block required soffit-to-ridge airflow in a ventilated attic; use baffles to keep soffit channels clear.
Air Sealing First: Why It Matters
Air leakage can move far more heat than conductive losses through insulation. Fix common leak points — attic hatch, plumbing stacks, recessed lights, and top plates — before adding bulk insulation. Our guide to common air leakage points lists typical fixes that often pay for themselves faster than extra R-value.
Moisture Control and Roof/cold-spot Risk
Dense insulation can change where condensation forms. Check roof sheathing condition and attic ventilation. In some retrofit cases, adding R-60 without addressing ventilation and vapor control can raise moisture risk in colder months. For crawlspace or floor projects, remediate moisture problems first—see crawl space moisture fixes.
Tools, Time, and Common DIY Mistakes
- Tools: insulation blower machine rental (cellulose/fiberglass), respirator, goggles, staple gun for batts, measuring tape, utility knife.
- Time: a typical 1,200 ft² attic topping project can take a weekend for batts or 1–2 days with a blower and helper.
- Mistakes: compressing batts, not sealing gaps, blocking vents, and underestimating electrical/fixture clearances around insulation.
If roofline work, replacement, or ventilation redesign is required, consult our roof installation tips and consider a pro for structural or major ventilation changes.
R-30 vs R-60 Insulation: Cost, Payback, and Energy Savings Examples
Sample Back-of-envelope Calculations
A small, well-sealed 1,200 ft² house in a heating-dominated climate might save roughly 10–20% on annual heating energy when upgrading from R-30 to R-60, depending on heating fuel, envelope leakage, and local climate. For example, if annual heating costs are $1,200, a 15% reduction is about $180/year. With installed cost differences of a few hundred to a few thousand dollars (DIY vs pro), payback can range from 3 to 20 years.
These are illustrative ranges. Exact savings depend on baseline leakage, fuel prices, and system efficiency. Use modeling or local calculators for precise estimates.
Factors That Change Payback (fuel Type, DIY Labor, Climate)
- Fuel type: electric resistance heating sees higher $ savings per Btu saved than natural gas in many areas, but local prices vary.
- Labor: DIY installation reduces cost significantly and shortens payback; professional spray foam increases cost and lengthens payback.
- Climate: colder climates yield higher annual savings for higher R-values.
- Interactions: adding high R without air sealing gives less return than doing both.
When R-60 is Worth the Extra Cost
- Cold climates with long heating seasons.
- Long-ownership horizons where operational savings accumulate.
- When the attic upgrade allows right-sizing a new heating system (purchase cost saved).
- When achieving passive-house or net-zero energy targets.
#
R-30 vs R-60 Insulation: Which Should You Choose?
Scenario-based Recommendations (5 Common Diyer Scenarios)
- Mild climate, budget DIY: Choose R-30 with thorough air sealing and a small top-up of blown cellulose for gaps.
- Cold climate long-term investment: Aim for R-60 at the attic with layered batts + blown-in cellulose or dense-pack; include attic hatch insulation and sealing.
- Limited attic depth: Insulate the roof deck, add continuous exterior wall insulation, or use high-R wall assemblies—review high-R wall strategies.
- Net-zero target: Prioritize airtightness, continuous exterior insulation, and R-60+ attic plus mechanical ventilation with heat recovery—see net zero home features.
- Mobile home or tiny house: Use targeted dense-fill, closed-cell foam pockets, and follow the mobile home insulation tips guide.
Decision Flowchart: Quick Questions to Pick R-30 or R-60
- Is your climate heating-dominated (long, cold winters)? If yes, lean R-60.
- Is attic depth limited or do you need attic access/storage? If yes, consider roof-deck insulation or wall upgrades.
- Is budget tight and ownership short-term? If yes, prioritize air sealing and aim for R-30.
- Are you pursuing net-zero or passive-house targets? If yes, choose R-60 and combine with continuous insulation and airtight details.
When to Consult a Pro or Run an Energy Model
Hire a pro if planning major roofline changes, spray-foam application over large areas, ventilation redesign, or if the building has complex moisture dynamics. Run an energy model when making decisions affecting HVAC sizing or if pursuing certification (PHIUS, Passive House). For small retrofits, a blower-door test can reveal whether air sealing will out-perform added R in payback.
The Bottom Line
For most budget DIYers in mild climates, r30 insulation with careful air sealing delivers good value and comfort quickly. In cold climates or for long-term net-zero goals, investing to reach r60 in the attic is often justified. Match the R-target to your climate, budget, and project horizon, and always seal air leaks before piling on bulk insulation.
Frequently Asked Questions
Is R-60 worth it?
Short answer: it depends on climate and ownership horizon. In cold, heating-dominated climates R-60 typically reduces annual heating energy noticeably and can pay back over time; in mild climates the incremental savings shrink, so fixing air leaks first often gives faster payback.
Consider your fuel costs, baseline envelope performance, and whether you plan to stay in the home long enough to recoup the investment; run a simple ROI using local energy prices.
Can I layer R-30 batts to reach R-60?
Yes, layering is common: install R-30 batts at the ceiling plane, then blow cellulose on top to add bulk without compressing the batts. Avoid compressing insulation, and keep ventilation channels open where required.
How does ventilation interact with high attic R-values?
Ventilation strategy matters. In a ventilated attic, keep a clear soffit-to-ridge airflow and use baffles so added insulation doesn't block vents. For unvented (conditioned) roof assemblies, insulation at the roof deck requires careful moisture management and often professional input.
Will upgrading insulation reduce my HVAC size?
Potentially. Significant envelope improvements (moving from R-30 to R-60 plus airtightness) can lower peak heating load and allow right-sizing a new system. But resizing should follow modeled or measured load calculations, not rule-of-thumb estimates.
Are there moisture risks when increasing attic insulation?
There can be if ventilation, vapor control, or roof details are faulty. Adding depth may change dew point locations; inspect roof sheathing, correct ventilation, and address any existing moisture problems before installing deep insulation.