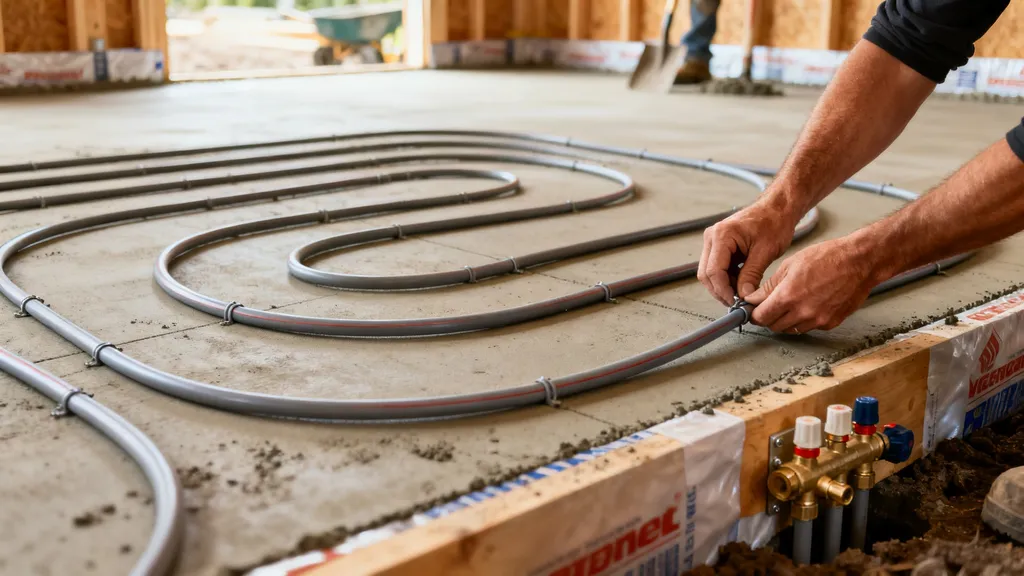
Step-by-step guide to planning, installing, and commissioning in-slab radiant floor heating for DIY eco homebuilders.
Radiant Floor Heating in Slab: Installation Guide
Radiant floor slab systems embed heating tubing into a concrete slab to deliver even, low-temperature warmth across a floor. For budget-conscious DIY builders, a properly designed radiant floor slab can reduce operating costs, improve comfort, and pair efficiently with heat pumps or solar thermal systems. This guide explains how in-slab radiant heating works, which materials and tubing patterns to choose, and a practical, step-by-step installation and commissioning plan you can follow on a new slab-on-grade or major remodel.
TL;DR:
- Radiant floor slab delivers even, low-temperature heat and pairs well with heat pumps when the slab and perimeter insulation are designed for low supply temperatures.
- Use hydronic PEX tubing with an oxygen barrier, continuous perimeter insulation, and a manifold with zone controls; pressure-test lines before pouring and follow a slow heat-up schedule.
- Plan slab thickness, tubing cover, and heat-source compatibility early; hire a pro for manifold plumbing or if you need buffer tanks or mixing valves.
Why Choose Radiant Floor Heating in Slab?
Radiant floor slab systems excel at delivering even, draft-free heat that feels warmer at lower air temperatures because heat radiates from large surface areas. For DIY eco homes, that means lower supply temperatures and steady comfort without the noise or ductwork of forced air. Research into slab systems shows measurable differences in surface temperature behavior and energy performance when systems are well designed and insulated; one study provides experimental and numerical data on how slab surface coatings and thermal mass affect average surface temperature and response times (see the research on radiant floor thermal behavior) https://pmc.ncbi.nlm.nih.gov/articles/PMC8838762/.
Energy and Comfort Advantages for DIY Eco Homes
- Even heat distribution: Floors deliver heat upward across living spaces, reducing cold spots near windows and exterior walls.
- Better comfort at lower air temps: Radiant systems often allow thermostats to be set 2–4°F lower while maintaining comfort, improving perceived efficiency.
- Passive-house compatibility: Radiant slab combines well with tight, insulated envelopes and the airtightness measures described in our passive house airtightness guide.
How Slab Systems Work with Thermal Mass
Concrete has high thermal mass, which smooths out temperature swings. Once warmed, a slab releases stored heat slowly—helpful in homes with steady loads or when paired with low-output sources like ground-source or air-source heat pumps. The trade-off is slower response: slabs won’t heat a cold space in minutes. Studies show slab thermal properties can shift surface temperature averages by up to around 15% depending on coating and construction choices (see experimental data) https://pmc.ncbi.nlm.nih.gov/articles/PMC8838762/.
When an In-slab System is Not the Right Choice
- Retrofit projects with finished floors often favor electric mats or above-slab systems to avoid major demolition.
- Homes needing rapid, high-temperature response (e.g., occasional and large heat loads) may prefer forced air or modulating hydronic radiators.
- If the site has poor slab insulation or frost issues, a slab-on-grade design must be adjusted—consult our slab-on-grade design guidance for cold climates.
Types of In-slab Radiant Systems and Key Materials
Hydronic in-slab heating is the standard choice for embedding in concrete slabs because it handles low supply temperatures, scales across whole-floor areas, and integrates with boilers or heat pumps. Electric systems (heating cables or mats) are possible but usually better for spot heating or thin overlays rather than full slabs.
Hydronic (PEX) vs Electric Mats — Why Hydronic Usually Wins for Slabs
- Hydronic systems use heated water circulated through tubing; they are cost-effective for large areas and pair with heat pumps.
- Electric mats are simpler to install in thin-slab overlays and are useful in small additions or retrofit tile jobs but become expensive on large floors.
PEX Tubing Options, Oxygen Barriers, and Spacing Basics
- PEX-A vs PEX-B: PEX-A is more flexible and commonly used for tight bends and serpentine layouts; PEX-B is stiffer and typically cheaper. Both work for in-slab use when rated for embedded use.
- Oxygen barrier: For closed-loop systems connected to metal boilers or heat pumps, use oxygen-barrier PEX to prevent corrosion in the mechanical system.
- Diameters and spacing: Common diameters include 3/8", 1/2", and 5/8". Smaller diameters increase flow resistance but allow tighter spacing. Typical spacing ranges from 6" to 12" on-center: tighter spacing raises surface temperature uniformity and reduces required water temperature.
Insulation Under Slab and Edge Details
- Use continuous under-slab insulation such as XPS or polyiso with appropriate compressive strength for traffic loads.
- Perimeter insulation (rigid board around the slab edge) reduces thermal bridging and is critical in cold climates.
- Include a thermal break between slab and foundation walls where appropriate to limit heat loss.
| Tubing type | Typical spacing | Typical use |
|---|---|---|
| 3/8" PEX | 6"-8" | High heat flux floors (tile), tight temperature control |
| 1/2" PEX | 8"-12" | General residential slab heating |
| 5/8" PEX | 10"-12" | Long loop runs, lower pump head preferred |
For deeper detail on insulation choices and R-values, see our guide to insulation options.
Design Considerations Before Installing a Radiant Floor Slab
Good design prevents problems later. Start with slab thickness, concrete cover over tubing, and reinforcement layout. Also size the system using heat-loss estimates and pick compatible heat sources.
Slab Thickness, Cover, and Reinforcement
- Typical residential slab thickness for in-slab tubing ranges 3.5"–5" over tubing, depending on structural needs and finish. The tubing should be placed at a consistent cover depth—commonly mid-slab in thin slabs or near the top of structural slabs for faster response.
- Use welded wire mesh or rebar chairs to support tubing, ensuring tubing is secured so it doesn't float during the pour.
- Provide at least the manufacturer-recommended concrete cover to protect tubing from mechanical damage.
Basic Heat-loss and System Sizing Principles (illustrative Example)
- Heat-loss calculations require U-values for assemblies, design outdoor temperature, indoor setpoint, and area. An illustrative calculation: for a 1,000 ft² well-insulated open-plan space with 20 Btu/hr·ft² heat loss, required heat output is ~20,000 Btu/hr. If loops deliver 500 Btu/hr each, you need ~40 loop equivalents—this is only an example to show the process and not a substitute for a proper calculation.
- Lower supply temperatures (e.g., 85–110°F) are more efficient with heat pumps. For higher-demand zones, shorter loop lengths or closer tubing spacing reduce required supply temps.
Compatibility with Heat Sources: Boilers, Heat Pumps, and Solar
- Boilers can supply higher temperatures but may be oversized for low-temp slab designs. Hydronic boilers work well when paired with mixing valves or control strategies to lower supply temps.
- Air-source and ground-source heat pumps are efficient when slab systems are designed for low supply temperatures. For guidance on sizing heat pumps that pair well with slabs, see our heat pump sizing reference.
- Solar thermal or PV-driven electric heating can be integrated; design controls and safe electrical practices are required when coupling systems.
Local codes and minimum insulation requirements vary; for example, some energy codes specify minimum R-values under radiant slabs—check the applicable standards such as the Minnesota Energy Code excerpt on floor insulation requirements for systems incorporating radiant heating https://codes.iccsafe.org/s/MNEC2020P1/6-heating-ventilating-and-air-conditioning/MNEC2020P1-ASHRAE-Ch06-Sec6.4.4.1.5.
Step-by-step Installation Guide for Radiant Tubing in Slab
This section gives a sequential checklist for installing tubing into a slab-on-grade. Follow local codes and manufacturer guidance at every step.
Site and subgrade prep: grade, compaction, drainage, vapor barrier
- Excavate and grade: Prepare a level subgrade, slope to drainage, and remove organic material.
- Compaction: Compact subgrade to engineering specs to limit settling.
- Drainage and moisture control: Install perimeter drains where required. Lay a continuous vapor barrier (6-mil or thicker as specified) to separate slab from damp soil.
- Under-slab insulation: Install rigid board (XPS or polyiso) with taped seams to the required R-value and compressive strength for slab loads.
- Optional fill: Use EPS or lightweight fill under footings or where code requires.
Layout, Securing Tubing, and Recommended Patterns
- Choose a tubing pattern: serpentine for low-cost, easy layout; or reverse-return/looped circuits for hydraulic balance. Reverse-return yields more even flow between the first and last loop.
- Secure tubing to welded wire mesh or rebar chairs using zip ties or clips rated for concrete. Keep tubing at the designed cover depth.
- Keep loop lengths reasonable (commonly under 300–400 ft per loop) to limit pressure drop and ensure even flow.
- Pre-run conduit or chase for manifold piping and rough-in manifold location close to the mechanical closet for easy access.
Pressure Testing, Concrete Pour Sequencing, and Curing
- Pressure test the tubing network before pouring concrete. A common illustrative test is pressurizing to 30–60 psi and holding for 24 hours while watching for pressure loss; follow manufacturer recommendations for exact pressures and durations.
- During the pour, maintain tubing position by using chairs and avoid concentrated foot traffic that can displace lines. Communicate placement constraints clearly to the concrete crew.
- After pour, allow concrete to cure per standard practice. Use a slow, controlled heat-up schedule for the first commissioning to avoid thermal shock to the slab and embedded tubing—typically ramping temperature gradually over several days.
Air-barrier and wall transitions
- Coordinate slab edge and wall air-barrier details to ensure continuous airtightness. See the air barrier details guide for connecting wall sheathing and slab-edge transitions.
What to watch for
- Avoid sharp bends or kinks in tubing.
- Label loops clearly at the manifold before pouring.
- Document loop mapping with photos and a drawing for future servicing.
Watch this step-by-step guide on installing radiant floor heating:
Manifolds, Controls, and System Integration
A well-located manifold and thoughtful control strategy are essential for maintainability and efficiency.
Manifold Selection, Placement and Piping Layout
- Choose manifolds with individual loop flow meters, isolation valves, and drain ports. Stainless steel and brass manifolds are common.
- Place manifolds in an accessible location—mechanical room or a recessed manifold cabinet near the main HVAC equipment.
- Route supply and return piping with short, insulated runs. Consider a primary/secondary piping layout if using a boiler or a buffer tank.
Control Strategies: Zones, Mixing Valves, and Thermostats
- Zone by function: common zoning includes living areas, bedrooms, bathrooms, and slabs with different floor coverings. Smaller zones yield better control but more piping.
- Mixing valves: When supply temperatures from the heat source exceed ideal slab temps, use thermostatic or motorized mixing valves to protect the slab and floor finishes.
- Controls range from simple room thermostats to advanced hydronic zoning controllers that sequence pumps and mixing valves. For homes integrating PV or electric components, follow safe electrical practices and the solar safety guidance in our solar system safety guide.
Integrating the Slab with Your Existing Heating Source
- With boilers, ensure corrosion protection via oxygen-barrier tubing and proper system fill/expansion strategies.
- With heat pumps, ensure the system is sized for low supply temps and consider a buffer tank to match thermal inertia between pump cycles and slab response.
- Mini-splits can complement slab heating for rapid response in peak loads; see our heat pump sizing guidance for matching systems.
Control tips
- Include bypass valves and balancing valves to tune flow rates.
- Use programmable setbacks and weather compensation where possible to reduce energy use.
Testing, Commissioning, Performance, and Cost Comparison
Commissioning ensures the installed slab performs as designed. Include pressure testing, controlled heat-up, and performance verification.
Pressure Test Protocol and Leak Diagnostics
- Pressure test each loop according to manufacturer guidance. An illustrative protocol is pressurizing to 30–60 psi and holding for 24 hours while monitoring for pressure decay; document readings.
- Leak diagnostics: look for pressure drops, wet spots, or unexpected elevation of moisture readings after pouring. Use tracer gas or thermal cameras for hard-to-find leaks in finished slabs.
First Heat-up Schedule and Performance Checks
- Slow ramp: Start with low supply temps and increase gradually over several days to allow the slab to equalize and avoid thermal cracking. Record slab surface and manifold temps during ramp.
- Verify individual loop flow meters and balance flows; check room-by-room surface temps and compare with expected design outputs.
- Troubleshoot uneven loops by checking flow, loop length, and tube spacing.
Common performance issues and fixes
- Uneven heat: Check loop spacing, loop length differences, air in system, or inadequate insulation.
- Slow response: Expect slow response due to thermal mass. If quicker response is needed, add local electric backup or combine with ductless heat pumps.
Comparison/specs Table: Tubing, Insulation, and Heat Sources
| Component | Typical spec | Notes |
|---|---|---|
| PEX-A (oxygen barrier) | 1/2" common | Flexible, good for serpentine; use for closed-loop hydronic |
| Under-slab XPS | R-10–R-20 typical | Choose compressive strength for loads; tape seams for continuity |
| Boiler supply temp | 120–180°F | Higher temps possible; use mixing if slab requires low temp |
| Heat pump supply temp | 85–120°F | Matches low-temp slabs best; improves COP at lower temps |
| Electric mats | 120–240 V mats | Good for small retrofit areas; high operating cost on large areas |
Cost comparison notes
- Upfront costs: Hydronic in-slab systems have higher installation cost than electric mats for small areas but are more economical over large floor areas. Quoted costs vary widely; use local quotes for accurate budgets.
- Operating costs: Heat-pump-driven hydronic slabs typically offer lower operating costs than electric resistance heating when properly sized and insulated. For budgeting within a high-performance build, compare system costs alongside our passive house cost breakdown Cost breakdown for passive house construction.
Useful external references on controls and design come from industry bodies and university research, for example ASHRAE's discussion of radiant systems and how controls affect efficiency Using radiant floor heating systems for efficient residential heating and tested dynamics for wooden floors with radiant systems https://cmec.wsu.edu/documents/2016/04/thermal-dynamics-of-radiant-floor-heating-with-wooden-flooring-systems.pdf/.
The Bottom Line
Radiant floor slab systems are a strong choice for eco-minded DIY builders planning new slabs: they deliver comfortable, even heat and pair well with low-temperature sources when the slab and insulation are designed correctly. Prioritize continuous under-slab insulation, oxygen-barrier PEX, clear manifold access, and a staged commissioning plan.
Decision Checklist for DIY Builders
- New slab vs retrofit: Choose in-slab hydronic for new slabs; consider electric mats for small retrofits.
- Heat source compatibility: Match slab design to boiler or heat pump supply temperatures; plan mixing or buffer solutions if needed.
- Insulation priorities: Install continuous under-slab and perimeter insulation before tubing.
- When to hire a pro: Consider professional help for manifold plumbing, pressure testing, or when complex controls or solar integration are involved.
Frequently Asked Questions
How long does PEX tubing last in a slab?
High-quality PEX tubing installed correctly and kept within manufacturer temperature and pressure limits typically lasts multiple decades; industry expectations often exceed 30 years. Use oxygen-barrier tubing in closed-loop systems to protect metal components and follow recommended cover depths. Lifespan depends on water chemistry, operating temperatures, and installation quality.
Can I repair a leak in an in-slab radiant system?
Repairing embedded tubing is disruptive but possible. Small leaks sometimes require slab removal or localized cutting and coring. For larger or inaccessible leaks, technicians may isolate the affected loop, depressurize, and replace piping from the manifold to a convenient access point. Documenting loop maps before pouring reduces time to locate a leak later.
Which floor coverings work best with radiant slab systems?
High-conductivity finishes like tile and polished concrete transfer heat efficiently and work well with in-slab systems. Engineered wood and some laminates also work but verify manufacturer limits for floor-surface temperatures and allowable temperature delta. Carpets with thick pads reduce heat transfer, so account for reduced output when selecting finishes.
Will radiant slab heating work with a heat pump?
Yes. Radiant slabs pair effectively with air-source or ground-source heat pumps because slabs perform well at lower supply temperatures. Design the tubing spacing and slab thermal mass for the heat pump's expected supply temperature and consider a buffer tank or mixing strategy to handle short cycling and match system inertia.
How long does it take for a slab to reach comfortable temperatures?
Slab response times vary: thin slabs with tubing near the surface warm faster (hours to a day), while thicker structural slabs can take multiple days to reach steady-state comfort. Plan for a slow, staged heat-up during commissioning and consider combining the slab with a faster-acting heat source like a ductless mini-split for rapid temperature recovery.