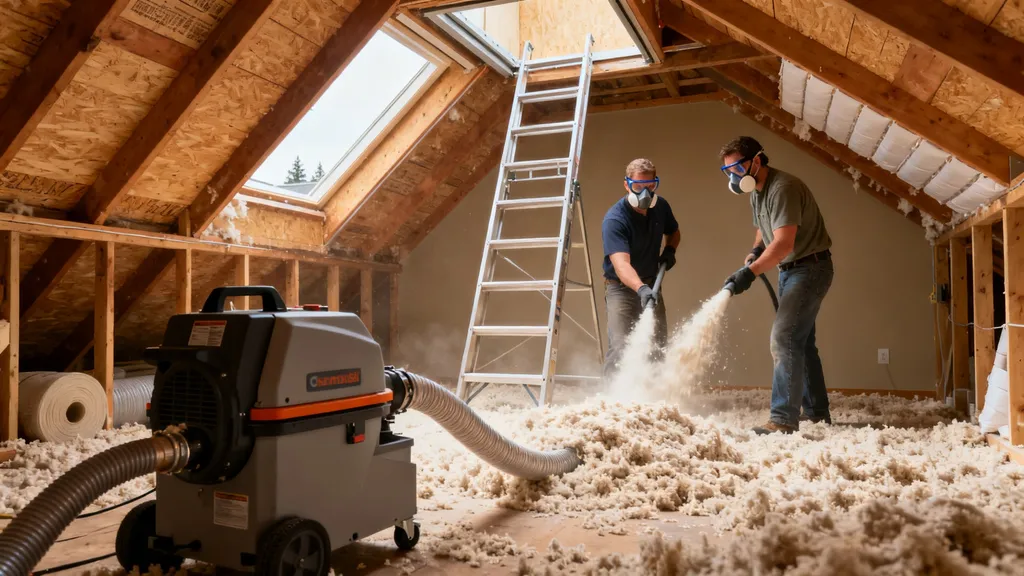
Learn how to plan, rent equipment, and install blown-in insulation (cellulose or fiberglass) in attics and walls with safe, budget-friendly steps.
DIY Blown-In Insulation: Step-by-Step Guide
Blown-in insulation is a fast, cost-effective way to raise an attic's R-value or fill irregular spaces where batts can't fit. This guide on DIY blown in insulation explains when this method makes sense, how to measure and calculate material needs, how to rent and set up a blower, installation techniques for attics and walls, and how to verify depth and performance after the job. Readers will learn practical safety steps, a worked example calculation, and troubleshooting tips to avoid the most common DIY errors.
TL;DR:
- Choose blown-in insulation when you need fast attic top-up, to fill irregular cavities, or to dense-pack walls; cellulose and blown fiberglass each have trade-offs.
- Measure attic square footage, pick a target R-value, then convert R to depth and volume; rent a blower sized to your job and bring proper PPE.
- Use consistent grid or chalk lines, work from the far corner toward the hatch, verify depths after 24–48 hours, and fix low-density spots promptly.
Step 1: Decide If Blown-in Insulation is Right for Your Project (DIY Blown in Insulation)
Blown-in insulation refers to loose-fill materials installed by pneumatic blower: primarily cellulose (recycled paper treated for fire resistance) or loose-fill fiberglass. DIYers choose blown-in for lower material cost, quick coverage, and strong retrofit performance where framing or irregular geometry limits batt installation.
When to Choose Blown-in Cellulose vs Blown-in Fiberglass
- Cellulose: Typical R-value per inch 3.2–3.8 (varies by manufacturer). Advantages include higher recycled-content (lower embodied carbon), good air-sealing when packed, and lower cost per R in many markets. Downside: cellulose absorbs and releases moisture; it must be used with proper ventilation and air-sealing.
- Blown fiberglass: Typical R-value per inch 2.2–2.7 for loose-fill. It resists moisture uptake better and is non-combustible, but it has higher embodied energy and can cost more per bag. Fiberglass is lighter so tends to settle less in some conditions.
Industry sources and vendor docs discuss DIY suitability and trade-offs for cellulose installs; see this practical discussion of DIY cellulose versus hiring a pro for decision points: Blown in cellulose insulation: To DIY or not to DIY?.
Projects Best Suited for Blown-in Insulation
- Attic top-up: Adding blown-in loose-fill over existing insulation to reach recommended R-values is common and economical.
- Wall cavities: Dense-pack blown cellulose can refill open wall cavities from drilled holes for siding or from the interior during renovation.
- Irregular spaces: Around ducts, eaves, and framing oddities where batts would gap.
- Kneewalls and cathedral ceilings: When combined with baffles and air control, blown-in can fill tough-to-reach voids.
A quick reality check: dense-packing walls often requires more skill and sometimes a pro; attic loose-fill is more approachable for first-timers. For alternatives such as mineral wool, see the mineral wool guide.
Step 2: Measure, Calculate Material Needs, and Gather Tools
Accurate measurement drives material cost and rental decisions. The Department of Energy and Energy Star publish R-value guidance by climate — consult local recommendations before choosing a target R. This step shows how to measure an attic, convert a target R into depth, and estimate bags needed (illustrative example).
Measuring Attic Area and Determining Target R-value
- Measure the clear floor area of the attic in square feet (length × width for simple shapes).
- Choose a target R-value based on climate and existing insulation. The Energy Star page lists recommended R-values by region; consult it to set a realistic target: Recommended home insulation R–Values.
Calculating Bags or Cubic Feet Needed (example Calculation)
Example (illustrative): 800 sq ft attic, target R-49, using cellulose at 3.5 R/inch (approximate).
- Required depth (inches) = Target R / R per inch = 49 / 3.5 ≈ 14 inches.
- Volume (cubic feet) = area × depth (ft): 800 sq ft × (14 in ÷ 12) ≈ 933 cubic feet.
- Cellulose bags: Many cellulose bags state cubic feet per bag (e.g., 2.5–3.5 cu ft per bag). If a bag yields 3 cu ft, bags needed = 933 ÷ 3 ≈ 311 bags.
- Always add 5–15% for waste, bridging, and settling during installation.
Label this calculation as an illustrative example only; bag yields and R per inch vary by product and manufacturer. For additional guidance on translating R-values into depth, see our article on insulation R-value choices and choosing R-values for walls and attics.
Checklist: Tools, PPE, and Supplies to Buy or Rent
- Tools and equipment: Insulation blower (rental), delivery hose (often 2–3 in. diameter), ladder, tape measure, chalk line or permanent depth markers, attic work boards or planks.
- PPE: NIOSH-rated respirator (P100 or N95 for fiberglass; P100 recommended for cellulose dust), goggles, disposable coveralls, gloves, knee pads.
- Supplies: Depth markers or wood strips, marking flags, plastic sheeting to cover fixtures, baffles for eaves, insulation supports (for above-ceiling joist bays), trash bags for cleanup.
- Blower specs to note: Rental shop will list blower capacity as bags per minute or cubic feet per hour and the model’s typical hopper size. Small units suit a single-car garage or small attic; larger 2-person units suit whole-house jobs. Confirm hose length and power requirements.
Rental sizing guidance appears in the next section; sizing wrong will cost time. Also consult technical literature on insulation performance and moisture handling: recent research summarizes thermal and hygrothermal behavior of insulation materials (see peer-reviewed summaries at the U.S. Department of Energy and related research).
Step 3: Rent or Buy the Blower and Set Up the Workspace (includes Video Embed)
Matching machine size to job scope saves time and rental money. Rental centers (big-box tool rental and local equipment shops) commonly stock mid-size blowers suitable for most attic jobs.
Choosing the Right Machine and Hopper Size
- Small jobs (single room or small attic): Portable blowers with small hoppers are fine. They handle short jobs and fit in a car.
- Medium jobs (whole-house attic under 1,000–1,500 sq ft): Choose a mid-size blower with a 40–60 cu ft/hr feed rate; this reduces refill trips.
- Large jobs (multiple attics or contractors): Large hoppers and higher throughput minimize downtime but require two people for handling.
Confirm hopper capacity and hose length with the rental shop. Verify whether the blower has a dedicated dense-pack or no-return kit if you plan to dense-pack walls.
Preparing the Blower, Hose, and Power Source
- Most consumer rentals run on 120V; some higher-capacity units need 240V. Confirm power requirements before hauling the machine.
- Check hoses for kinks and secure couplings. Test-run the machine briefly to confirm feed rate and to practice nozzle motion with an assistant.
- Bring extension cords rated for the amperage; avoid household light-duty cords.
Watch this step-by-step guide on removing blown-in attic insulation:
Attic Prep: Clearances, Ventilation, Access, and Air Sealing
- Create stable walkways with attic planks; do not step between joists on drywall ceiling.
- Protect HVAC, wiring, and fixtures with plastic sheeting. Box and seal recessed lights if they are not rated for direct contact with insulation.
- Inspect and ensure baffle ventilation from soffit to ridge is unobstructed. Do not block soffit vents; use baffles to maintain airflow.
- Prioritize air sealing before adding insulation: seal attic-floor penetrations, top plates, chimneys, and duct leaks to maximize thermal performance.
- Label hazards (e.g., low headroom, strong trusses) near the hatch and on the attic floor for helpers.
Rental shops and blower manufacturers include setup manuals that respond to model-specific quirks; lean on those resources for brand-specific setup and troubleshooting. For recommended settled-to-installed depth allowances for cellulose, manufacturer guidance sometimes specifies blowing additional depth to allow for settling; some sources detail 10–20% overfill in practice — check product installation literature for exact figures.
Step 4: Technique — How to Blow Insulation for Even Coverage and Proper Density
Technique determines performance. Attic loose-fill and dense-pack wall installations use different nozzle motion, settings, and expectations.
Blowing Into Attics: Patterns, Depth Markings, and Working From Far to Near
- Start at the farthest corner from the attic hatch and work back toward the hatch so the hose and worker don’t compress freshly placed insulation.
- Use chalk lines or a marked grid to keep uniform depth. Place depth markers set at the required depth at regular intervals (for example, every 4–6 feet).
- Keep a steady nozzle motion: sweep in overlapping passes rather than building piles. Read your depth gauge frequently and stop when markers are reached.
- Allow for 24–48 hours to settle before final depth verification; measure after settling to determine if a top-up is needed.
Dense-pack Wall Technique vs Free-fill Attic Technique
- Free-fill attic: Uses lower blower pressure and wider nozzle motion to deposit loose, fluffy insulation. Target is a loose, uniform blanket across joists.
- Dense-pack walls: Require a denser delivery using a no-return or dense-pack kit and a different feed rate. Installers often drill small holes into sheathing or interior plaster, insert the hose, and pack until cavity resists further material movement. Dense-pack will produce higher effective R per cavity and limit airflow.
- Dense-pack walls demand more skill: avoid overfilling that could bow studs or crack finishes. For complex wall projects, consider consulting a professional.
How to Avoid Over- or Under-compaction
- Under-compaction leaves low-density spots and lowers R-value. Fix by re-blowing targeted trouble spots at higher feed until density is uniform.
- Over-compaction (packing too tight) lowers performance for loose-fill fiberglass and can stress cavities—avoid forcing material in short bursts close to the nozzle.
- Factors influencing density include blower feed gate setting, hose length, and how fast the nozzle moves. Longer hose runs reduce feed pressure and may under-deliver; shorten hose or increase blower feed setting to compensate.
The Department of Energy and Energy Star recommend verifying settled depths and following manufacturer installation instructions to meet target R-values and safety rules: see Energy Star for recommended R-values and installation basics: Recommended home insulation R–Values.
Step 5: Finish Work — Depth Checks, Sealing, and Inspection
Finishing correctly locks in performance. Depth checks, sealing penetrations, and proper hatch treatment are essential.
Checking Depths Across the Attic and Recording Results
- Create a depth-check map: place sticky flags or markers on a grid (for example every 6–8 feet). Measure settled depth at each point and record results on a simple sketch.
- If settled depths vary more than a few inches across the attic, re-blow low spots and re-measure after a day.
- Photograph marked areas and the attic access for records.
Sealing Penetrations, Insulating Kneewalls, and Installing Attic Hatch Covers
- After insulation, seal attic hatch with perimeter gasket or weatherstripping and add an insulated hatch cover to prevent major convective loss.
- Box recessed lights with airtight covers unless fixtures are IC-rated and designed to be in contact with insulation.
- For kneewalls and conditioned attic conversions, consider combining blown-in cavity fill with rigid foam to maintain continuous insulation and control vapor drive. For context on combining strategies, see continuous insulation for walls and roofs and rigid foam options.
Cleanup, Disposal, and Recycling Notes
- Sweep or vacuum small spills. Cellulose is biodegradable and often accepted in some local composting streams, but follow municipal disposal rules.
- Bag leftover material per rental shop guidance; some suppliers will take back unused cellulose or accept returns.
- Perform a final visual inspection for blocked vents, compressed insulation, and areas needing additional air sealing.
For dense-pack walls or installations near chimneys, a final professional inspection is recommended. If a chimney chase or unprotected heat source exists, get expert advice before covering with insulation.
Step 6: Common Mistakes and Troubleshooting During DIY Blown-in Installs
Anticipating and correcting common errors prevents rework and safety hazards.
Fixing Low-density Spots and Bridging
- Problem: Low-density areas show thin coverage or gaps (bridging).
- Fix: Re-blow targeted zones, slow the nozzle movement, and reduce hose distance. For deep pockets, temporarily hold material in place with insulation supports while topping up around edges.
Dealing with Moisture, Compression, and Settling
- Moisture: If insulation becomes damp from leaks or condensation, stop and diagnose the moisture source. Damp cellulose can promote mold; once source is fixed, affected insulation may need replacement.
- Compression: Avoid walking directly on the insulation blanket; use planks. Compressed areas lose R-value; loosen or re-blow those areas.
- Settling: Expect some settling—measure after 24–48 hours. If settled depth is below target, top up. If excessive settling occurs later, investigate attic ventilation and vapor pathways.
When the Blower Clogs or the Hose Won’t Feed
- Common causes: Hopper feed gate too closed, damp material, hose kinks, hose coupling leaks, or foreign objects in hopper.
- Troubleshooting: Turn off machine, clear hose and hopper, check feed gate setting, ensure dry material, smooth hose runs without sharp bends. If problems persist, consult the rental shop or the machine manual — rental shops often provide on-call tech help.
Red Flags That Require a Pro
- Insulation near unshielded chimneys or combustion appliances without proper clearances.
- Active moisture leaks, visible mold, or rot.
- Structural concerns (bowed studs after dense-packing) or unusual pressure in walls.
For air-quality and health trade-offs between foam and cellulose, readers may compare options in our piece on safer spray foam options.
The Bottom Line
DIY blown in insulation is a highly effective, budget-friendly retrofit for attics and irregular cavities when planned carefully. Measure accurately, rent the right blower, prioritize air sealing, and verify settled depths — if a job involves dense-pack walls near heat sources or active moisture issues, consult a pro.
Frequently Asked Questions
How deep should blown-in insulation be for my climate?
Target depth depends on your climate zone and the material's R-value per inch. Energy Star publishes recommended R-values by region; use those as a baseline, then convert R to depth using the product’s R/inch. For example, if Energy Star recommends R-49 in a cold climate and your cellulose has ~3.5 R/inch, the installed depth is roughly 14 inches (illustrative). Always confirm settled-depth expectations from the manufacturer and measure settled depth 24–48 hours after installation.
Can I install blown-in insulation myself safely?
Yes, many homeowners can safely install attic loose-fill insulation with proper PPE (NIOSH-rated respirator, goggles, gloves), correct blower sizing, and basic attic safety (stable planks, labeled hazards). Dense-packing walls or working near chimneys and combustion appliances carries additional risk; those situations often warrant professional help.
What if my insulation settles unevenly after a year?
Some settling is normal. For uneven settling, map depth points across the attic and plan targeted top-up blows to bring low areas up to target settled depth. If settling is excessive or rapid, inspect for moisture or airflow issues that may be moving material; correct the source and then top up. For persistent problems, consult an insulation contractor who can assess ventilation, air sealing, and material choice.
Is cellulose safe near recessed lights or chimneys?
Cellulose must not contact unshielded or non-IC-rated recessed lighting; create airtight boxes or use approved covers. For chimneys and flues, maintain manufacturer-specified clearances and use non-combustible barriers. If uncertain, have a licensed professional inspect the chimney and advise on required clearances or protective flashing before insulating around it.