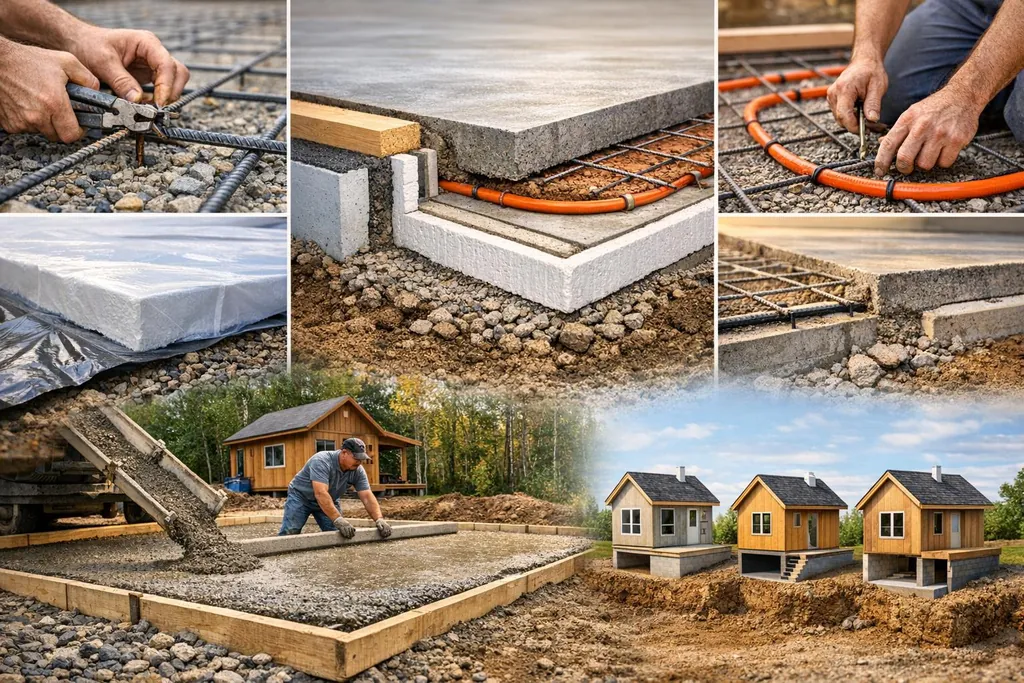
Compare slab, FPSF, crawl space, and basement foundations with insulation, vapor-barrier, and DIY pouring tips for small homes.
DIY Foundation Options for Small Homes and Cabins
Choosing the right foundation for your small home or cabin impacts energy efficiency, durability, and cost. Here's a breakdown of the main options and considerations:
- Slab-on-Grade Foundations: Simple, affordable, and ideal for flat lots. Frost-Protected Shallow Foundations (FPSFs) are great for cold climates, reducing excavation depth and preventing frost heave.
- Crawl Spaces: Provide utility access but need proper sealing to prevent moisture issues.
- Basements: Offer extra storage or living space but are costlier and prone to water damage without proper insulation.
Key Topics Covered:
- Energy Efficiency: Insulating slab edges and under-slab areas can cut heating costs by 10–20%.
- Moisture Protection: Use vapor barriers and proper drainage to prevent mold and radon issues.
- Crack Prevention: Reinforcement (rebar or fiber mesh), proper curing, and control joints are essential.
- Radiant Heating: Embedding PEX tubing in slabs provides even, efficient heating.
- Cost Considerations: Slab foundations cost $8–$13 per square foot, while basements can exceed $40,000.
Quick Comparison:
| Feature | Slab-on-Grade | Crawl Space | Basement |
|---|---|---|---|
| Cost | $4,000–$20,000 | $10,000–$20,000 | $26,000–$50,000+ |
| Energy Efficiency | High (with insulation) | Low | Variable |
| Flood Risk | Low | Moderate | High |
| Utility Access | Difficult | Easy | Moderate |
| Maintenance | Minimal | Moderate | High |
Pro Tip: For cold climates, FPSFs save money on excavation and improve energy performance, while vapor barriers and insulation ensure durability and comfort.
::: @figure 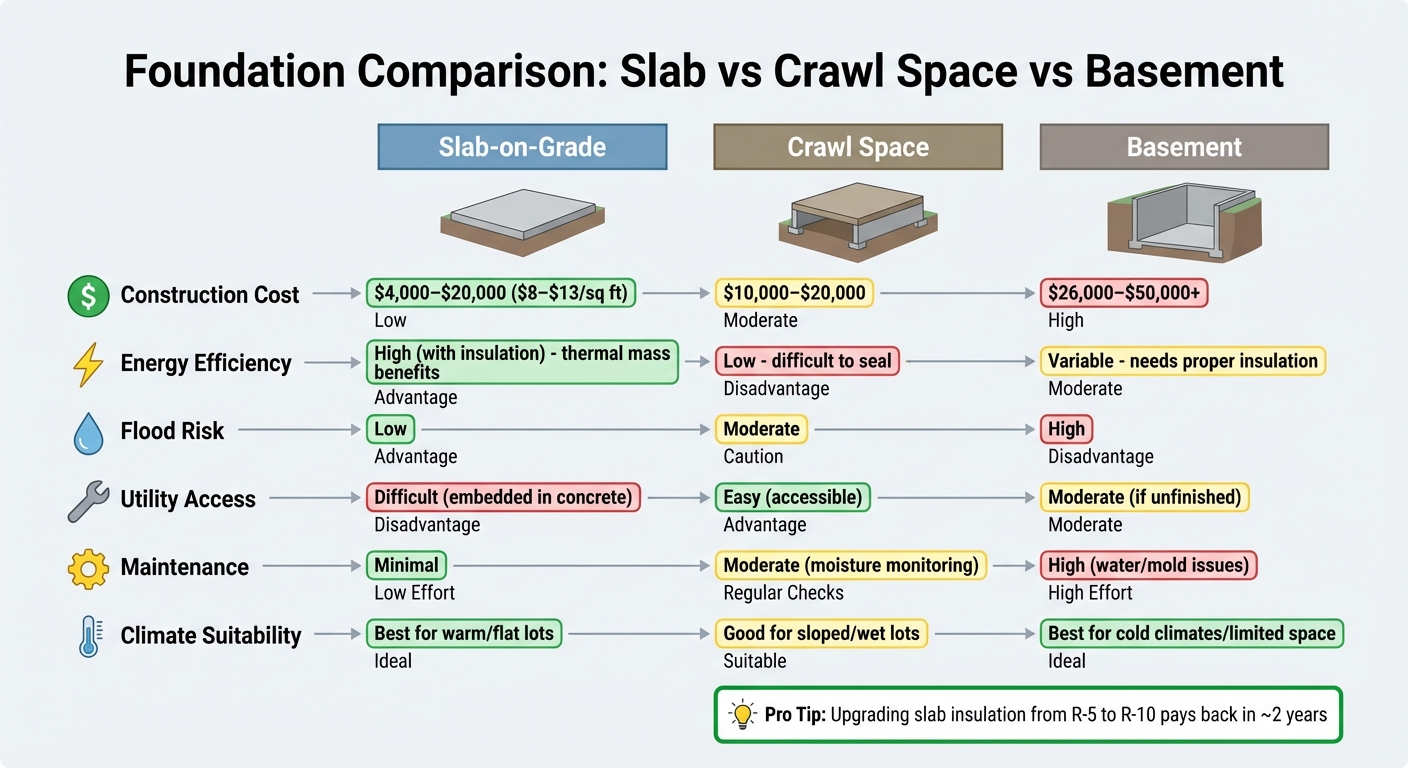 :::
:::
Frost-Protected Shallow Foundations (FPSF) Explained
How FPSF Works in Cold Climates
Frost-protected shallow foundations (FPSFs) rely on rigid foam insulation to trap heat and keep the ground from freezing. This eliminates the need for deep excavation to reach the frost line. Instead of digging down 4 feet or more, you can create a foundation just 12 to 16 inches deep, even in cold regions.
Here’s how it works: vertical insulation is placed along the slab edges, while horizontal "wing" insulation extends outward from the footing. In heated buildings, escaping warmth keeps the soil below from freezing. For unheated structures, the insulation uses geothermal heat to achieve the same effect.
> "If you include enough rigid-foam insulation around a foundation, however, you can keep the soil under the house warm enough to permit shallow excavations, which can be as little as 12 in. or 16 in. deep, even in northern areas." > – Martin Holladay, Contributing Editor, Fine Homebuilding
One inch of polystyrene insulation (R-4.5) provides thermal resistance comparable to about 4 feet of soil . For heated buildings using FPSFs, the International Residential Code specifies maintaining a minimum monthly mean temperature of 64°F .
Benefits of FPSF for Small Homes and Cabins
FPSFs can save DIY builders a lot of money. A study by the NAHB Research Center found that these foundations typically cost 15% to 21% less than traditional deep foundations . The savings come from reduced excavation, using less concrete, and speeding up construction - often allowing the footing and slab to be poured in a single step.
In Scandinavia, over 1 million homes have been built using FPSFs in the last 40 years, where this method is standard practice . Beyond cutting costs, FPSFs are energy-efficient. Rigid foam insulation reduces heat loss through slab edges, which can lower heating bills. Plus, the minimal excavation needed makes this system perfect for remote cabins or small lots with limited access.
| Feature | Traditional Foundation | Frost-Protected Shallow Foundation |
|---|---|---|
| Excavation Depth | 4+ feet (below frost line) | 12–16 inches |
| Concrete Volume | High (deep walls and footings) | Low (monolithic slab) |
| Construction Speed | Slower (multiple pours) | Faster (single pour) |
| Cost | Baseline | 15%–21% lower |
| Energy Efficiency | Variable | High (integrated insulation) |
These benefits pave the way for a straightforward construction process, outlined below.
Step-by-Step Guide to Building an FPSF
- Plan: Determine your local air-freezing index to calculate how much insulation is needed and the width of the horizontal wings. Refer to International Residential Code Table R403.3 for guidance .
- Excavate: Remove all organic topsoil and dig a shallow trench, typically 12 to 16 inches deep .
- Establish Drainage: Add a 4- to 6-inch layer of washed gravel or crushed stone. This layer ensures proper drainage and creates a level base for the insulation . Proper drainage is crucial, as moisture can reduce the insulation’s effectiveness.
- Install Insulation: Position vertical insulation around the perimeter, then add horizontal insulation extending outward from the footing. At corners, use wider or thicker insulation to offset increased heat loss .
- Materials & R-Value Adjustment: Use extruded polystyrene (XPS) or high-density expanded polystyrene (EPS). When calculating R-values, adjust XPS from R-5 per inch to R-4.5 per inch to factor in potential moisture absorption .
- Form and Pour: Set up forms, incorporating insulation if desired. Pour the reinforced slab and footing in one step for efficiency.
- Protect Exposed Insulation: Once the concrete cures, cover vertical insulation with a durable material like stucco, metal flashing, or pressure-treated plywood. The covering should extend at least 4 inches below ground level to shield against UV damage and wear .
- Final Precautions: Keep polystyrene insulation away from hydrocarbon-based products like gasoline, benzene, or tar, as they can damage it. In areas prone to termites, use standard prevention methods like soil treatments or termite shields to protect the below-grade foam .
How to Install Under-Slab Insulation for Energy Efficiency
Choosing the Right Insulation Material
When it comes to under-slab insulation, expanded polystyrene (EPS) is a budget-friendly option, offering about R-4 per inch at nearly half the price of extruded polystyrene (XPS). While XPS provides a slightly higher R-value of about R-5 per inch and better moisture resistance, EPS remains a popular choice due to its affordability and lower environmental impact. Mineral wool rigid boards are another option, especially since they are noncombustible, but they lack the strength to handle heavy loads. Meanwhile, bubble foil insulation, priced around $0.58 per square foot, works best as a radiant heat reflector when combined with rigid foam to meet building codes.
> "EPS (expanded polystyrene) is a lot less harmful in terms of greenhouse gas emissions during manufacturing, and is about half the price \[than XPS\]... You would get a much higher R value per dollar." > – Mike Reynolds, Co-founder, Ecohome
Building codes often require insulation values between R-5 and R-7.5, but upgrading to R-15 can significantly cut heating costs, often recouping the investment in just two years. Consider this: uninsulated slabs can be responsible for up to one-third of a home's total heat loss.
Installation Tips for DIY Builders
Once you've chosen your insulation material, proper installation is key to maximizing its energy-saving potential. Start by removing 6 inches of organic material from the site and replacing it with 4 to 6 inches of compacted clear stone, using 3/4-inch or 3/8-inch sizes. This drainage layer prevents moisture buildup and ensures a stable, level base. Uneven surfaces can lead to voids and cracking, so aim for precision, leveling the stone within 1/4 to 1/2 inch.
To minimize heat loss, stagger the joints of your insulation panels. Extend the insulation along the vertical edges of the slab all the way to the top of the concrete to prevent thermal bridging. Avoid using metal fasteners, as they can reduce the overall R-value by nearly 50%.
For a seamless insulation layer, seal all seams with high-quality, moisture-resistant tape to stop concrete from seeping between panels. If you're installing radiant tubing, secure it to the reinforcement mesh with zip ties, trimming them flush to prevent any interference with the concrete surface. Lastly, protect any above-grade insulation with materials like stucco, pressure-treated wood, or aluminum flashing to shield it from UV damage.
The Best Vapor Barrier Setup Under a Slab
Why a Vapor Barrier is Necessary
Concrete might seem solid, but it's surprisingly porous. Without a vapor barrier, moisture from the soil can seep through, causing damage to floor finishes, weakening adhesives, and even encouraging mold growth - especially in tightly sealed spaces like cabins with limited airflow. Installing a vapor barrier is a key step to protect not just the concrete slab but also any integrated systems, such as radiant heating.
A well-installed vapor barrier also helps manage radon, a dangerous gas linked to lung cancer. By containing and venting radon when levels exceed 200 Bq/m³, it adds an extra layer of safety to your home.
> "Overall reduction in moisture content of the slab is important to prepare the surface for floor covering adhesives and prevent moisture damage." > – Robert J. Pierson, Ecohome
Beyond moisture control, the barrier acts as a capillary break, preventing liquid water from rising through the slab. This is critical for protecting radiant heating tubes and other embedded systems from water-related wear and tear.
These factors highlight the importance of proper vapor barrier installation, which we’ll break down next.
Best Practices for Vapor Barrier Installation
To ensure your vapor barrier performs as intended, follow these tried-and-true installation tips.
Start with 10-mil polyethylene sheeting instead of the thinner 6-mil option. While 6-mil sheeting meets basic code requirements, it’s prone to tearing underfoot or during the placement of reinforcement mesh. The thicker 10-mil sheeting offers much better durability and is essential for areas where radon protection is a concern.
| Feature | 6-mil Polyethylene | 10-mil Polyethylene |
|---|---|---|
| Primary Use | Standard moisture protection | High-performance moisture & radon protection |
| Durability | Moderate; prone to construction damage | High; resists punctures and tears |
| Recommended For | Basic sheds or garages | Living spaces and radon-prone areas |
When laying the barrier, overlap all seams by at least 6 to 12 inches and seal them with high-quality building tape specifically designed for vapor barriers. Pay extra attention to sealing around penetration points like plumbing stacks, drains, and electrical conduits to maintain an airtight seal.
> "Polyethylene needs to be intact with no holes simply for the containment and evacuation of radon gas buildup below the slab." > – Mike Reynolds, Ecohome
Use rebar chairs with wide bases to lift your reinforcement mesh off the barrier. Placing steel reinforcement directly on the polyethylene can puncture it, undermining its effectiveness. Before pouring the concrete, inspect the entire barrier for any damage. If you spot any tears, patch them with scraps of polyethylene and tape to ensure the barrier remains intact.
How to Prevent Cracking in a Slab-on-Grade Foundation
Common Causes of Cracking
Cracks in slab-on-grade foundations weaken the structure and allow moisture and radon to seep through. To prevent this, it's crucial to understand what leads to cracking in the first place.
One of the primary causes is uneven settling. If the foundation is built on expansive clay or poorly compacted soils, the subgrade may lack the strength needed to support the slab. This can result in differential movement, which leads to cracks \[19, 22\].
Another common issue is frost heave, which occurs when frozen soil expands and lifts the slab. Pouring concrete into frozen formwork or letting the temperature drop below 50°F during the first three days after pouring can also cause frost damage and surface failure \[6, 19, 22\].
Improper curing is another factor. If the concrete loses moisture too quickly, it doesn't fully hydrate, resulting in weak, shrinkage-prone material \[18, 19\]. As Robert J. Pierson from Ecohome explains:
> "Concrete chemically sets, then subsequently dries, but if it dries too soon, then it doesn't set properly and strength is compromized." > – Robert J. Pierson, Ecohome
To avoid these issues, maintain the concrete temperature above 50°F for at least three days during curing . This is especially important because cracks in the slab can allow radon gas to enter, which has been linked to 16% of lung cancer deaths in Canada .
The next step involves understanding how reinforcement placement and control joints can help manage these stresses.
Reinforcement and Control Joint Placement
Proper placement of reinforcement and control joints is key to preventing cracks. Concrete naturally shrinks as it cures, so guiding where this shrinkage occurs is essential.
Reinforcement height plays a critical role. Use rebar chairs or support chairs to keep welded steel mesh or rebar at the correct height. If the reinforcement sinks too low during the pour, it won't effectively resist tension forces, increasing the likelihood of cracks \[18, 19\].
Once the slab has cured, saw control joints into the surface. These joints guide where cracks should form, reducing the chance of random hairline cracks . As Mike Reynolds from Ecohome notes:
> "Once cured, expansion joints can be cut into the surface in order to control where hairline cracks appear." > – Mike Reynolds, Ecohome
For smaller structures like homes or cabins, ensure the slab is at least 5 inches thick. Thinner slabs are more likely to crack under weight . If the soil conditions are poor, consider a raft slab design instead of a thickened-edge footing. A raft slab spreads the load across the entire footprint, making it more stable on soils with low bearing capacity . As Reynolds describes:
> "A raft slab acts a bit like a snowshoe in the way it distributes weight evenly over a larger surface... it is also less prone to movement and cracking than buildings that bear on a footing." > – Mike Reynolds, Ecohome
Moisture management during curing is equally important. Keep the slab moist by hosing it down and covering it with polyethylene for at least three days. This ensures proper curing rather than premature drying \[18, 19\]. In colder weather, you may need to use construction heaters for up to two weeks after enclosing the building to ensure the slab dries correctly before installing flooring . Reynolds emphasizes this point:
> "The concrete must be kept moist for at least three days because it needs to cure and not as some would say dry." > – Mike Reynolds, Ecohome
Before pouring the slab, ensure the clear stone base is leveled to within ½ inch of the desired elevation using a vibrating plate compactor. An uneven base can result in varying slab thickness, which concentrates stress in thinner areas and promotes cracking . Also, avoid pouring into frozen formwork to prevent frost-related issues .
How to Pour a Concrete Slab from Start to Finish!! DIY Concrete Prep and Finish
Should You Use Rebar or Fiber Mesh for Your Slab?
When it comes to controlling cracks in a slab-on-grade, picking the right reinforcement can make all the difference in your project’s durability and performance.
Rebar: Built for Strength and Longevity
Rebar is the go-to choice for reinforcing slabs that need to handle heavy loads and resist lateral forces. These steel rods are manually placed - typically at 24-inch intervals - to strengthen the connection between footings and foundations, ensuring stability where it matters most .
For load-bearing applications, such as small homes or cabins, building codes often require rebar. It’s a safeguard against major structural shifts and joint separation . Without rebar, concrete masonry unit (CMU) walls that aren’t fully grouted can lose lateral stability under soil pressure . Some contractors even go beyond code requirements, adding up to 20% more rebar to provide extra strength and peace of mind .
However, installing rebar is labor-intensive. Each rod must be carefully tied and positioned, and if your project includes rigid foam insulation beneath the slab, you’ll need to avoid puncturing the vapor barrier during placement .
If this sounds like a lot of effort, there’s a simpler option for less demanding applications.
Fiber Mesh: Affordable and Easy to Use
Fiber mesh offers a budget-friendly way to control surface cracks. Unlike rebar, fibers are mixed directly into the concrete, eliminating the need for manual placement \[27,28\]. This makes it an excellent choice for DIY builders looking to save time and reduce labor while still addressing shrinkage cracks.
Adding steel fibers to your mix costs about $5 per cubic yard of concrete , making it an economical solution for smaller projects. Pairing fiber mesh with a high-strength 5,000-psi concrete mix can produce slabs that hold up well in freeze/thaw cycles . The fibers improve the slab’s stiffness and help it endure temperature fluctuations without developing hairline cracks.
That said, fiber mesh isn’t a substitute for rebar in structural applications. It’s best suited for non-load-bearing slabs, such as garage floors, sidewalks, or as supplemental reinforcement alongside rebar \[27,28\].
Choosing the Right Reinforcement for Your Project
The decision between rebar and fiber mesh depends on your project’s needs. For structures that must support walls and roofs, rebar is essential. For lighter-duty applications or added crack resistance, fiber mesh is a practical and cost-effective choice.
| Feature | Rebar | Fiber Mesh |
|---|---|---|
| Primary Function | Structural integrity and load support \[27,28\] | Controls shrinkage and surface cracks |
| Installation | Labor-intensive; rods tied and placed | Easy; fibers mixed into concrete |
| Best Use | Footings, load-bearing walls, high-stress areas | Slabs-on-grade, freeze/thaw protection |
| Cost | Varies by code requirements | Around $5 per cubic yard |
For the best results, consider combining both methods. Rebar provides the structural strength needed for load-bearing applications, while fiber mesh adds surface-level crack resistance. Together, they create a slab that’s both durable and resilient over time .
Thermal Bridging at the Slab Edge - and How to Fix It
When it comes to slab insulation, tackling thermal bridging at the edges is essential for improving energy efficiency. Heat escaping from the slab's perimeter can drive up heating bills significantly.
What is Thermal Bridging?
Thermal bridging happens when heat escapes through the slab edge. In fact, this edge loss can account for over half of the total heat loss from a slab .
> "This edge thing is a big deal – the thermal bridging that occurs if you don't do it costs you more than half the thermal resistance of the whole deal." – Joseph Lstiburek, Principal, Building Science Corporation
In colder climates (Climate Zones 4 and higher), an uninsulated slab edge creates a large temperature difference between the concrete and indoor air. This can lead to condensation, humidity issues, and that unpleasant "cold floor" feeling near exterior walls . In winter, melted snow right next to the foundation is often a clear sign of heat escaping .
By insulating the slab edge, homeowners can cut heating costs by 10%-20%, saving around $50–$60 annually for a typical 1,800‑ft² home .
Let’s look at some effective ways to insulate slab edges and reduce this heat loss.
Insulation Strategies for Slab Edges
The key to stopping thermal bridging is creating a continuous thermal break with rigid insulation. The installation method depends on how the slab connects to the foundation.
- For monolithic slabs: Install rigid foam insulation that extends from the top of the slab to the bottom of the grade beam .
- For independent slabs: Place insulation between the slab and wall. Cut the foam at a 45‑degree angle to allow the concrete to cover the upper edge, ensuring both a thermal and movement break .
Materials like XPS, EPS, rigid fiberglass, or rock wool are commonly used for below-grade insulation . Two inches of XPS provides about R‑10 insulation, and in colder regions, extending insulation 4 feet horizontally can offer even greater benefits .
To protect exposed insulation, use finishes like stucco, pressure-treated wood, brick, or metal flashing. In areas prone to termites, maintain an inspection gap or opt for borate-treated insulation .
The cost of installing R‑10 edge insulation for an 1,800‑ft² home ranges from $300 to $600, with a payback period of about 5–10 years . Be sure to place a polyethylene vapor barrier over the insulation before pouring the concrete to prevent moisture intrusion .
Slab Heating 101: Integrating Radiant Tubing
Embedding radiant heating directly into a concrete slab transforms the floor into a source of cozy, even warmth. This method is especially practical for smaller homes and cabins, as it eliminates the need for bulky radiators or ductwork, saving valuable space while delivering consistent comfort.
Benefits of Radiant Heating in Slabs
Concrete serves as a thermal mass, absorbing heat from the PEX tubing and releasing it gradually throughout the day. The result? Even warmth across the entire floor - no cold spots or drafts like those common with forced-air systems.
Another advantage is the ability to create zones for individual temperature control. For instance, you could set your bathroom to a toasty 72°F while keeping the living room at a comfortable 68°F. This zoning capability not only enhances comfort but can also help lower energy bills.
Once installed, the system requires minimal upkeep. PEX tubing resists scale, chlorine, and corrosion, making it a low-maintenance solution. Plus, a warmer slab helps reduce condensation and discourages mold growth, contributing to better indoor air quality.
Ready to get started? Here’s a step-by-step guide to installing radiant tubing in your slab.
Steps to Install Radiant Heating Systems
- Calculate Heat Load: Consider insulation, windows, and your local climate to determine the system's size.
- Add Insulation: Lay rigid foam insulation (XPS or EPS Type II) beneath the tubing to prevent heat loss into the ground and ensure warmth is directed upward.
- Choose the Right PEX Tubing:
- PEX-A: Ideal for intricate layouts and tight bends.
- PEX-B: A cost-effective choice for most residential or commercial applications.
- PEX-C: Best for situations where rigidity is acceptable.
- Lay the Tubing: Use a serpentine pattern for smaller rooms or a counterflow pattern for larger spaces. Space the tubing 6, 9, or 12 inches apart, depending on your heating needs. Keep each loop under 300 feet to maintain water flow and avoid pressure drops.
- Secure and Test: Attach the tubing to reinforcing mesh or rebar, then position the manifold centrally to minimize the length of runs and ensure even flow across zones. Pressure-test the system before pouring the concrete.
- Pour the Concrete: Place the heating elements close to the slab surface to maximize efficiency and speed up response times.
| PEX Type | Flexibility | Best Use Case |
|---|---|---|
| PEX-A | Highest | Intricate layouts, tight bends |
| PEX-B | Moderate | Standard residential/commercial |
| PEX-C | Lowest | Specific rigid applications |
How to Pour a Concrete Slab Yourself (Step-by-Step Guide)
Pouring a concrete slab on your own might sound like a big task, but breaking it into smaller, manageable steps can make it much more approachable. With proper preparation and close attention to detail, you can create a solid, durable foundation that will stand the test of time.
Preparing the Site and Forms
Start by clearing the area of any debris, especially wood, to help prevent termite issues . Excavate the site to the required depth and add a 4-inch layer of 3/4-inch crushed stone. This gravel base acts as a barrier to stop moisture from seeping into the slab. Use a vibratory plate compactor to make sure the base is firm and stable.
Next, build your formwork using stakes and string lines to ensure everything is square and level. Mark the desired pour height inside the forms with a chalk line. If you're working in an area prone to termites, consider using foam insulation treated with boric acid derivatives and install continuous termite shields under the sill plate for added protection.
Place a 10-mil polyethylene vapor barrier directly on top of the gravel. Avoid adding sand between the barrier and the concrete, as this can reduce its effectiveness. As Graham Davis, a Building Performance Specialist at IBACOS, points out:
> "For an under-slab vapor barrier to be most effective, it should be in direct contact with the underside of the slab" – Graham Davis, Building Performance Specialist, IBACOS
Overlap and tape all seams in the vapor barrier, and seal any penetrations carefully. If you're adding rigid foam insulation, such as XPS or EPS Type II, position it either beneath the slab or along the exterior edges.
Now, install your reinforcement material, whether it's rebar or welded steel mesh. Use support chairs to keep the reinforcement at the correct height, ensuring it won't sink during the pour. Proper placement is crucial to avoid structural cracks. If you're planning to include radiant heating, secure your PEX tubing at this stage. Also, take care of any rough-ins for future plumbing needs, as altering a cured slab later is a major challenge.
Once the forms and reinforcement are ready, you're set to mix and pour the concrete.
Mixing and Pouring Concrete
Before mixing, check the weather conditions. Avoid pouring if there's a risk of freezing, as frozen formwork can compromise the slab's strength. Keep the concrete at a temperature above 50°F (10°C) throughout the curing process to ensure proper setting.
Pour the concrete evenly across the forms. Use a power trowel to smooth the surface, and if you want a polished, high-end finish, you can refine it further after the initial setting.
Curing and Final Touches
Curing is a critical step that ensures the concrete reaches its full strength. As Mike Reynolds from Ecohome explains:
> "The concrete must be kept moist for at least three days because it needs to cure and not as some would say dry" – Mike Reynolds, Ecohome
To keep the slab moist, hose it down regularly and cover it with a tarp or polyethylene sheet. You can also apply a curing agent to slow the drying process and prevent issues like edge curling.
After three days of curing at temperatures above 50°F (10°C), cut control joints using an expansion joint saw. These joints help guide natural cracking along clean, straight lines, improving both the appearance and durability of your slab.
Slab vs Crawl Space vs Basement: Pros, Cons, and Energy Use
Choosing the right foundation for your small home or cabin involves weighing upfront costs, energy performance, and maintenance requirements. Each option comes with its own set of advantages and challenges.
Comparison of Construction Costs
When it comes to affordability, slab-on-grade foundations take the lead. These typically cost between $4,000 and $20,000, or about $8 to $13 per square foot. They serve as both the foundation and finished floor, eliminating the need for basement walls and floor joists . Crawl spaces, which require footings and short walls but less excavation than basements, fall into the $10,000 to $20,000 range . On the higher end of the spectrum, basement foundations can cost anywhere from $26,000 to $50,000 or more, depending on the size of the home. When you include subfloors and finished flooring, basement costs can easily exceed $40,000 .
The environmental impact of construction is another factor to consider. An average foundation requires 75–100 tons of concrete, and producing one ton of Portland cement releases about one ton of greenhouse gases . Opting for a monolithic slab instead of a multi-pour strip footing and floating slab can cut emissions by approximately 3.9 tons . As Mike Reynolds, Editor at Ecohome, explains:
> "A finished slab over basement construction can potentially save you tens of thousands of dollars during construction."
These cost savings also translate into notable energy performance differences between the foundation types.
Energy Efficiency and Climate Suitability
Initial costs are just part of the equation - long-term energy efficiency and climate compatibility are equally important. Slabs are highly efficient, thanks to their thermal mass, which absorbs and retains heat. This makes them a great choice for passive solar designs . In colder climates, upgrading sub-slab insulation from R-5 to R-10 can pay off in as little as two years . Techniques like frost-protected shallow foundations further improve slab performance in cold regions .
Basements, on the other hand, offer mixed results. While their thermal mass can be beneficial, they are prone to heat loss unless insulated externally, which can negate some of their energy-saving potential . Crawl spaces are the least efficient due to challenges in insulation and sealing, which can lead to energy loss.
Climate plays a pivotal role in foundation choice. Slab foundations are ideal for areas with high water tables or where stairs are impractical, while basements are better suited for sloped lots or locations with height restrictions that require building downward .
Maintenance and Longevity Considerations
Maintenance needs differ significantly depending on the foundation type. Slab foundations are low-maintenance once installed correctly, though control joints are necessary to manage natural cracking . One downside is that plumbing and electrical lines are embedded in the concrete, making repairs both complicated and costly . Installing conduits or sleeves before pouring the slab can help mitigate this issue .
Crawl spaces provide easy access to utilities, but they come with their own challenges. Without proper ventilation or sealing, they can become breeding grounds for humidity and mold . Basements require the most upkeep, as they are susceptible to flooding, moisture, and mold over time . As one expert put it:
> "Basements are quite frankly, indoor swimming pools waiting to happen."
If you opt for a basement, allow the concrete walls to dry for at least two years before finishing the interior to avoid trapping moisture . Similarly, concrete slabs can take up to two years to fully shed excess moisture .
| Feature | Slab-on-Grade | Crawl Space | Basement |
|---|---|---|---|
| Construction Cost | $4,000–$20,000 | $10,000–$20,000 | $26,000–$50,000+ |
| Energy Efficiency | High (thermal mass) | Low (hard to seal) | Variable (needs insulation) |
| Flood Risk | Low | Low to Moderate | High |
| Utility Access | Difficult (embedded) | Easy (accessible) | Moderate (if unfinished) |
| Maintenance Needs | Minimal | Moderate (moisture checks) | High (water/mold monitoring) |
| Climate Suitability | Best for warm/flat lots | Good for sloped/wet lots | Best for cold/limited space |
Conclusion: Building a Strong Foundation
The type of foundation you choose - whether it's a slab, crawl space, or basement - has a direct impact on your home's comfort, energy efficiency, and durability. Elements like insulation levels, frost-protected shallow foundations (FPSF), and vapor barrier setups all play a role in creating a solid and energy-efficient base.
Going beyond the minimum building code can pay off significantly. For example, upgrading insulation to R15 or R20 can provide quick returns on investment . Installing a high-quality 10-mil vapor barrier does more than just control moisture; it also helps protect against radon gas, a serious health hazard linked to about 16% of lung cancer deaths in Canada .
To ensure long-term success, consult a structural engineer, plan plumbing carefully with sleeves or conduits, and maintain a 5% drainage slope to keep water away from your foundation .
It's worth noting that above-ground living space is often appraised at 100% of its square footage, whereas basements are typically valued at only 50–75% . A well-constructed slab foundation can save on upfront costs, lower the risk of flooding, and help avoid moisture-related issues.
FAQs
What are the main advantages of using a frost-protected shallow foundation for small homes or cabins?
A [frost-protected shallow foundation](/glossary/frost-protected-shallow-foundation) offers a range of benefits that make it an attractive option for construction projects, especially in colder regions. One major advantage is that it eliminates the need for deep excavation. This not only cuts down on construction costs but also speeds up the building process significantly.
Another key benefit is its ability to prevent frost heave. By incorporating insulation around the foundation's perimeter, this design safeguards structures from the damaging effects of freezing temperatures.
On top of that, it helps reduce heat loss through the foundation, contributing to better energy efficiency. This makes it a smart, cost-effective solution for smaller homes or cabins, especially for those aiming to build with sustainability in mind.
How does adding insulation under a concrete slab help with energy efficiency and heating costs?
Adding insulation beneath a concrete slab can significantly cut down on heat loss, helping to keep your home warmer during the winter and cooler in the summer. This not only boosts energy efficiency but can also trim your heating bills by 10–20%, depending on where you live and the local climate.
Under-slab insulation acts as a thermal barrier, stopping heat from escaping into the ground. This is particularly crucial in colder areas, where uninsulated slabs can waste a lot of energy. By helping to maintain a steady indoor temperature, it also eases the workload on your heating system, which can lead to long-term savings.
Should I use rebar or fiber mesh to reinforce my concrete slab?
When deciding between rebar and fiber mesh, it all comes down to the specific needs of your project. Rebar is a solid choice for delivering traditional strength and structural stability, especially in areas that handle heavy loads or require extra reinforcement.
On the flip side, fiber mesh works well for smaller slabs. It helps improve crack resistance and spreads stress more evenly throughout the concrete. For small, [energy-efficient homes](/blog/cost-strength-moisture-resistance-plywood-vs-osb-showdown) or cabins, fiber mesh is often a practical pick. It’s easier to install and focuses on controlling cracks effectively.
If your project involves larger slabs or more demanding requirements, rebar might be the better fit. Ultimately, think about the size of your slab, the loads it will bear, and your budget to make the right call.