The theory behind my choices for wall and roof design, as well as the materials used.
This is part 6 of my Nova Scotia build series. Catch up on Build Update 5: Roof Trusses & Sheathing if you missed it.
---
What Is A Passive House?
When I started this build research journey, I knew I wanted an energy efficient home. I wanted to minimize my environmental impact, but I also liked the idea of being self-sufficient: having a home that could power itself, or needed little power (often the two go together).
Turns out, there are lots of people interested in the same thing.
---
Continue to Build Update 7: Building the Larsen Trusses & Adding Siding →
Passive houses, which you can get certified for if you like, require very little energy to heat or cool.
They achieve this by meeting a few specific criteria:
- Being very airtight
- Having efficient mechanical ventilation (ie. powered ventilation) with high-efficiency heat recovery
- Having a specifically low value of heating and cooling demand, often achieved through smart window placement & shading, and super-insulation
In other words: very airtight, super-insulated, with high-performance windows placed in strategic places.
There are some cool early examples here in Canada, including the Saskatchewan Conservation House and the Larsen truss construction technique, pioneered by Edmonton builder John Larsen, which I’ll talk more about later.
So, passive house intrigued me, though I was less interested in getting the actual certification.
Pretty Good House
Another related idea is the Pretty Good House, something that came about because “Fed up with other building standards, from the wimpy and under-enforced building code to the nit-picky Passivhaus, Dan asked, essentially, what should you include in a house that does right for its inhabitants and the planet, but that does not go beyond reasonable environmental or financial payback.”
Their list of criteria is here:
“In no particular order, a PGH 2.0/Low Carbon Home should:
- Be as small as possible. Ideally with multi-family or multi-generational occupants.
- Be PV-ready or include photovoltaic panels. PV-ready means designed, built and sited in such a way that a reasonably-sized photovoltaic array can handle all of the home’s energy needs on an annual basis. (PV panels pay their carbon debt in 2-4 years.)
- Be simple and durable. Simple shapes are easier to air-seal and insulate, perform better in harsh weather, and require fewer materials and less maintenance than more complicated buildings. If you need to bring in a structural engineer, your design might be too complicated. Invest in the parts that are hard to change later.
- Use wood and wood-derived products as construction materials. Just make sure the wood is sustainably harvested, locally if possible. Otherwise the trees are better left to remove CO2 through photosynthesis. The more materials are processed, in general, the higher their carbon footprint.
- Use air-source heat pumps. Mini-splits can be efficient to -15°F or below, affordable (especially for the sizes needed in a PGH) and relatively simple to install. For those who can’t stand the look of an appliance on the wall, there are slim-duct, ceiling cassette, and floor-mounted versions. But the wall-mounted units are the most efficient, so learn to love them. Heat-pump water heaters are a no-brainer for most homes.
- Invest in the envelope. Insulation and air-sealing should be good enough that heating and cooling systems can be minimal, with indoor air quality and comfort levels that are very high.
- Be affordable, healthy, responsible and resilient.
- KISS: Keep It Simple + Safe, easy to operate and understand. Use owner-proof systems to get around operator influence.
- Consider traditional, non-flashy approaches: deciduous trees shading south and west walls; cooling via fans and natural convection instead of air conditioners; use biomass secondary water heating (i.e., let your wood stove heat your water); air-dry your clothes.
- Be part of a sustainable community: have access to community solar, jobs and services nearby that minimize driving, and shared infrastructure costs, to name a few advantages. A one-hit wonder in the middle of the woods often comes with a bigger carbon footprint than a community-based home.
A PGH 2.0/Low Carbon Home should minimize or avoid:
- Concrete, which contributes 10% of man-made global warming emissions, partly through fuel to heat and move minerals, but 60% from release of carbon dioxide (CO2) from limestone (CaCO3) to get calcium oxide (CaO) for Portland cement. One concrete-reducing technology that is gaining ground is helical metal piers, which are screwed into the soil to support decks, houses and more. Some engineers and builders have doubts, but with many thousands of installations, they have a proven track record.
- Foam, especially HFC (hydrofluorocarbon)-blown closed cell spray foam and XPS (extruded polystyrene) rigid insulation. When building a new house there should be no need to use foam above grade.
- Combustion appliances, especially those that burn fossil fuels. You can have a wood stove in a PGH but make sure it’s EPA-certified and include dedicated makeup air.
- Unhealthy materials.”
Choosing How to Build
With the above in mind, I knew that there were some guidelines in terms of how I wanted to build. They ended up very close to the “Pretty Good House” guidelines.
These were:
- Choose simple building shapes: single level, mostly rectangular forms would keep construction simple and fast.
- Electric-only, ready for PV: using propane or natural gas is one of the ways off-grid homes reduce their electricity load. But I don’t really consider that “off-grid” as you’re still reliant on non-renewable resources. Keeping things electric means I can use solar to generate on-site.
- Use natural materials where possible: this lowers the carbon footprint of the build, and is also safer for health.
- Use vapour-permeable designs and materials where possible: many materials, like Styrofoam and its relatives, are great insulations, but trap moisture. In practice, this means that you have to be very careful about where moisture gets trapped, otherwise you get rot and mold. Keeping things vapour-permeable means there’s more room for error (moisture can move, and things can dry).
- Apply rules of thumb for passive heating/cooling: I messed around with passive house planning tools and found them cumbersome; there are rules of thumb in terms of window selection depending on direction, shading, etc. that simplify things a lot.
- Minimize thermal bridging as much as possible: this is mostly about planning. How are you going to build window openings? How will you build out the insulation? A little thought ahead of time can increase thermal performance a lot.
Super-Insulating Walls
There are many different ways to achieve higher-than-normal insulation levels in a home build, and different builders prefer different things.
I had a few principles specifically for the walls that I wanted to focus on, some of them mentioned above, namely:
- Use natural materials where possible
- Use vapour-permeable designs and materials
- Minimize thermal bridging as much as possible
Off the bat, this eliminated a few different designs.
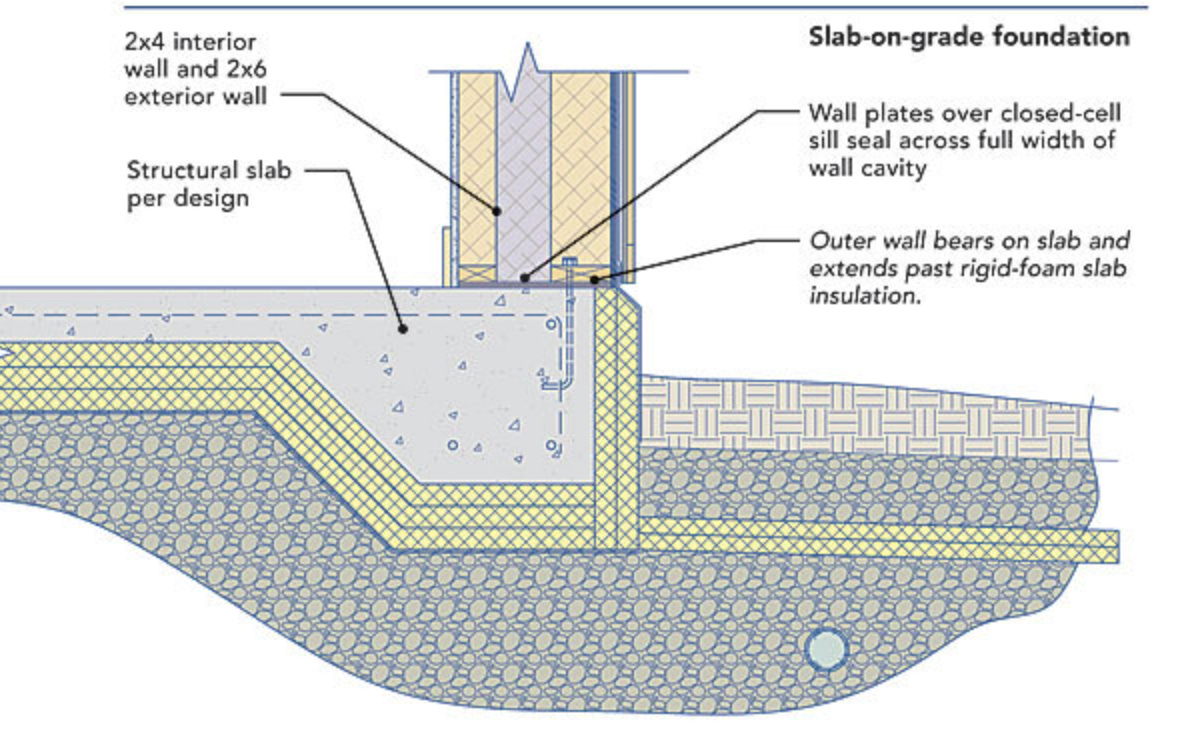
Double-stud construction is popular for passive houses, but since I was building on a slab-on-grade, the top corner of the slab, around the perimeter, is a weak point in terms of insulation:
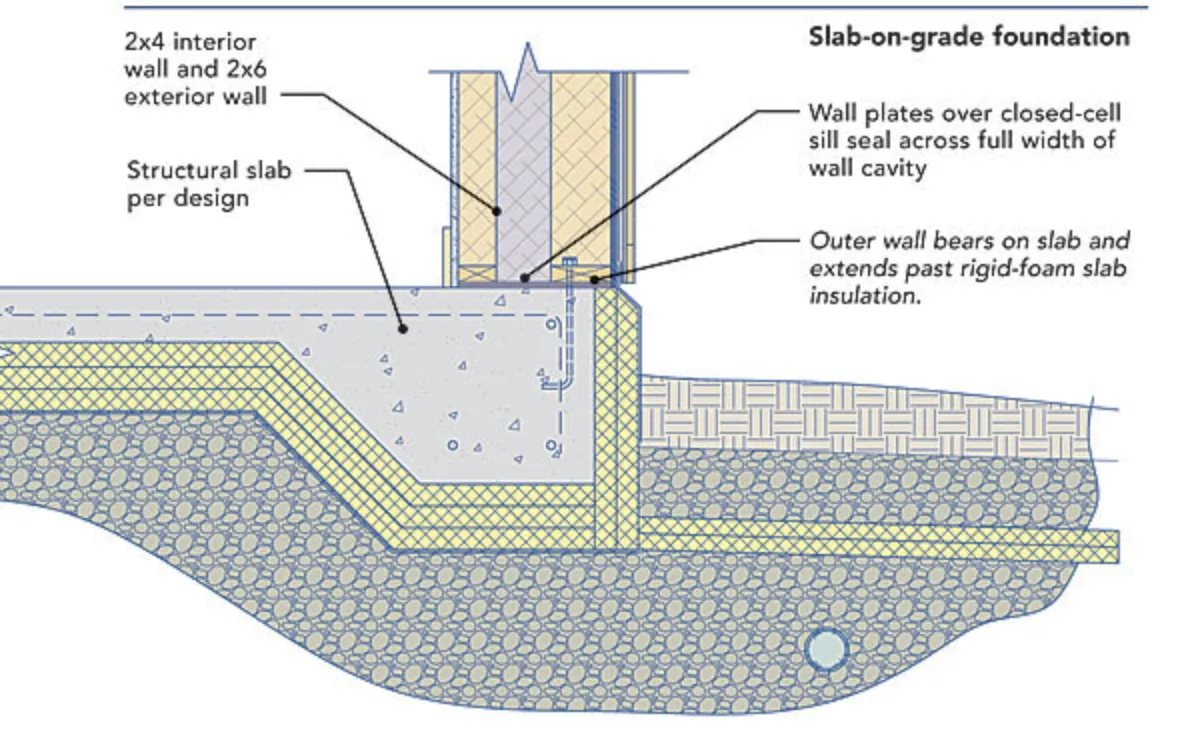
Double-stud wall on a slab-on-grade (from Fine Homebuilding)
The section captioned “Outer wall bears on slab and extends past rigid-foam slab insulation” is the part I’m talking about. There is little insulation here, especially if you don’t extend the sill plate over the edge.
You can improve this by adding rigid insulation of some kind over the exterior of the wall, but of course that adds cost.
And the other downside is you lose interior space with the second interior wall.
Rigid exterior insulation is another popular technique for creating super-insulated homes, like this screenshot of a home covered in mineral wool insulation:
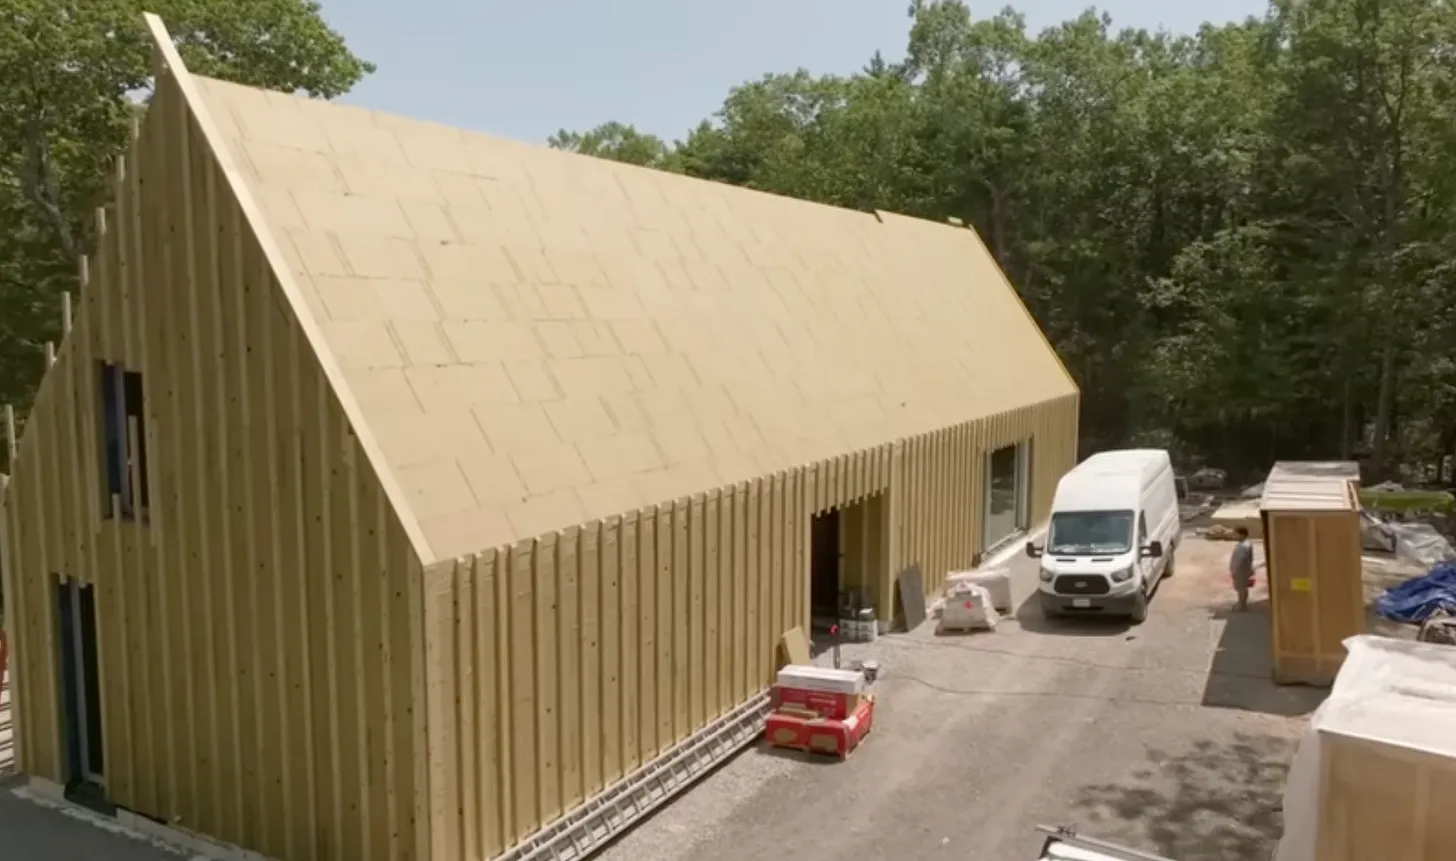
Mineral wool insulation covering the whole exterior (full video here)
A good visual of this for a slab-on-grade construction looks like this:
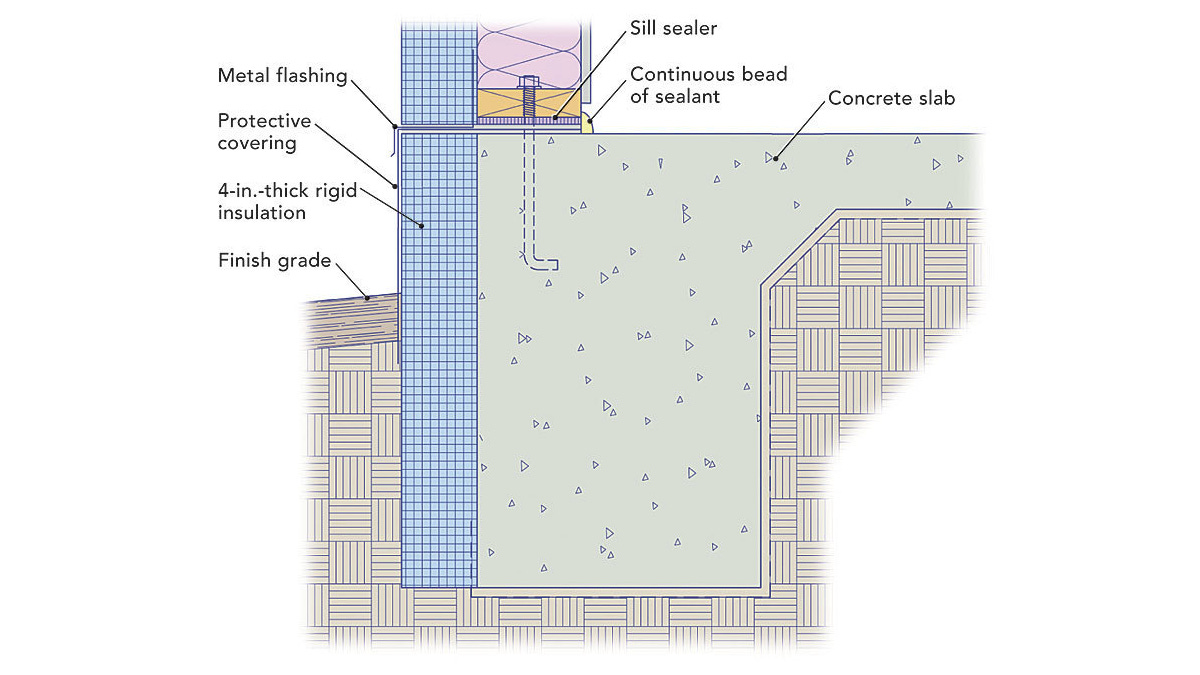
Rigid insulation on the exterior of a wall for a slab-on-grade construction (from Fine Homebuilding)
I don’t mind this kind of construction, as long as it uses mineral wool, not rigid foam (which is vapour impermeable), but it starts to get expensive pretty quickly.
Larsen trusses are another possible method, the one I ultimately chose.
Larsen Trusses
Larsen trusses, as I mentioned earlier, were invented by a builder from Edmonton, John Larsen.
They are a truss—just a small built-up structure—on the outside of a load-bearing wall, designed to serve as a cavity for insulation.
This article outlines the various methods for building them (of which there are many), and I’ll highlight two of the visuals here.
The first shows my preferred method for building the trusses themselves, using 2x2s and plywood gussets.
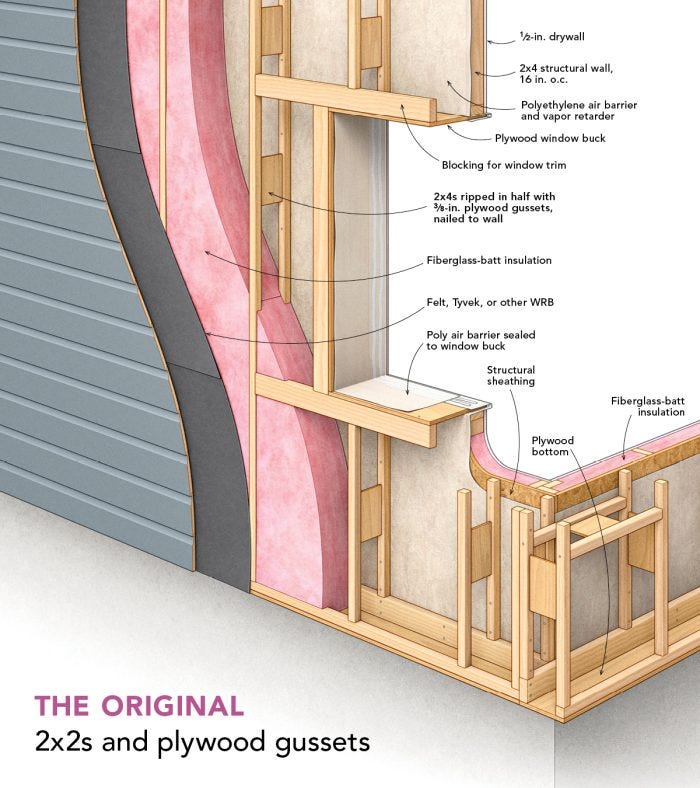
A Larsen truss wall built with 2x2s and plywood gussets, simple and cheap (source)
Why is this my preferred method?
It’s cheap, very simple, and allows infinite customization of the thickness of the walls. It also minimizes thermal bridging compared to the visual below, where there’s more wood in the trusses, which isn’t great for insulation.
This visual shows more of how I wanted to construct the wall layers, and the materials I wanted to use:
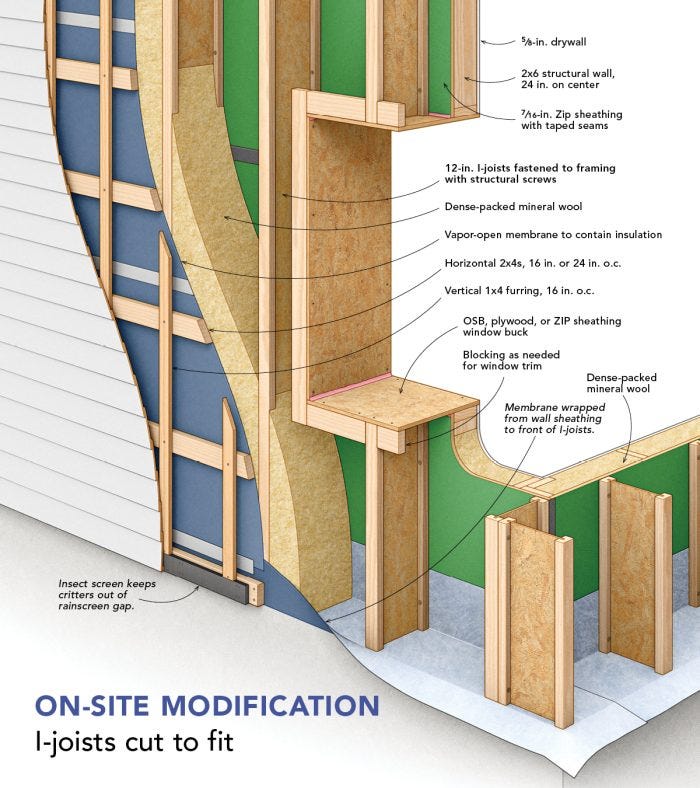
A Larsen truss example that is closer to the materials I wanted to use (source)
You can see here they’re using Zip sheathing (simple and effective for vapour and air-sealing), cellulose insulation, which is environmentally-friendly, renewable, and very DIY-friendly (and cost-effective).
Other details which I aimed to keep: vapour-permeable membrane to contain insulation, the corner-buildup details, and horizontal strips to hold the siding.
Why Cellulose Insulation?
There are a number of reasons why cellulose is an ideal insulation:
- Renewable & environmentally-friendly compared to something like rigid foam
- Good insulation values
- Relatively cheap
- DIY-friendly (the store will give you the blower when purchasing minimum amounts)
- Matches ceiling insulation
With the Larsen truss outside the load-bearing wall and the air/vapour barrier, and a vented roof using cellulose insulation, you can get a continuous insulation layer around the whole building, looking like the gray sections in the figure below (the only difference being the insulated slab-on-grade instead of foundation like in this diagram):
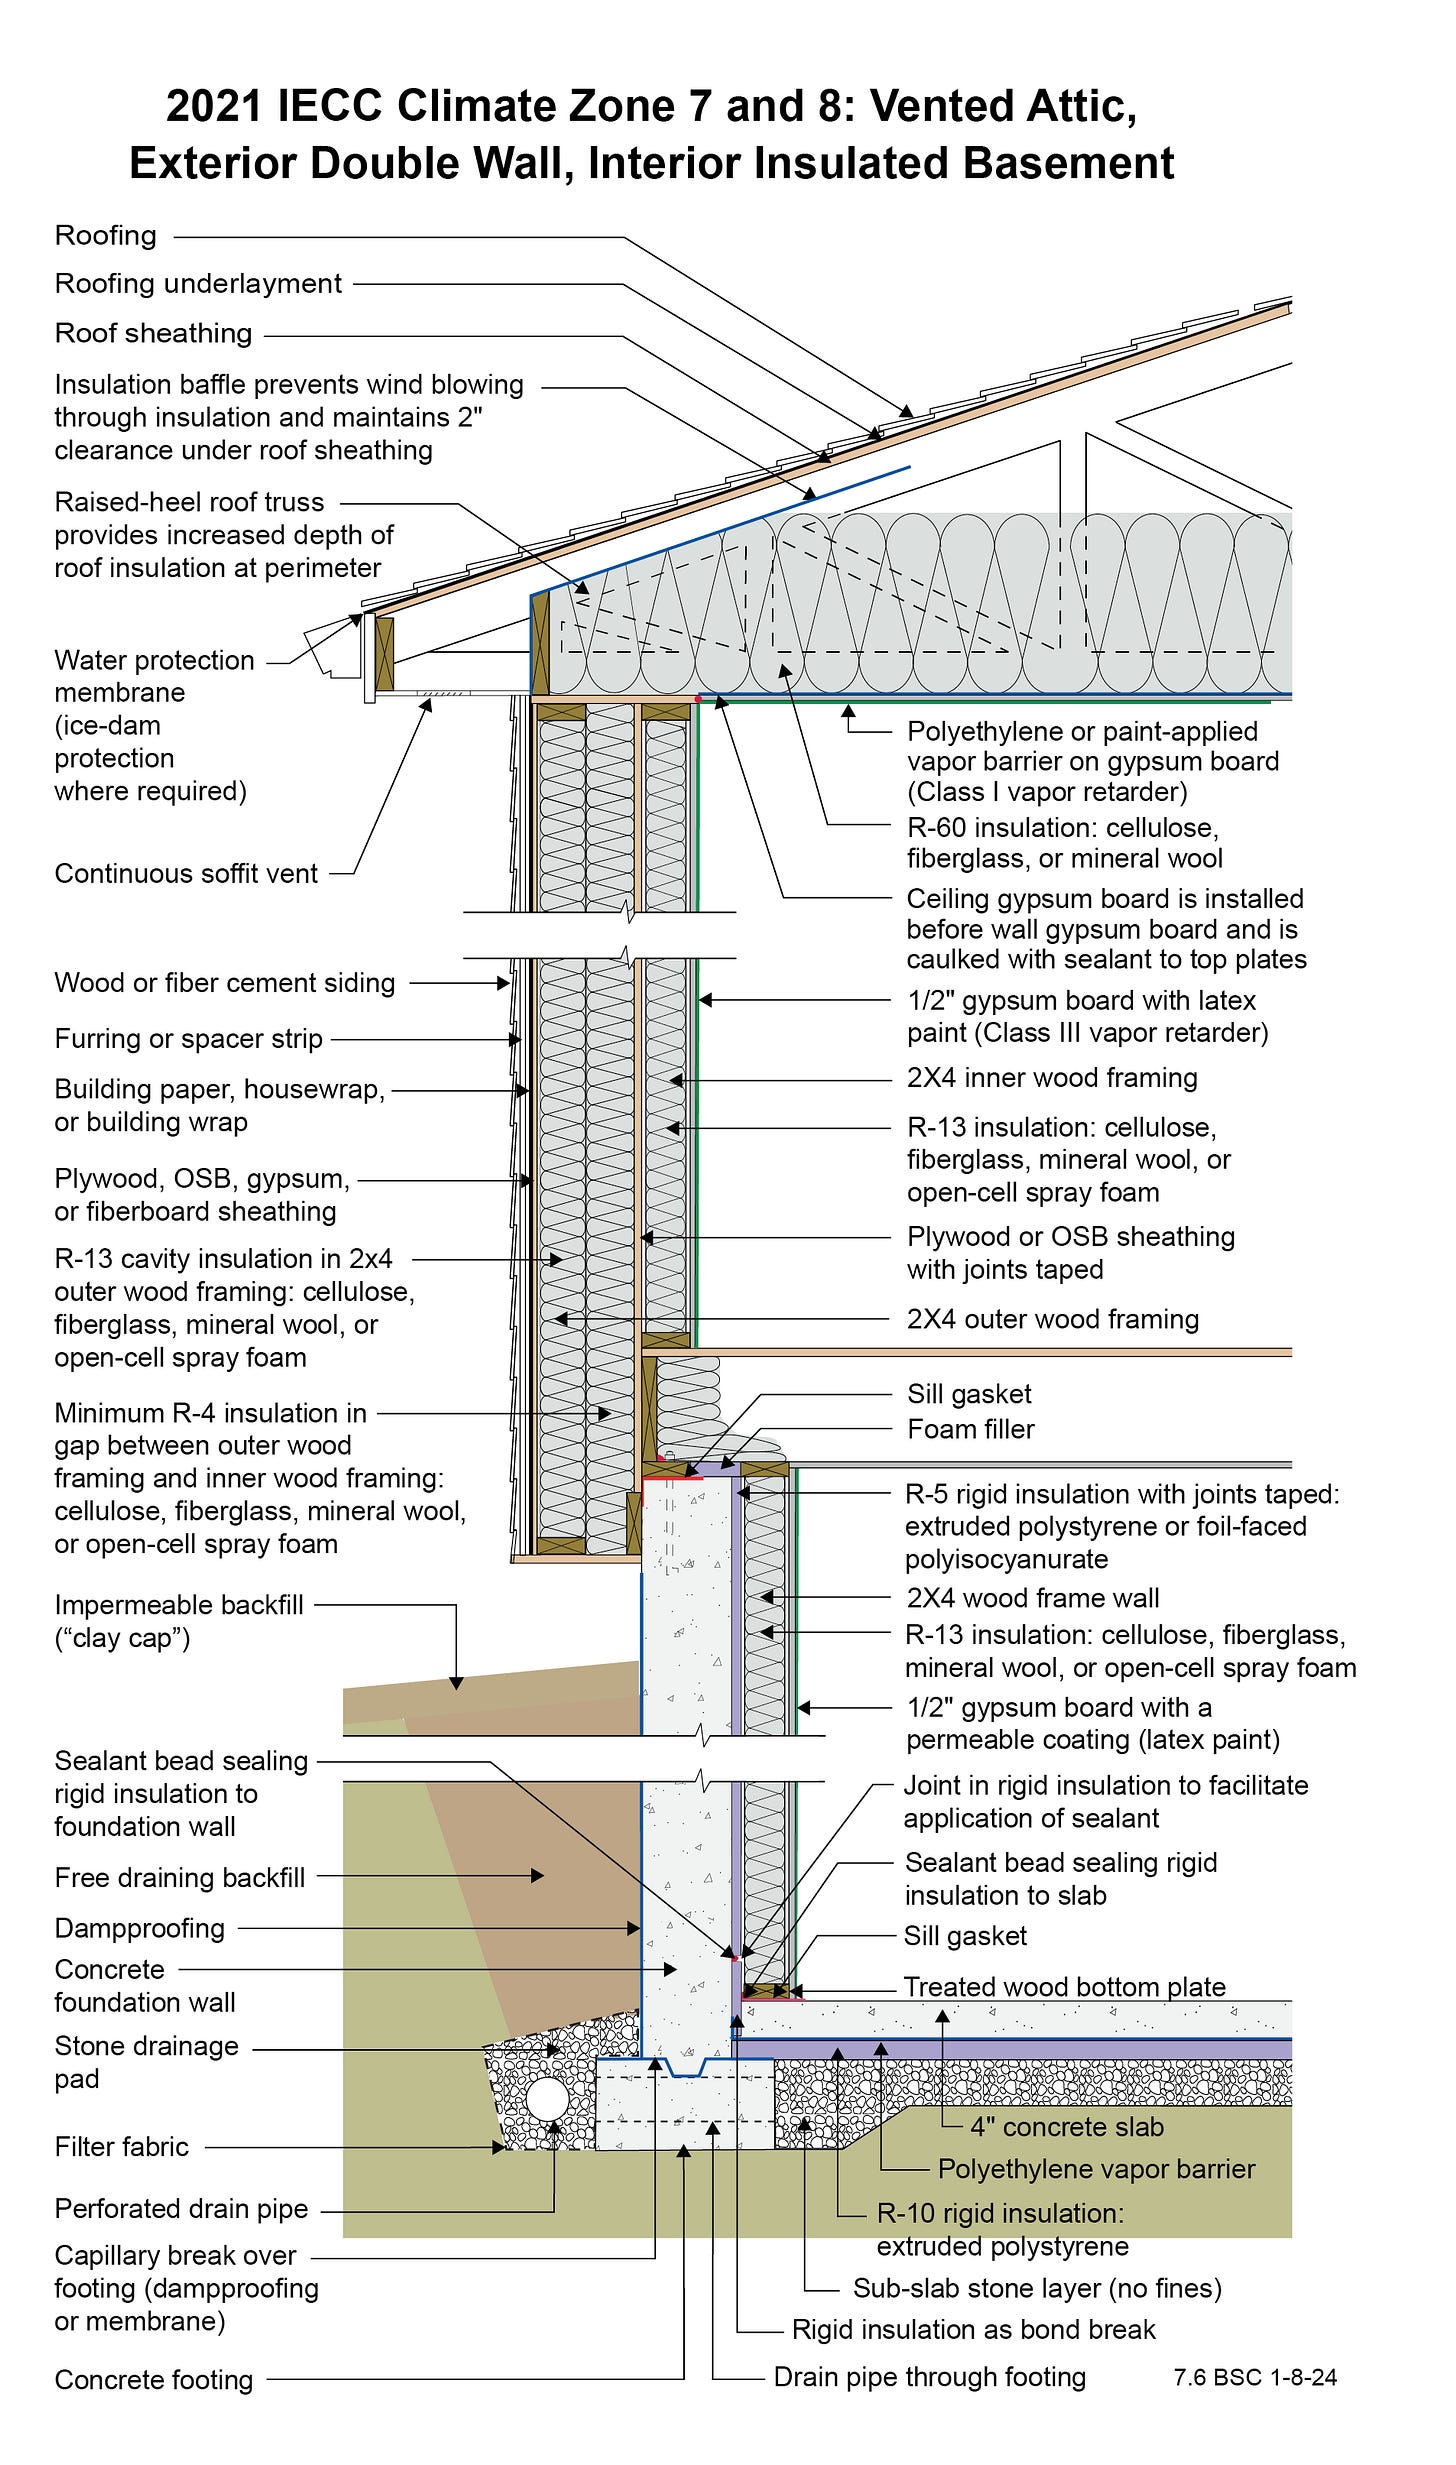
Visual of continuous insulation around the walls and into the ceiling (source)
Why Vapour-Permeable Materials & Design?
Materials like rigid foam and spray foam are highly performant in terms of insulating.
They can also be very useful, getting into spaces that aren’t otherwise accessible, and resisting rot or damage well.
However, they scare me.
All houses have vapour and air traveling through them, regardless of how airtight you make them.
Perfectly designed walls control this flow very well, and keep bulk moisture (rain, etc.) out, while still allowing humidity control via movement of moisture through the walls and ceiling.
However, if you don’t design your walls or roof/ceiling assembly perfectly, and you use some of these vapour-impermeable materials, moisture gets trapped.
Moisture getting trapped leads to rot, which is big trouble.
Cathedral ceilings are a good example: they are very nice when you’re inside the building, but you have to be very careful when building and designing them. Often rigid insulation or spray foam is used because there isn’t much space for extra insulation.
But if you get a roof leak, often the water has nowhere to go.
In a vented roof assembly, the moisture is free to get out, and would likely dry without any issues.
Here’s a quick visual (a cathedral ceiling in both cases):
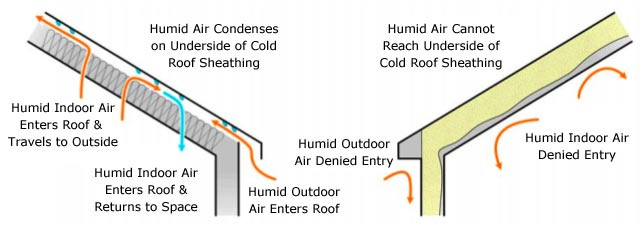
You can quickly see that in an unvented assembly, you must be very confident in your humidity and moisture control, while a vented assembly has some room for error.
This is a good visual of the type of vented scissor-truss assembly I’m aiming for (minus the rigid foam blocking):
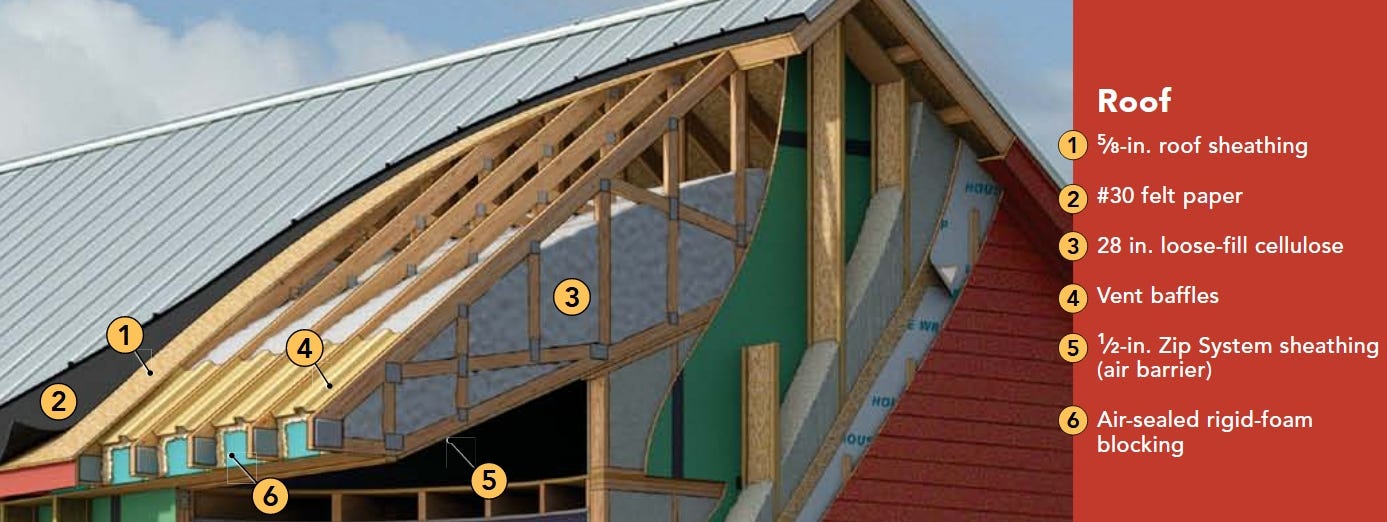
A vented, cellulose-filled scissor truss roof assembly (source)
It shows the Larsen trusses on the right side as well.
So in general, I want to use vapour-permeable designs (like vented roofs) and materials (like cellulose, mineral wool, etc.) to give a margin of error on moisture and air moving through the assembly.
I’m a lot less worried about things getting wet or damp if I know they can dry.
---
Continue to Build Update 7: Building the Larsen Trusses & Adding Siding →