Build update 5 covers roof truss installation, sheathing layout, ridge beam alignment, and tips for small-building roofing.
This is part 5 of my Nova Scotia build series. Catch up on Build Update 4: Framing the Small Shed if you missed it.
---
Prepping Before Roof Trusses
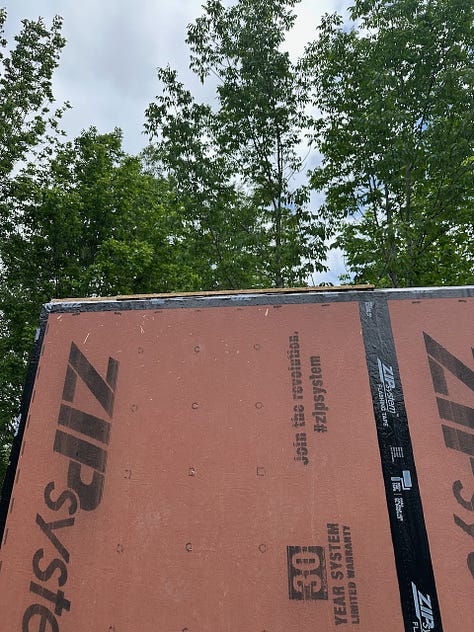
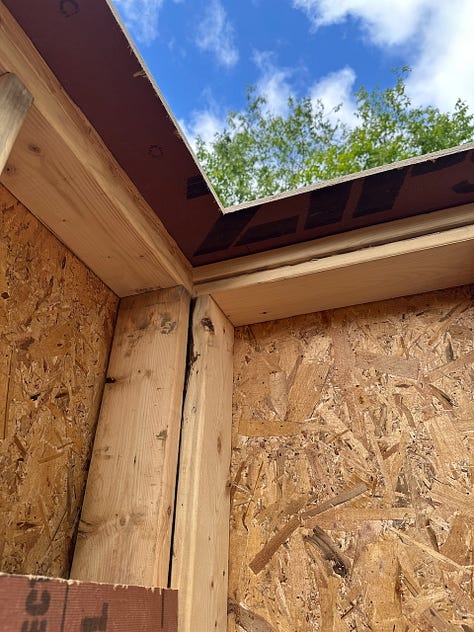
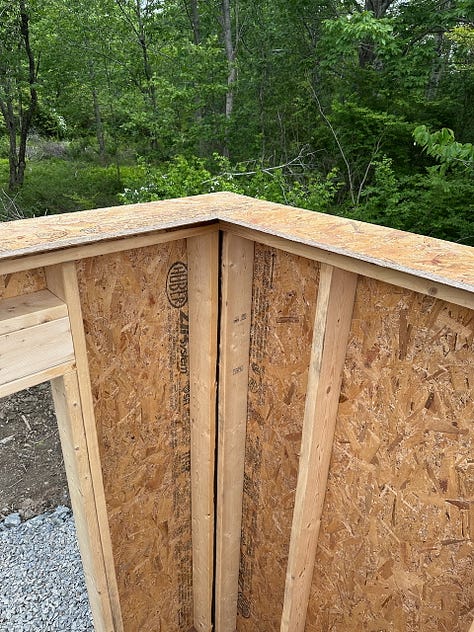
One air barrier detail that I learned from another passive house blog (I believe the excellent Kimchi and Kraut blog) was to flip a piece of Zip upside down on top of the top plate, to add space for Zip panels on the underside of the ceiling.
This keeps the air barrier going along the ceiling without much effort, and makes it easy to tape when you’re ready to close the ceiling.
---
Continue to Build Update 6: The Theory of Passive Houses & Larsen Trusses →
You can see the detail here:
<ImageGallery columns={3} caption="Upside-down Zip around the top plate">
</ImageGallery>
Since our small shed is 8x12, this was very easy, as I used 3 4’x8’ Zip sheets, cutting out the middles to install later.
I realized later on that this is only really helpful for flat ceilings, and you could also just put the Zip panels on the underside of the trusses and tape to the top plate. But that would also require cutting the panels down to size.
To maintain the airtightness, I added a bead of acoustic sealant before putting down the Zip upside-down.
Raising Trusses
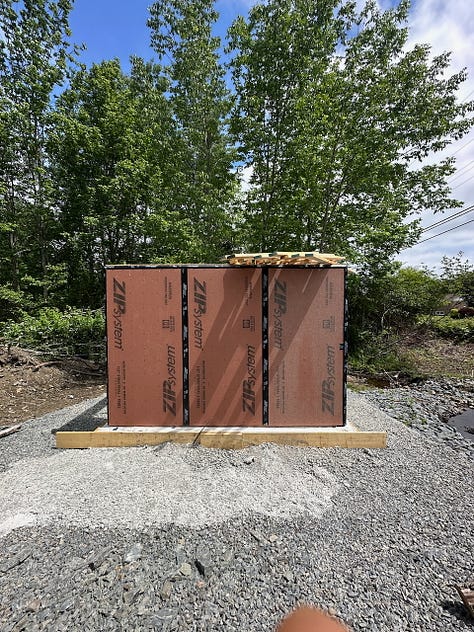
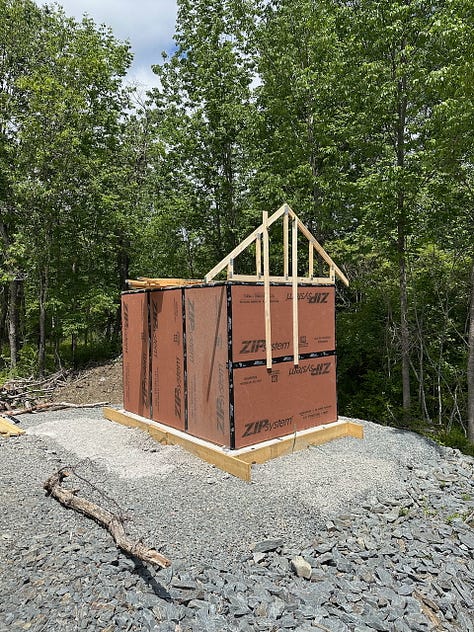
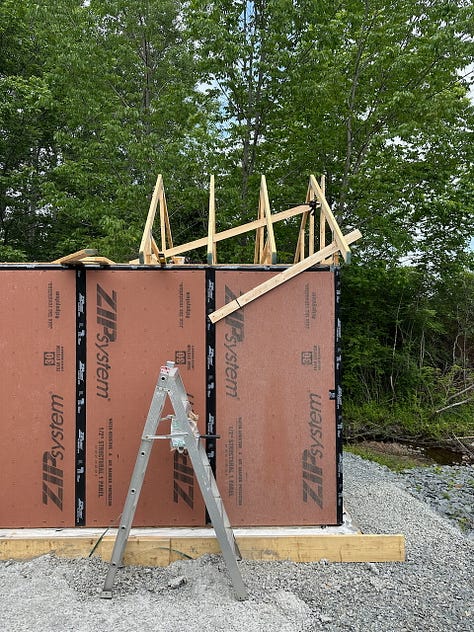
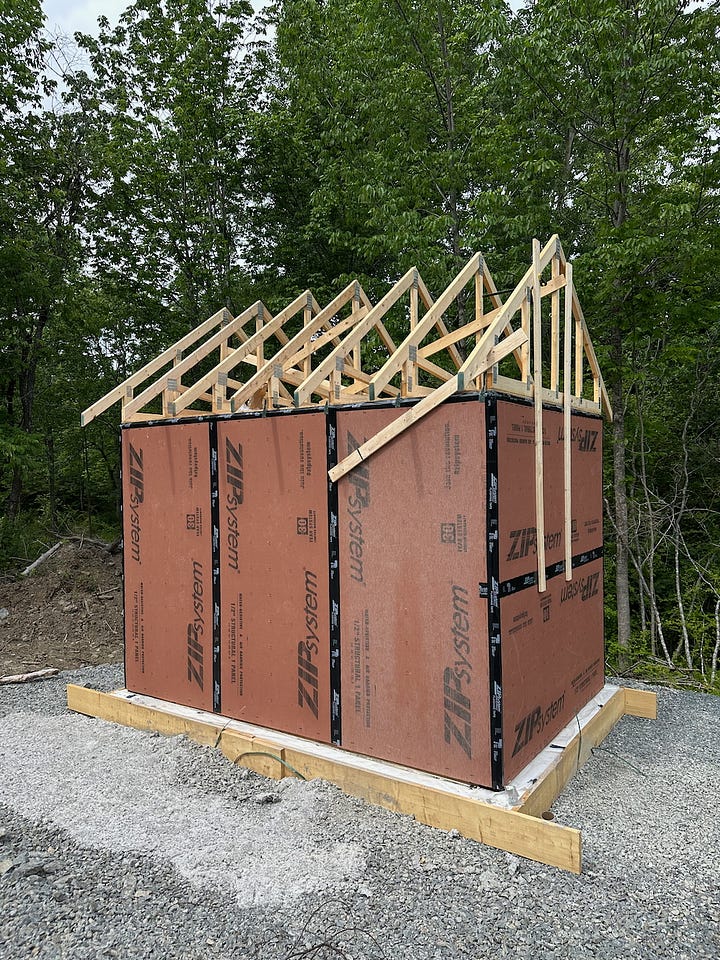
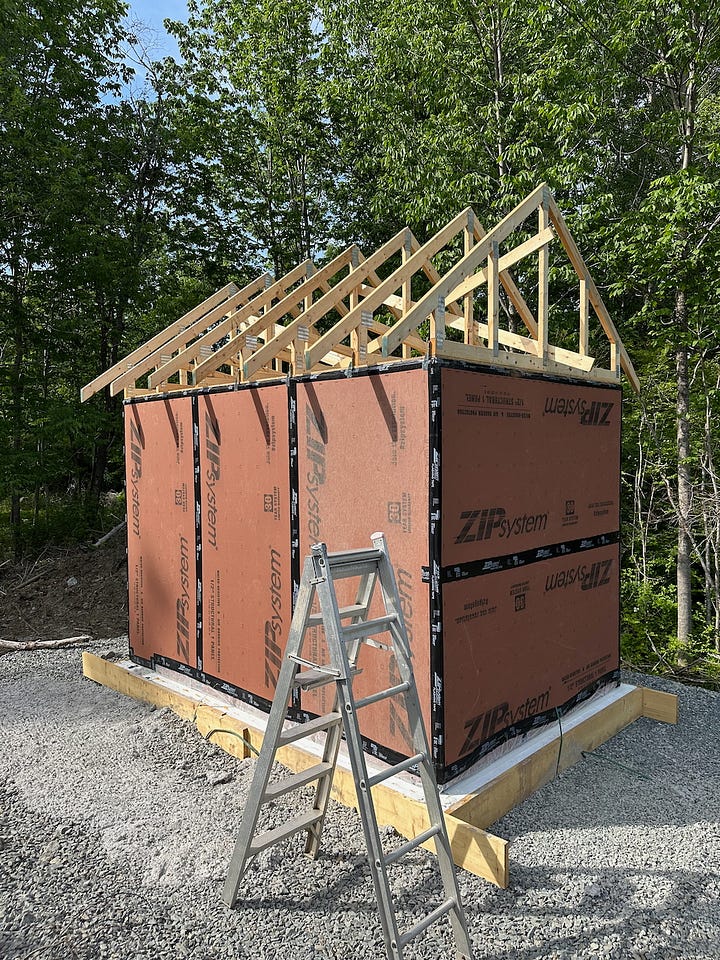
Given how small this shed is, putting up the trusses wasn’t that complicated.
The main steps are:
- Add bracing/backstop at the end(s)
- Add blocking 24” o.c. where the truss meets the top plate (I didn’t do this on this shed, I should have)
- Lift the trusses in place 1-by-1, and tilt up (you can use a 2x4 to push up the peak if you like, and you can even add 24” spacer blocking beforehand if you like); I lifted a bunch of them onto the top plates first on this one
- Add some diagonal bracing, checking for correct spacing and being directly upright/level before attaching to bracing
- Work your way from one end to the other until all trusses are up
Now, because the trusses were so small on this building, I grouped or skipped some of these steps. But as they get bigger, having a good process becomes much more important.
<ImageGallery columns={3} caption="Progression of adding trusses one by one">
</ImageGallery>
One of the biggest pains here was not having a good working platform inside the shed. I had to go up and down ladders constantly, moving them around.
The quick solution to this ended up being setting up a couple 2x10s stacked on each other between two ladders—makeshift scaffolding.
As the buildings get bigger, this also becomes more important, and I’ll continue to refine my system for this in future.
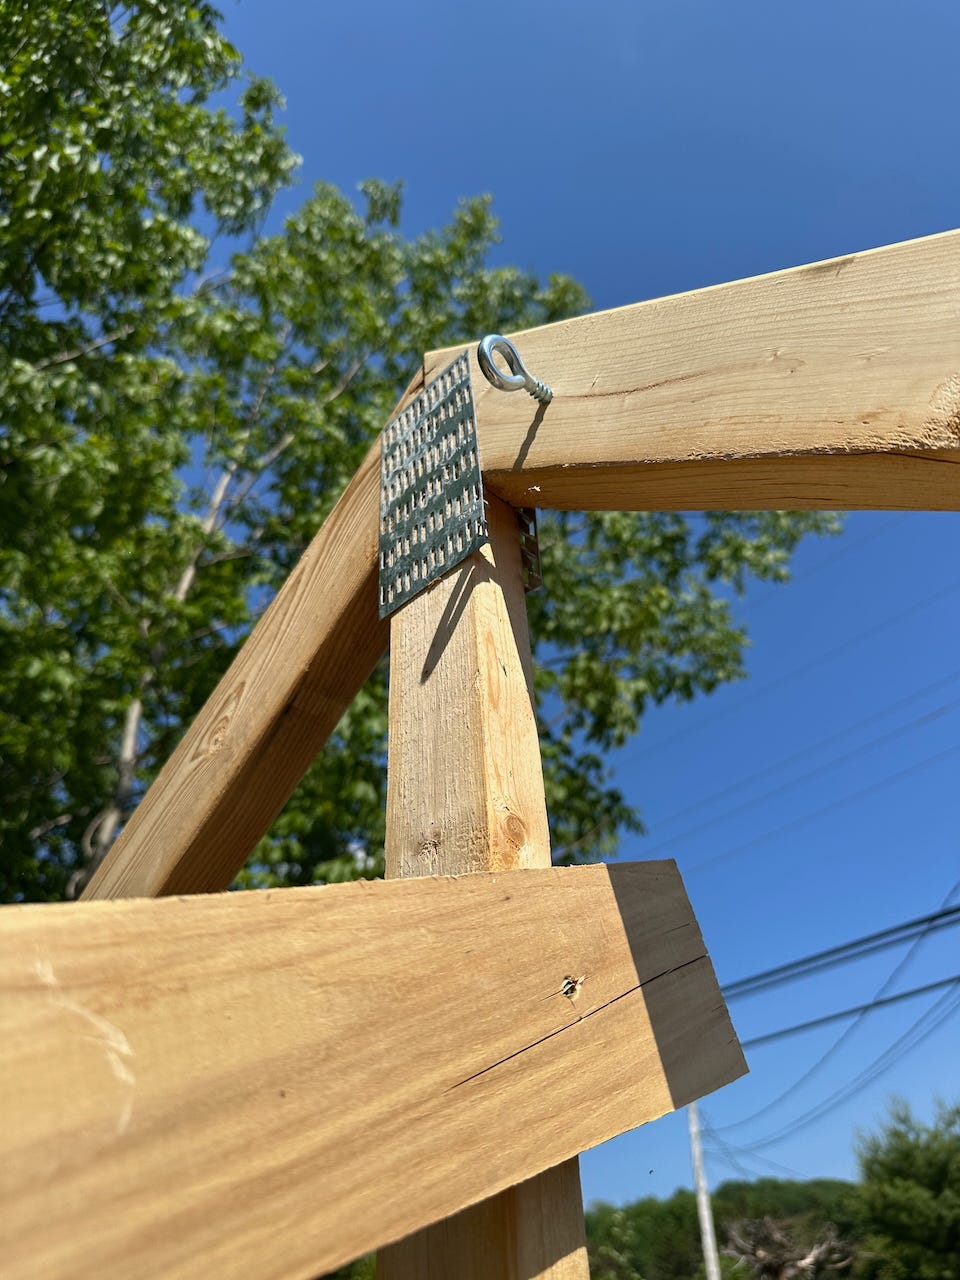
Another mistake I realized when securing the trusses to the top plates: I should have installed hurricane ties before the side sheathing.
Hurricane ties typically secure trusses to the top plates like this:
Hurricane ties securing roof trusses to top plate (Source)
However, since I added the wall sheathing first, there was the extra 1/2” of space between the edge of the truss and the outside of the sheathing. This offsets the hurricane ties enough to make them much weaker.
Getting Around the Roof
I mention this as a separate section because it will be a recurring theme: moving around the roof is difficult.
When the trusses are up, one of the most useful things was adding 2x10 boards along the bottom of the trusses as a walkway.
This way, I could move along amongst the trusses and feel secure lifting sheathing up, balancing to screw/nail it in, etc.
Long 2x10s along the trusses will be something I continue doing for all future builds: it makes things much safer and easier.
Adding Roof Sheathing
At first, I wasn’t going to bother adding roof sheathing, since this was a shed, and not being inspected.
However, I reversed course, knowing this is supposed to be a test build. However, I did substitute in normal OSB instead of Zip (about 1/4 the cost) + used the remaining two sheets of Zip I had.
It turned out to be a good decision, because there were A LOT of learnings when it came to sheathing the roof. It was also the beginning of what would be (and remains) one of the biggest pain points of building, made worse by doing it solo: doing roof work.
Getting things on the roof is hard, getting around the roof safely is hard, and it is almost always slow.
My first mistake building the gable end overhangs on the sheathing:
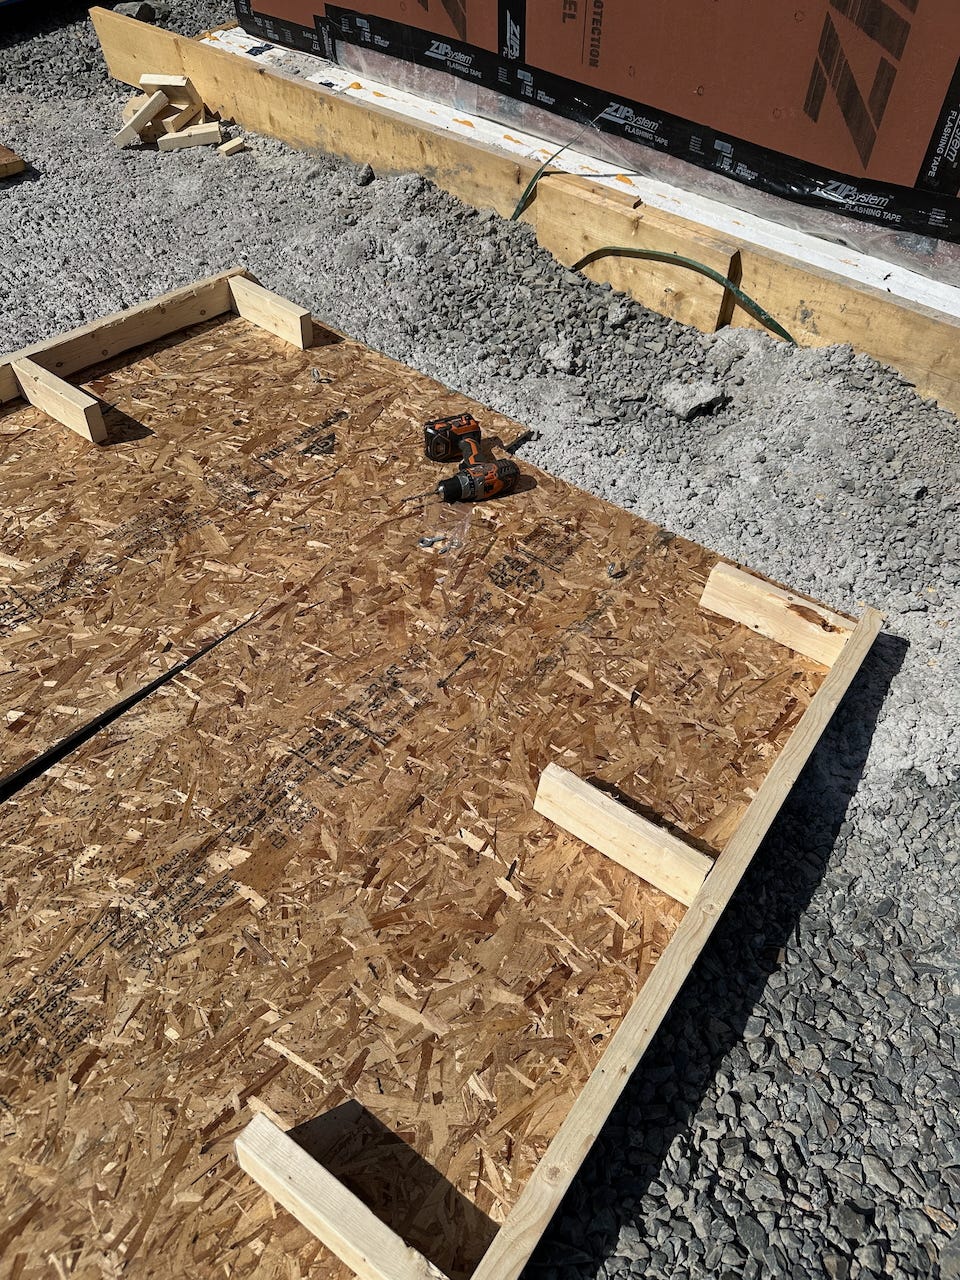
This seemed like a good idea at the time: building things on the ground tends to be easier, and a good idea.
However, I should have simply built the gable end overhang—known as “ladder framing”—as one piece, and then put it up, before doing any of the sheathing.
Doing it on the sheathing itself created a very unstable piece of sheathing, even heavier than normal, which I’d struggle to get in place and secure.
Getting the panels up was difficult, even on this relatively small roof.
First I tried some kind of pulley system. That didn’t work well and was labor intensive and slow.
Next, I tried resting sheathing on a step ladder before going inside to pull it up; also not a good idea:
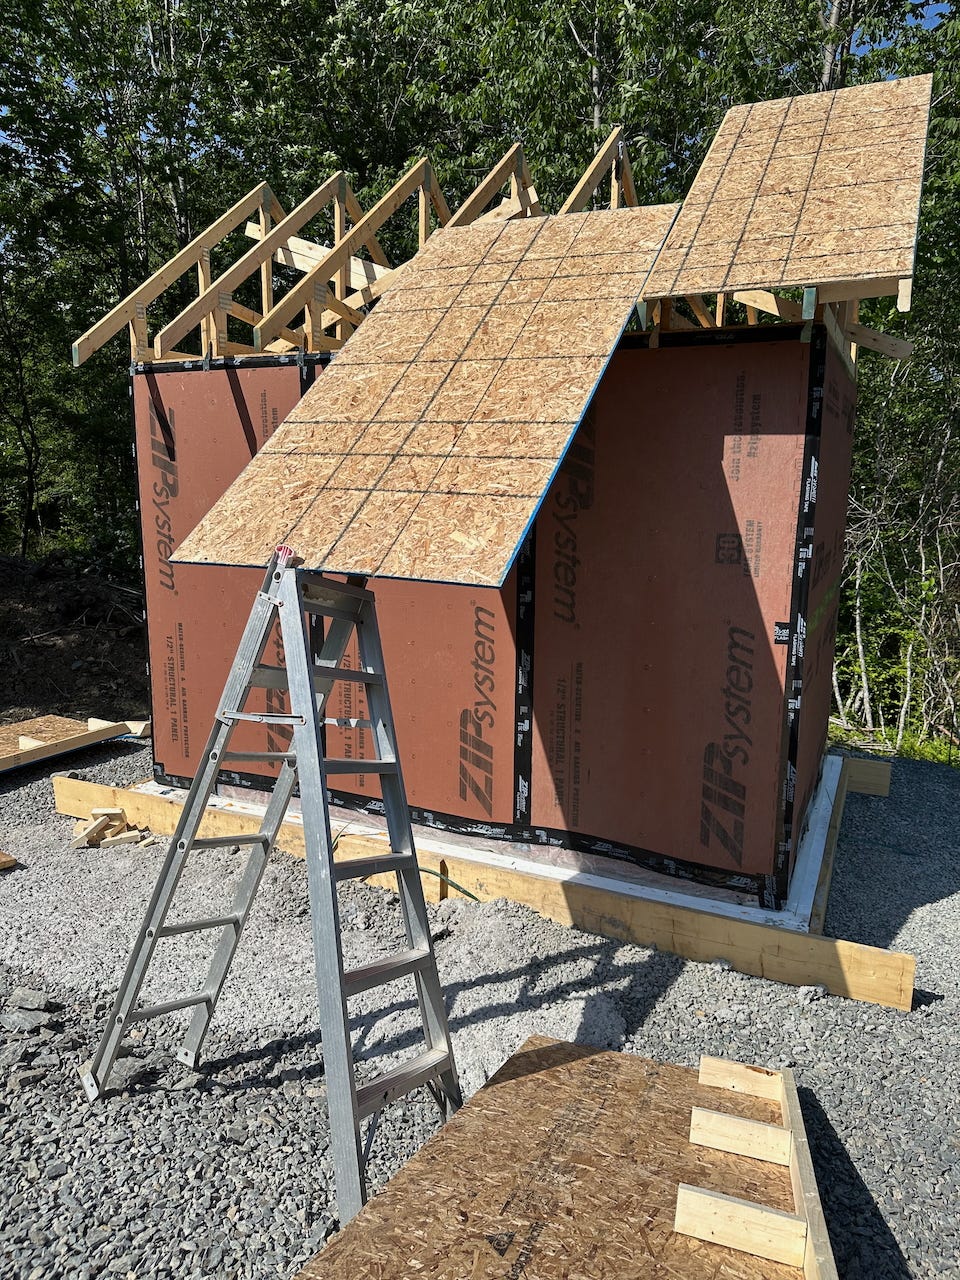
Finally, I got closer to the real solution, building myself a little ramp to slide panels up on:
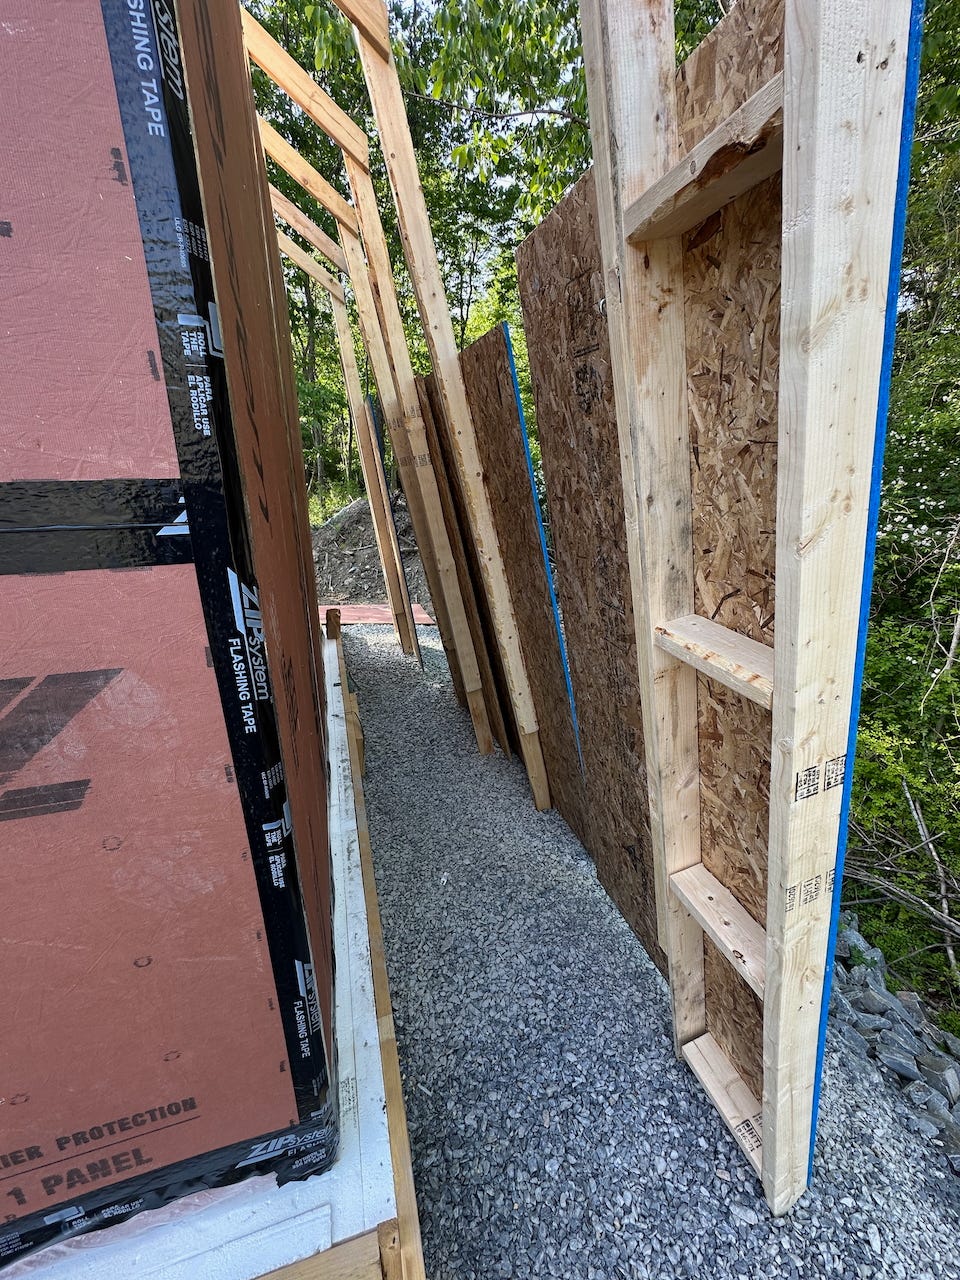
I recruited my dad to help me, and between the two of us, this slide system made things much easier.
I was missing one thing to make it solo builder-friendly: stops. Adding stops on the slide lets me push it partway up, rest it there, then go inside and pull it up the rest of the way.
This YouTube video demonstrates an example:
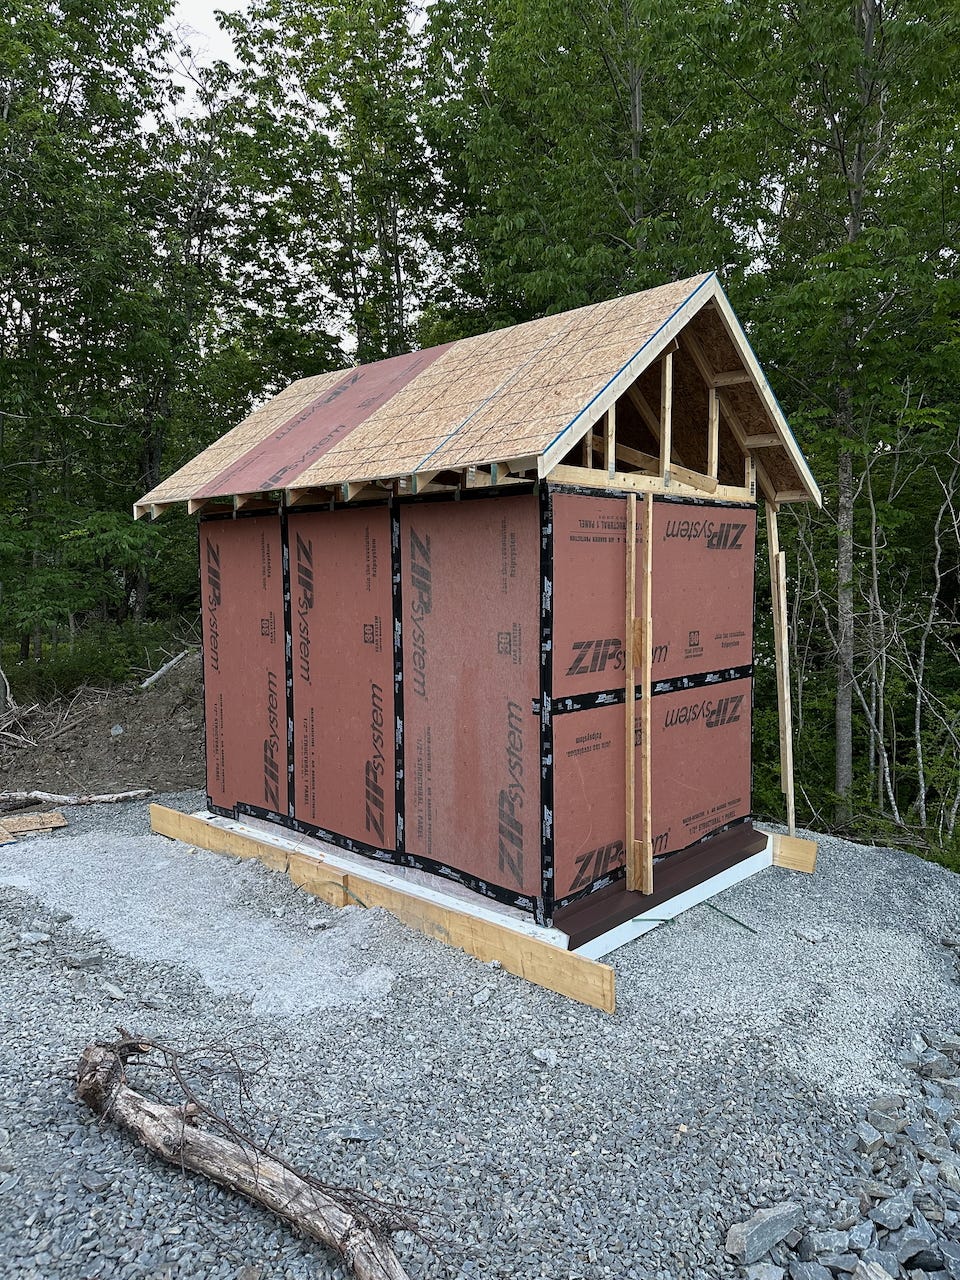
Eventually, we got all the sheathing up and secured:
Mistakes/Improvements for Next Time
I’ve mentioned a couple already, which I’ll include in this list, but here are some of the other things I’ve learned/plan to improve in future:
- Putting wall sheathing on before hurricane ties: as mentioned above, I should have put the trusses up before the wall sheathing so that the hurricane ties are flush with the top plate. This makes air sealing a little harder, but adds much more strength.
- Not adding blocking for truss locations: these trusses were small enough that it didn’t matter, but with bigger trusses it gets more important. I should be screwing in a small block of wood that the bottom of the trusses can rest against ever 24” to make tilting them upright easier solo.
- Not having a working platform inside the building: going up and down ladders is a big pain, and time consuming. Improving this would make life much easier when tilting up and securing trusses.
- Not doing gable end ladder framing before adding sheathing: adding this to a piece of sheathing made it even harder to get on the roof, and led to some inconsistencies in size/securing that weren’t great. I should be putting these up before doing the sheathing at all.
- Not ordering trusses designed for outlookers at gable ends: speaking of, at the gable ends, ideally I’d use outlookers rather than ladder framing. Outlookers require a slightly smaller end truss, so it’s something that has to be planned in advance. It produces a stronger, more secure gable overhang. This is what it looks like (source):
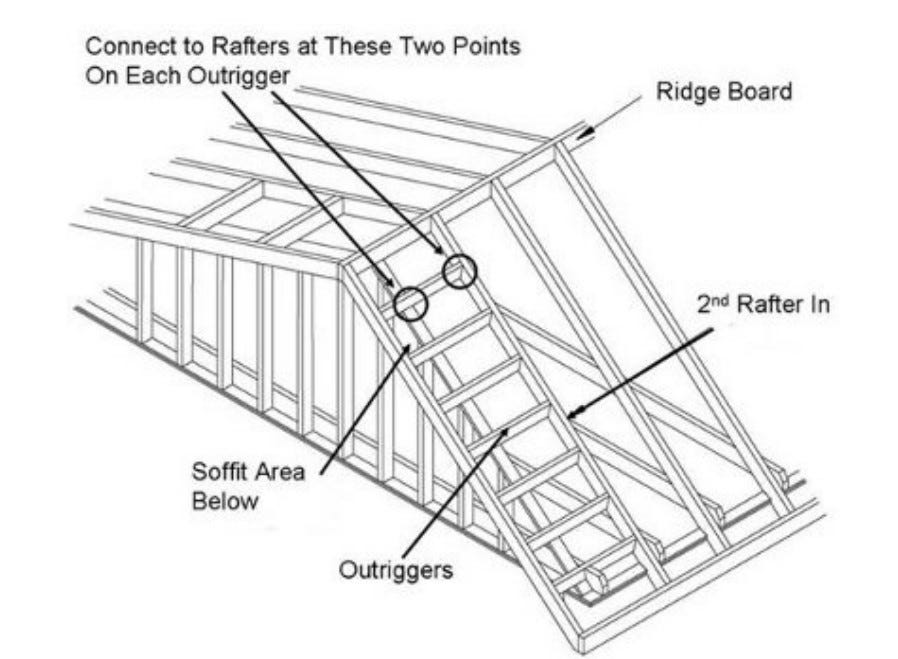
Outriggers are much stronger than ladder framing at the gable end overhangs
- Not using a sheathing slide with stops: this made getting sheathing up much more difficult than it needed to be. I’ll be doing this for all future builds.
- Putting the roof sheathing on vertically: turns out, you’re not supposed to do this! Staggering the sheathing horizontally is stronger. It should look like this (source):
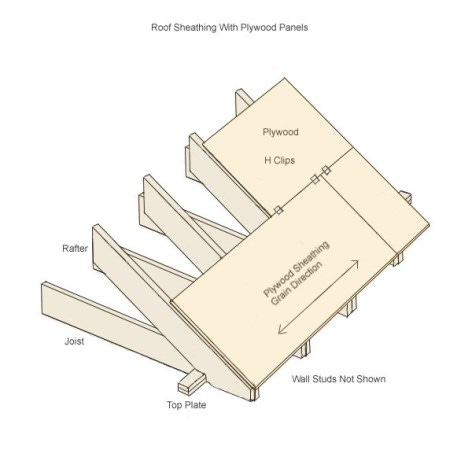
How you’re supposed to put roof sheathing on
- Not using spacer H-clips for the roof sheathing: as you can also see in the diagram above, you’re supposed to put h-clips like these ones along the roof sheathing, to help prevent bowing at the edges and add strength to the roof.
- Not leaving a space at the ridge: partly because the panels fit perfectly, I didn’t leave a space at the ridge, which for a vented roof is a no-no. It meant I had to cut a hacky space later.
Tools/Things I Found Helpful
- Magnetic wristband: I kept dropping screws, which is particularly annoying when standing on a ladder. This allows me to have a bunch within easy reach, without having to reach back into my tool belt.
- Auto-retracting bit holder: when trying to secure panels, I was balancing screws against the drill, inevitably leading to frustration and lots of screws getting dropped. This retracting bit holder provides support for the screw, meaning far less get unbalanced when trying to drill them in.
- Aluminum 2-in-1 ladders (2x) + 12’ 2x10s: two of the same ladder, plus two 2x10 boards, means I can put the boards between the two ladders, giving me a long, elevated work platform. I also chose these ladders in particular because they can extend to be longer, but don’t involve all the extension mechanisms that a lot of them do, meaning they’re much lighter and easier to move around.
- Nail gun: when I was using it for framing, I was using 3 1/4” nails. Thankfully, it will take down to 2” nails, so I used 2 3/8” nails for the sheathing into the trusses.
---
Continue to Build Update 6: The Theory of Passive Houses & Larsen Trusses →