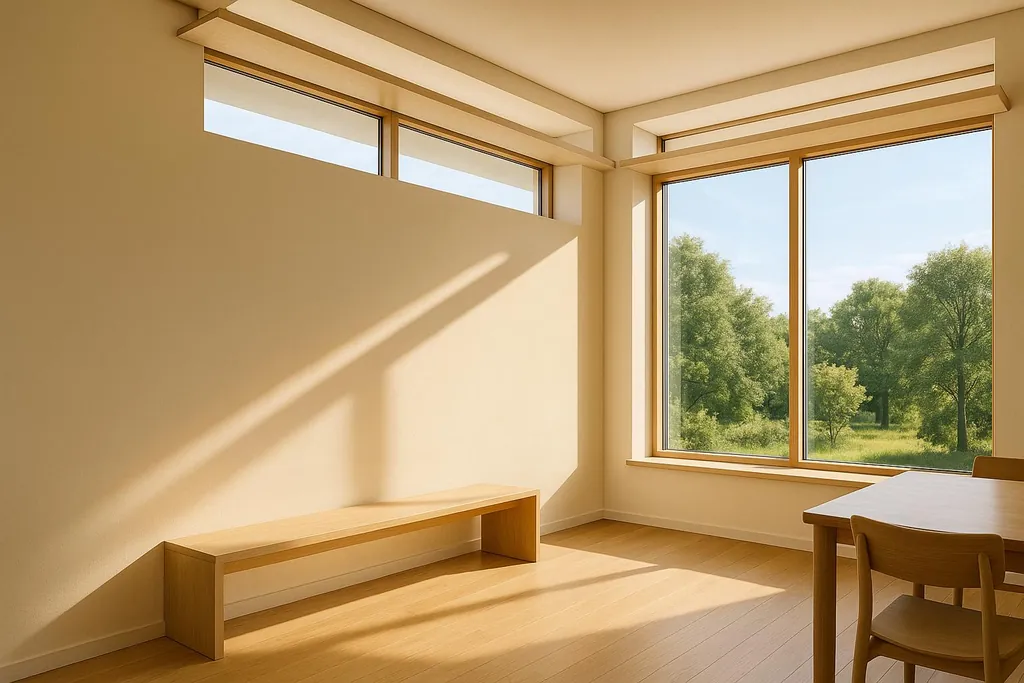
Explore how light shelves enhance natural lighting and energy efficiency in passive homes, providing practical installation tips and design insights.
Ultimate Guide to Light Shelves for Passive Homes
Light shelves are a smart way to bring more natural light into your home, lower energy costs, and improve comfort. These horizontal structures, placed above windows, reflect sunlight deeper into indoor spaces, reducing the need for artificial lighting. They’re especially effective for passive homes, designed to maximize energy efficiency.
Key Points:
- Purpose: Reflect sunlight indoors to brighten spaces and reduce glare.
- Types: Fixed, adjustable (manual), and automatic (sensor-controlled).
- Placement: Best on south-facing windows in the U.S. for year-round efficiency.
- Materials: Aluminum, powder-coated steel, or reflective laminates for durability.
- DIY-Friendly: Requires basic tools like a level, drill, and brackets for installation.
Light shelves are low-maintenance, with occasional cleaning and seasonal adjustments ensuring optimal performance. Whether you’re building a passive home or upgrading an existing space, they’re a practical solution to improve lighting and energy use.
How Do Light Shelves Improve Daylighting? - Civil Engineering Explained
How Light Shelves Work
Light shelves function by capturing sunlight and reflecting it deeper into indoor spaces. They bounce light upward, using the ceiling as a secondary reflector to evenly spread daylight throughout a room. This approach not only brightens interiors but also reduces reliance on artificial lighting.
How Daylight Redirection Works
When sunlight hits the light shelf, it reflects upward toward the ceiling. The ceiling then acts like a diffuser, scattering the light to reduce glare and soften harsh shadows. For the best results, the placement and reflective quality of the shelf need to be carefully planned.
Types of Light Shelves
Light shelves come in three main varieties, each catering to different needs and preferences:
- Passive light shelves: These are fixed in place and don’t require adjustments, providing consistent performance throughout the day.
- Dynamic light shelves: These can be manually adjusted to change their angle, allowing for better control over sunlight capture as the day progresses.
- Automatic light shelves: Equipped with sensors and motors, these shelves adjust themselves automatically to maximize efficiency. While they offer top-tier performance, they come with more complex installation requirements.
Adapting to Climate and Sun Patterns
The effectiveness of a light shelf depends heavily on the local climate and the sun’s path. In the U.S., sun angles and intensity vary by region. For example:
- Areas with low winter sun benefit from shelves designed to capture light closer to the horizon.
- Regions with high summer sun may require steeper shelf designs to manage the light effectively.
- Coastal areas often need shelves that focus on capturing softer, indirect light.
Additionally, selecting materials that can withstand the local weather is crucial for long-term durability and performance.
Designing Light Shelves for U.S. Passive Homes
When designing light shelves for passive homes, careful planning is crucial to align with your location, home orientation, and local building codes. These considerations ensure your light shelves not only perform well but also comply with U.S. construction standards. The goal is to strike a balance between functionality and practicality while meeting regional requirements.
Site Orientation and Placement
South-facing windows are often the prime candidates for light shelves in the U.S., as they receive consistent sunlight throughout the day. Positioning the shelf higher allows sunlight to penetrate deeper into the interior spaces, enhancing natural light distribution.
The ideal placement for a light shelf depends on factors like room dimensions, window size, and the angle of the sun in your area. For east- or west-facing windows, angled shelves can be more effective at capturing the lower-angle light during sunrise or sunset. Additionally, adjusting the depth or extension of the shelf based on your geographic location can optimize daylight capture across different seasons. Don’t forget to select materials that are both durable and reflective to ensure long-term performance.
Choosing Materials for Durability
Durable and reflective materials are essential for light shelves that last. Aluminum is a widely used option in the U.S., known for its corrosion resistance and low maintenance needs. Powder-coated steel offers a budget-friendly alternative but may require periodic checks to maintain its protective coating, particularly in humid or coastal environments.
For those pursuing sustainable options, engineered lumber with reflective laminate surfaces can be a great choice. Another robust option is fiberglass-reinforced plastics, which perform well in challenging climates.
The finish on the reflective surface is just as important as the material itself. A specular finish provides high reflectance, while a diffuse finish ensures more even light distribution and minimizes glare. Once the materials are selected, it’s vital to integrate the light shelf with the appropriate window systems to maximize efficiency.
Pairing with Window Systems
Light shelves are often easiest to pair with common window styles like double-hung or casement windows. Double-hung windows frequently feature horizontal mullions that can serve as natural mounting points for the shelves. For casement windows, it’s essential to ensure the light shelf doesn’t obstruct window operation.
Low-emissivity (Low-E) coatings on windows can enhance energy efficiency by reducing heat gain while still allowing visible light to pass through. However, some configurations may slightly limit the ability to redirect light. Similarly, passive house designs that incorporate triple-pane windows may require sturdier mounting systems to accommodate the added weight and thickness of the glass.
Finally, coordinate the light shelf installation with other window treatments - like window films, automated blinds, or shades - to ensure all elements work harmoniously without affecting overall performance or compliance with local codes.
DIY Installation of Light Shelves
Installing light shelves yourself can be a rewarding project that gives you control over the design while saving money. With the right tools and a bit of patience, many DIY enthusiasts with basic construction skills can tackle this task successfully.
Tools and Materials
To get started, you'll need the following tools: a level, drill with the proper bits, stud finder, measuring tape, pencil, and safety gear like gloves and safety glasses. Depending on your setup, a saw for cutting and a ladder for reaching higher spots might also come in handy.
When choosing materials, focus on sturdy mounting hardware that can hold the shelf securely over time. Ideally, you'll want to attach the shelf to a wall stud for maximum stability. If no stud is located in your desired spot, consider using heavy-duty alternatives like self-tapping or molly bolts that can handle the weight.
Step-by-Step Installation Process
Once you’ve gathered everything you need, follow these steps to install your light shelf:
- Locate and Mark Studs:
Use a stud finder to identify the position of wall studs and mark them with a pencil. Attaching the shelf to a stud ensures long-term durability.
- Draw a Level Guideline:
Use a level to draw a straight line on the wall where the shelf will go. This guideline ensures the shelf is perfectly horizontal - don’t rely on your eyes for this step.
- Attach the Brackets:
If you’re working with exposed framing in new construction, secure your brackets directly to the studs. For existing walls, use appropriate fasteners if studs aren’t accessible.
- Install the Shelf:
Once the brackets are in place, position the shelf on them, check that it’s level, and tighten everything securely.
A properly installed light shelf not only enhances your home’s natural lighting but also aligns with passive design principles, making your space more energy-efficient.
Avoiding Mistakes and Staying Safe
To ensure a smooth installation, avoid common pitfalls like failing to secure the shelf to a structurally sound surface, using weak hardware, or improvising with the wrong tools. These mistakes can lead to instability or even failure of the installation. Always double-check the mounting surface's integrity by confirming the location of studs or using appropriate anchors.
Safety is key throughout the process. Wear protective gear, take your time, and don’t hesitate to consult a professional if you encounter structural challenges. Cutting corners may save time in the short term but could compromise the durability and safety of your project.
Maintaining and Adjusting Light Shelves
Once your light shelves are installed, regular upkeep is essential to keep them performing as intended. Like any feature exposed to the elements, they need periodic care to maintain their reflective surfaces and structural stability.
Cleaning and Inspection
Dust, dirt, and debris can reduce the effectiveness of your light shelves, so keeping them clean is a must. Use a soft cloth and a mild soap solution to wipe the surface, avoiding harsh cleaners that could damage the finish. While cleaning, inspect the mounting hardware for signs of wear or looseness to ensure the brackets and supports are secure. Also, check for weather-related damage, such as fading or cracking, especially on surfaces exposed to the sun and rain.
For indoor light shelves, regular dusting with a microfiber cloth can prevent buildup. Take a moment to confirm that the shelves haven’t shifted out of position, which could indicate settling or loose hardware.
Seasonal Adjustments for Optimal Performance
The sun’s angle changes throughout the year, so adjustable light shelves can be repositioned to make the most of these variations. During the summer, you may need to tilt the shelves to limit heat gain while still guiding natural light into the room. In winter, adjusting them to capture more of the low-angle sunlight can improve daylight penetration. To simplify adjustments, some homeowners mark the optimal positions on the hardware for each season.
Troubleshooting Common Issues
If glare becomes a problem, try tweaking the angle of the shelf to redirect light away from direct sightlines. On the other hand, if the shelves aren’t spreading enough light into the room, it might be time for a good cleaning or even re-coating the reflective surface.
Heat buildup near windows can sometimes occur if the shelf blocks proper airflow. Ensure there’s enough clearance around the shelf and window frame to allow air to circulate. Structural problems like sagging or vibrations often stem from inadequate support. If you notice any instability, consider reinforcing the mounting system with sturdier brackets or fasteners.
Condensation on or near the shelves could point to thermal bridging or poor insulation. Addressing this early - either by improving insulation or adding thermal breaks - can prevent bigger issues like mold or structural damage.
Key Takeaways for Light Shelves for Passive Homes
Light shelves are a smart, budget-friendly way to improve your home's energy efficiency while enhancing indoor comfort. When thoughtfully designed and installed, these features can create a brighter, more pleasant living space by harnessing natural light.
Why Light Shelves Work
Light shelves bring sunlight deeper into your home, helping to regulate indoor temperatures. During summer, they provide shade and reduce heat, while in winter, they allow sunlight to warm your space. Plus, they’re built to last - with no moving parts, they require minimal upkeep. A quick cleaning every now and then is usually all it takes to keep them functioning well.
With these perks in mind, you’re ready to explore how to incorporate light shelves into your home.
Starting Your DIY Light Shelf Project
If you're ready to roll up your sleeves, a DIY light shelf project is a great way to get started. These projects are straightforward for many homeowners, needing only basic carpentry skills and tools. It’s a hands-on way to harness the benefits of light shelves while gaining valuable experience.
A good starting point? Look for a south-facing window in a space like your living room, kitchen, or home office. These areas often get plenty of sunlight, making them ideal for your first installation. Starting small lets you test the waters and refine your approach before tackling larger projects.
For a detailed guide, check out [DIY Eco Homes](/). They offer step-by-step instructions, cost breakdowns, and troubleshooting tips to help you plan your project with confidence. Whether it's measuring your window or fine-tuning your installation, these resources will guide you through the process, ensuring better light distribution and a more comfortable home as you hone your skills.
FAQs
How can I figure out the best size and angle for light shelves based on my home's location and sunlight exposure?
To figure out the best size and angle for light shelves, you’ll need to consider a few key factors: where your home is located, which direction your windows face, and how the sun moves across the sky in different seasons. By understanding how sunlight enters your home throughout the year, you can determine the right angle to reflect light further into your rooms while keeping glare to a minimum.
In most parts of the United States, light shelves are typically installed at the top of windows. They’re angled to catch higher sun rays during the summer and lower winter sunlight. The height of your windows and the depth of your rooms also play a role in deciding the size and angle of the shelves. For a more accurate setup, you can use tools like solar path charts or sun simulation software to customize the design for your location.
What are the pros and cons of using automatic light shelves compared to manual or fixed ones?
Automatic light shelves offer some clear perks, like making the most of natural daylight without constant manual tweaking. They can help cut down on energy use and make indoor spaces more comfortable - especially in homes designed with passive energy principles. Their ability to adjust automatically to shifting sunlight throughout the day is a big plus.
That said, there are a few downsides to consider. These systems often come with higher initial costs and can be trickier to install and maintain. On the flip side, manual or fixed light shelves are easier on the wallet and simpler to set up, but they can’t adapt to changing sunlight angles, which might make them less effective in the long run.
Can light shelves work with existing window treatments, and will it impact their effectiveness?
Yes, light shelves can work seamlessly with existing window treatments without losing effectiveness. When thoughtfully designed and installed, they enhance natural light distribution, cut down on glare, and contribute to energy savings - especially in passive homes.
For the best results, it's crucial to align the placement and design of both systems. This way, light shelves can direct sunlight further into the room, while window treatments handle privacy and provide extra light control when needed.