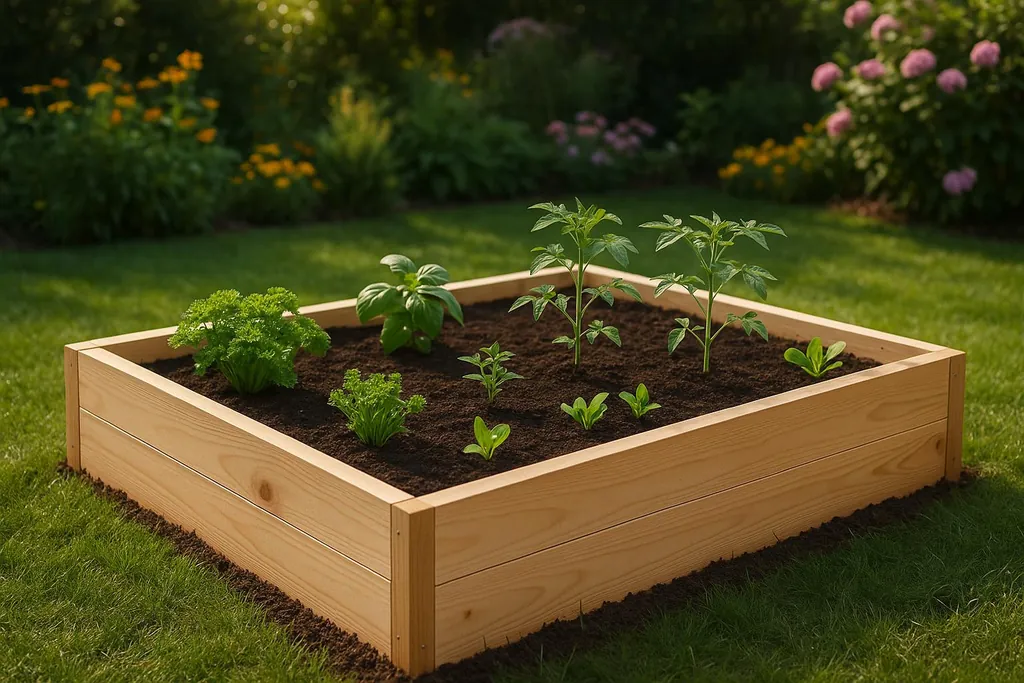
Learn how to build a durable, eco-friendly raised garden bed with the right materials, tools, and techniques for a thriving garden.
How to Build a Raised Garden Bed
Building a raised garden bed is a straightforward way to improve your gardening experience. It offers better drainage, easier maintenance, and control over soil quality. Here’s what you need to know:
- Materials: Use untreated cedar, redwood, or recycled composite boards for durability and to avoid chemicals in your soil. Avoid treated lumber due to potential chemical leaching.
- Tools: A circular saw, cordless drill, and basic hand tools are essential. Use galvanized screws and metal corner brackets for a sturdy structure.
- Site Prep: Choose a sunny spot with good drainage. Clear the area of weeds and debris, and consider adding hardware cloth to prevent pests.
- Assembly: Cut and assemble the frame using pre-drilled holes and secure with screws. Add a bottom barrier like hardware cloth or cardboard.
- Soil Mix: Combine compost, topsoil, and sand or perlite for a nutrient-rich, well-draining mix. Adjust pH for specific crops.
- Maintenance: Water regularly, use mulch to retain moisture, and refresh soil nutrients annually. Protect the wood with food-safe preservatives.
How To Build Durable Raised Garden Beds | Step-by-Step DIY Tutorial
Choosing Eco-Friendly Materials
The materials you choose for your garden bed play a big role in its durability, the health of your plants, and, of course, environmental impact. Let’s explore some of the most eco-conscious options and important factors to keep in mind when building your garden bed.
Best Material Options for Your Garden Bed
Untreated cedar is a favorite for raised garden beds, and it’s easy to see why. Naturally resistant to decay, it can last 10–15 years without introducing harmful chemicals into your soil. This makes it an excellent choice for gardeners who want longevity without compromising plant health.
Redwood offers many of the same benefits as cedar, with added durability. It’s naturally resistant to rot and pests and can last 15–20 years with proper care. While redwood is pricier, its rich color matures beautifully over time, making it a standout feature in any garden.
Reclaimed wood is a sustainable option that helps reduce waste. Just be sure the wood hasn’t been treated with chemicals, as those can leach into the soil and harm your plants.
Recycled composite boards are a durable blend of recycled plastic and wood fibers. These boards are moisture-resistant, insect-proof, and decay-resistant, with an impressive lifespan of 20+ years. While the upfront cost is higher, their durability makes them a long-term investment.
Naturally rot-resistant hardwoods like black locust and white oak are another solid choice. These woods naturally fend off decay and can last 15–25 years, reducing the need for frequent replacements. This makes them a smart pick for gardeners aiming to balance longevity with sustainability.
Why to Avoid Treated Lumber
Treated lumber might seem like a practical option, but it often comes with hidden risks. Older pressure-treated wood contains chromated copper arsenate (CCA), which includes arsenic - a toxic chemical that poses serious health risks. Even modern treatments like alkaline copper quaternary (ACQ) still use copper compounds, which can build up in the soil over time.
These chemicals can harm soil organisms, potentially affect plant health, and raise concerns about food safety, especially in edible gardens. Root vegetables, which grow in direct contact with the soil, are particularly vulnerable to any chemical leaching.
Material Cost and Durability Comparison
Here’s a quick breakdown of some common materials to help you weigh cost, durability, and environmental impact:
| Material | Cost per Linear Foot | Expected Lifespan | Environmental Impact | Availability |
|---|---|---|---|---|
| Untreated Cedar | $3.50–$5.00 | 10–15 years | Low (renewable resource) | Widely available |
| Redwood | $4.00–$7.00 | 15–20 years | Low (renewable, slow-growing) | Regional availability |
| Reclaimed Wood | $2.00–$4.00 | 8–12 years | Very low (waste diversion) | Limited availability |
| Recycled Composite | $6.00–$10.00 | 20+ years | Low (recycled materials) | Widely available |
| Untreated Pine | $2.00–$3.50 | 3–5 years | Low (renewable resource) | Widely available |
Pine is the most affordable option, but it comes with a trade-off: a much shorter lifespan. It’s a good choice for temporary gardens or if you’re experimenting with different bed placements. Plus, frequent replacements give you the flexibility to change bed sizes or layouts as your needs evolve.
Additional Considerations
Your local climate plays a big role in how well your materials hold up. For example, high humidity or heavy rainfall can accelerate the decay of less durable woods, while intense sun and dry conditions in desert areas may cause cracking or splitting.
Transportation costs are another factor to keep in mind. Locally sourced materials, like reclaimed wood or regionally available species such as cedar in the Pacific Northwest, can save you money and reduce the environmental impact of shipping.
Tools and Supplies You'll Need
Before diving into your garden bed project, make sure you have all the necessary tools and materials on hand. While many of these are common workshop staples, some are specifically tailored for building garden beds.
Basic Tools and Materials List
Power Tools are key to making clean, precise cuts and assembling your bed efficiently. A circular saw or miter saw is ideal for cutting lumber, especially thicker boards like 2x12s. Opt for a 7¼-inch blade for the best results. A cordless drill equipped with both drilling and driving bits will handle the assembly process with ease.
Hand Tools you’ll need include a speed square for accurate corners, a 25-foot tape measure for precise measurements, a pencil for marking cuts, and a level to ensure everything is even. A rubber mallet is also helpful for making gentle adjustments during assembly.
Hardware and Fasteners are essential for holding everything together. Use exterior wood screws, preferably stainless steel or galvanized, in 2½-inch or 3-inch lengths to resist rust. For a standard 4x8-foot bed, you’ll need 16–20 screws. To strengthen the joints, especially for taller beds or softer woods, consider adding galvanized steel corner brackets.
Ground Preparation Materials are crucial for protecting your garden bed from pests and weeds. Hardware cloth with ¼-inch mesh is effective at keeping out burrowing critters like gophers and moles. A 4x8-foot piece typically costs between $15 and $25. While optional, landscape fabric can help suppress weeds and improve drainage if you’re placing the bed on grass or cleared soil.
Additional Durability Options
Once you’ve gathered the basics, you might want to consider a few upgrades to make your garden bed last longer.
Metal Corner Brackets are an excellent addition, especially for softer woods like pine. These heavy-duty galvanized brackets cost $3–8 each and significantly reinforce the joints, which is especially useful if you plan to move or disassemble the bed in the future.
Wood Preservatives can extend the life of your garden bed while keeping it safe for growing food. Look for food-safe options like tung oil or linseed oil, which protect the wood from moisture. A quart costs $12–20 and can cover two to three garden beds.
Drip Irrigation Supplies are a great way to simplify watering. Basic drip line kits start at $25 and can be installed during construction by drilling small holes in the bed walls.
Corner Post Extensions are useful if you plan to add height to your bed later or install trellises. Treated 4x4 posts, cut to 2–3 feet, provide a sturdy anchor for these future additions.
Measurements and Cost Estimates
To finalize your planning, take a closer look at the dimensions and costs involved.
For a standard 4x8-foot bed made from 2x10-inch boards, expect to spend $15–25 on screws, hardware cloth, and other small supplies.
Tool costs will depend on what you already own. A basic cordless drill costs $40–80, while a circular saw ranges from $60–150. If you don’t want to buy a saw, many home improvement stores rent them for $25–35 per day.
Budget-friendly options include shopping for lumber sales, reclaimed materials, or discounted boards with minor damage. End-of-season sales can also offer significant savings, with discounts of 20–30% on lumber.
Keep in mind that prices can vary by location. Coastal and urban areas often have prices 15–25% higher than the national average, while rural areas with local sawmills may provide better deals.
Preparing Your Site
Getting your site ready is a crucial step to ensure your raised garden bed performs well and lasts for years to come. Let’s break it down into the key steps for creating the perfect foundation.
Choosing the Right Location
Start by ensuring your garden gets 6–8 hours of direct sunlight each day. This is essential for healthy vegetable growth. Observe your yard at different times to find a spot with consistent sunlight. Morning sun is especially helpful since it dries dew from leaves, lowering the risk of fungal issues.
Next, think about water access. Place your bed within 50 feet of a water source for convenience. If you’re planning multiple beds, now’s a good time to consider installing a simple irrigation system or running a dedicated water line to the area.
Pay attention to drainage. Avoid low spots where water tends to pool after rain, as this can lead to soggy soil and attract mosquitoes. A slight slope is actually ideal because it lets excess water drain away naturally.
Finally, check the ground conditions. Raised beds can go almost anywhere, but avoid areas with large tree roots or underground utilities. If you plan to dig deeper for corner posts or drainage, call 811 (the national "Call Before You Dig" hotline) to ensure safety.
Once you’ve found the right spot with good sunlight, water access, and drainage, it’s time to mark and prepare the area.
Marking and Clearing the Area
Start by measuring carefully. For a standard 4×8-foot bed, use a 25-foot tape measure and mark the corners with spray paint or wooden stakes. Add an extra 6 inches around the edges for easier assembly and future maintenance.
Next, remove the sod for better ground contact and to keep the bed stable. Use a flat spade to cut the sod into squares, then lift it out. Don’t toss it - flip the sod grass-side down in a corner of your yard to decompose into nutrient-rich soil for later use.
Level the ground by clearing away tree roots, rocks larger than 1 inch, and filling in any dips or holes. While minor unevenness is fine, major bumps or slopes can make assembling your bed tricky.
Finally, clear debris and weeds from the area. Pull out large weeds by hand and rake away any leaves, sticks, or other organic material. With a clean, level site, you’ll be ready to address wildlife concerns.
Site Layout and Wildlife Protection
The way you position your bed can make a big difference. Orient the long side of the bed east to west if possible. This ensures plants get even sunlight throughout the day, preventing taller plants from shading shorter ones.
If you’re thinking about adding more beds in the future, plan ahead. Leave at least 3 feet of space between beds for easy access with a wheelbarrow or walking paths.
To protect your garden from burrowing pests like gophers or moles, lay down a ¼-inch hardware cloth before building the bed frame. Overlap the edges by 2 inches and secure them with landscape staples, especially if it’s windy.
For larger pests like deer or rabbits, consider perimeter protection. Installing fencing now is much easier than trying to add it after your bed is planted.
Lastly, think about accessibility. A 4-foot-wide bed allows you to reach the center from either side without stepping on the soil. If your bed is up against a wall or barrier, limit the width to 2–3 feet to ensure you can still reach everything.
Setting up your site with proper layout and wildlife protection not only helps your garden thrive but also keeps maintenance manageable in the long run.
Building Your Raised Garden Bed
Now that your site is ready and materials are on hand, it’s time to assemble your raised garden bed. By using environmentally conscious materials and following a clear process, you’ll create a sturdy bed that’s built to last. While the steps are straightforward, taking your time ensures a reliable structure for years of gardening.
Cutting and Assembling the Frame
Start by measuring and cutting two 8-ft boards and two 4-ft boards for a 4×8-ft bed. Using 2×12 cedar planks gives you a 12-inch depth, which works well for most vegetables. If you’re planting crops with deeper roots, go for 2×16 boards or stack two 2×8 boards for a total depth of 16 inches.
For clean and accurate cuts, use a circular saw or miter saw. After cutting, lightly sand the edges to avoid splinters. Before attaching anything, dry-fit the frame by laying the boards on a flat surface. Measure the diagonals to confirm the corners are square - this small step can save you trouble later.
When forming the corners, use butt joints by placing the shorter 4-ft boards inside the longer 8-ft boards. This method creates neat corners and allows for easier disassembly if needed. To avoid splitting the wood, mark and pre-drill pilot holes using a drill bit slightly smaller than your screws.
Securing the Structure
For durability, use galvanized deck screws. Three-inch screws are ideal for 2×12 boards, providing a secure hold without poking through the other side. If your garden bed will face wet conditions, consider stainless steel screws, which resist corrosion even better.
Secure each corner with three screws arranged in a triangular pattern. Place the screws 1 inch from the edges and 2 inches from the ends of the boards. Before fully tightening, check the alignment of the frame, and if necessary, use a rubber mallet to gently adjust the corners.
For extra strength, especially with taller beds, add metal corner brackets. Products like the A34 angle bracket from Simpson Strong-Tie work well with 2×12 boards and significantly reinforce the structure. If your bed is 16 inches or taller, include a horizontal support board across the center of each long side. Use 2×4 boards cut to fit snugly and secure them with 2½-inch screws. This step prevents the sides from bowing outward under the weight of the soil.
Once the frame is secure, you’re ready to install a bottom barrier to keep pests at bay.
Installing a Bottom Barrier
To protect your plants from burrowing pests like gophers and moles, use hardware cloth with ¼-inch openings. This material also allows helpful earthworms to move freely. Roll out the hardware cloth, cutting it 2 inches larger than the bed on all sides. Secure it with landscape staples spaced every 12 inches along the perimeter. Fold the excess material up against the inside walls of the bed for a seamless barrier.
If pest protection isn’t a concern, you can use landscape fabric to suppress weeds or cardboard as an eco-friendly option. Cardboard decomposes within 12–18 months, providing an initial weed block while enriching the soil over time.
When using multiple pieces of any barrier material, overlap the seams by 6 inches to prevent weeds from sneaking through gaps. Once the barrier is in place, position your completed frame over it. Trim any excess material extending beyond the bed walls with a utility knife for a tidy finish.
With the frame and bottom barrier complete, your raised garden bed is ready for the next steps in creating a thriving garden space.
Filling and Planting Your Raised Bed
With your frame ready and a bottom barrier in place, it’s time to fill your raised garden bed with the right materials. The key to a flourishing garden lies in proper drainage and a nutrient-rich soil mix that supports healthy plant growth.
Building Drainage and Soil Layers
Good drainage is essential to prevent waterlogged roots and to create a strong foundation for your plants. Start by adding a 2-inch layer of coarse materials like small branches, twigs, or wood chips. This layer helps create air pockets for drainage. Next, add another 2-inch layer of organic matter such as decomposed leaves, grass clippings, or shredded paper to transition into your growing medium.
For a standard 4×8-foot bed that’s 12 inches deep, you’ll need about 21 cubic feet of soil to fill the remaining 8 inches. If your bed is deeper - say, 16 inches - you’ll need closer to 32 cubic feet of soil. Be sure not to fill the bed all the way to the top; leaving about an inch of space below the rim prevents soil from spilling over during heavy rains and allows room for a mulch layer later.
Creating the Right Soil Mix
A well-balanced soil mix is critical for raised beds, offering good drainage, nutrition, and water retention. A popular recipe combines equal parts compost, topsoil, and coarse sand or perlite. Use dark, crumbly compost with a rich, earthy smell, and opt for screened topsoil rather than fill dirt to avoid weeds and debris. If you’re unsure about the quality of your soil, ask your supplier for a basic soil analysis to check pH levels and organic matter content.
Incorporating coarse sand or perlite improves drainage without making the soil too heavy. You can also enrich your mix with organic amendments. For example, aged manure (10–15% of your mix) provides slow-release nitrogen. Aged chicken manure is another great option, but make sure it’s been composted for at least six months to avoid damaging plant roots. If you’re planting acid-loving crops like blueberries, add sulfur or peat moss to lower the pH. For most vegetables, aim for a pH between 6.0 and 7.0. Soil test kits, often available through local Cooperative Extension offices, can help you fine-tune your mix.
Once your soil is ready, you can move on to selecting plants that will thrive in your raised bed.
Choosing Plants for Your Climate Zone
Selecting plants that match your USDA Hardiness Zone is crucial for a successful garden. These zones, based on average minimum winter temperatures, range from Zone 3 in colder northern areas to Zone 10 in the warmer southern regions.
Cool-season crops like lettuce, spinach, and peas can be planted 2–4 weeks before the last frost, as they thrive in temperatures between 40°F and 70°F. Warm-season vegetables such as tomatoes, peppers, and squash need soil temperatures above 60°F and stable nighttime conditions. Wait until a week or two after the last frost to transplant these heat-loving plants.
Raised beds are particularly great for root vegetables like carrots and radishes because the loose soil allows them to grow freely. Carrots can be planted when soil temperatures reach about 45°F, and they often taste sweeter after exposure to cooler weather. Radishes grow quickly, maturing in just 25–30 days, and can be planted in succession throughout the growing season.
When choosing plant varieties, consider the length of your local growing season. In cooler climates, opt for quick-maturing varieties, while gardeners in warmer areas can choose plants that produce over a longer period. Companion planting is another way to maximize space - place taller crops like tomatoes on the northern side of the bed to avoid shading smaller plants, and pair fast-growing radishes with slower-growing vegetables.
For more tailored advice, check with your local Cooperative Extension office for planting calendars and region-specific tips.
Maintenance and Long-Term Care
A raised garden bed, when properly cared for, can deliver bountiful harvests year after year while remaining sturdy and reliable. Routine upkeep not only ensures the bed’s longevity but also reinforces the sustainable methods used during its creation.
Watering, Mulching, and Seasonal Care
Raised beds tend to dry out faster because of their improved drainage and airflow. During hot summer days, you might need to water every day or two, especially for shallow-rooted plants like lettuce and herbs. However, opting for deep, less frequent watering helps develop stronger root systems compared to light daily sprinkling.
To make watering more efficient, consider installing a drip irrigation system or laying soaker hoses in a zigzag pattern beneath a layer of mulch. This setup minimizes water waste and reduces evaporation compared to overhead sprinklers.
Adding a 2–3 inch layer of organic mulch - like shredded leaves, straw, or wood chips - around your plants helps retain moisture, suppress weeds, and regulate soil temperature. Just be sure to keep the mulch a couple of inches away from plant stems to avoid attracting pests or encouraging fungal growth.
Seasonal care is key to keeping your garden productive all year. In the fall, clear out old plants and spread a layer of compost over the soil to nourish beneficial organisms and prepare for spring planting. If winters are harsh where you live, consider using row covers or cold frames to protect your beds and extend the growing season.
When spring arrives, lightly turn the top 4–6 inches of soil to preserve earthworms and other helpful microorganisms. Adding 1–2 inches of fresh compost annually will replenish nutrients and maintain soil health. These steps help prevent long-term structural and soil-related problems.
Preventing Wood Rot and Soil Problems
To protect your garden bed from wood rot, ensure proper drainage by sloping the soil away from the frame or installing a French drain to avoid water pooling. Even rot-resistant woods like cedar can break down if they stay wet for too long.
For added protection, line the inside of your garden bed’s wooden boards with heavy-duty plastic sheeting, leaving the bottom open for drainage. This barrier reduces direct soil contact, prolonging the life of the wood. Check the liners regularly and replace them when they start to deteriorate.
Soil health is just as important as structural care. Annual soil testing can help you catch imbalances before they harm your plants. Use pH test strips to monitor acidity; most vegetables grow best in soil with a pH between 6.0 and 7.0. If the soil is too acidic, applying agricultural lime in the fall can help. For alkaline soil, adding materials like sulfur or pine needles can bring the pH back into balance.
Compacted soil can also become an issue over time, especially if you frequently step into the bed during maintenance. To avoid this, use stepping stones or temporary boards when harvesting. If compaction does occur, gently work in coarse compost or aged manure to restore the soil’s texture.
Another potential issue is salt buildup from fertilizers, which can harm plants and soil organisms. If you notice white, crusty deposits on the soil surface or signs of fertilizer burn, flush the bed with water to reduce salt levels.
Eco-Friendly Gardening Practices
In addition to regular maintenance, adopting eco-friendly habits can boost your garden’s productivity while being kind to the environment.
Rotate crops within your bed each season. For example, follow nutrient-heavy plants like tomatoes with light feeders or legumes to maintain soil balance and reduce the risk of disease. Companion planting is another smart strategy. Herbs like basil can repel pests when planted near tomatoes, while nitrogen-fixing beans can benefit heavy feeders like squash. Adding flowering plants such as marigolds, nasturtiums, or sweet alyssum can attract pollinators and other beneficial insects.
Composting directly in your garden bed is another sustainable option. During winter, bury kitchen scraps in unused sections of the bed or create small compost pockets between plants. This method enriches the soil with nutrients over time without needing a separate compost bin.
Water conservation can go beyond efficient irrigation systems. Collect rainwater in barrels placed near your beds, and consider using greywater from your kitchen sink - just make sure it’s free of soap or chemicals. Planting drought-tolerant vegetable varieties can also help reduce water usage.
For pest control, natural methods are often the most effective and environmentally friendly. Encourage beneficial insects by planting flowers that attract them, and use organic deterrents like row covers to protect young plants from pests. Copper strips around the bed’s edges can keep slugs and snails at bay, while hand-picking larger pests like hornworms and Japanese beetles in the early morning is a simple but effective solution.
Conclusion: Your New Garden Bed is Ready
Well done! You've successfully built a raised garden bed that’s not only practical but also kind to the environment. By choosing eco-conscious materials and thoughtful construction methods, you've created a garden bed that’s built to last without compromising the health of your soil or surroundings.
This elevated design offers plenty of perks that traditional gardens simply can't. Better drainage means no more worrying about soggy roots, and the raised structure gives you greater control over soil quality. Plus, let’s not forget how much easier it is on your back and knees when planting, weeding, or harvesting. And because you’ve used natural, safe materials, your garden will age gracefully without adding harmful chemicals to your growing space.
Over time, this raised bed will do more than just grow vegetables - it will help conserve water, boost your harvest, and support a thriving mini-ecosystem. From attracting beneficial insects to enriching the soil, you’ve set the stage for a healthier, more sustainable backyard. Most importantly, you’ve taken a step toward producing fresh, nutritious food while contributing to the well-being of your local environment.
But this is just the start! If you're eager to take on more eco-friendly projects, why not explore other ways to make your home more sustainable? From energy-efficient building ideas to creative garden structures, there’s a world of possibilities waiting for you.
With the care techniques you’ve learned, this raised garden bed will keep providing fresh produce and supporting the ecosystem for seasons to come. It’s a small but meaningful step toward a greener, more self-sufficient lifestyle.
FAQs
What are the advantages of using eco-friendly materials to build a raised garden bed?
Using eco-friendly materials for your raised garden bed offers several benefits worth considering. For starters, they help keep your soil safe by minimizing the chance of harmful chemicals seeping into it. This means your plants and crops can grow healthier and free from unwanted contaminants. Materials like untreated wood or recycled items are great options, as they not only protect your garden but also help conserve resources and cut down on waste.
Another perk is how these materials encourage biodiversity. They create a more natural setting that supports helpful insects and microorganisms, which are essential for a thriving garden ecosystem. On top of that, eco-friendly options are often long-lasting and naturally resistant to decay, making them both a smart and environmentally conscious investment for your gardening projects.
How do I ensure good drainage and healthy soil in my raised garden bed?
To create the perfect environment for your raised garden bed, start with a soil mix that's 70% quality garden soil and 30% compost. This blend delivers essential nutrients while ensuring proper drainage. For even better results, consider adding perlite or coarse sand to prevent water from pooling and compacting the soil.
Steer clear of using materials like plastic, trash bags, or gravel at the bottom of your garden bed. These can disrupt drainage and might even contaminate the soil. Instead, loosen the soil beneath the bed and mix in organic matter like compost or vermicompost. This approach improves aeration, increases fertility, and provides the perfect conditions for plant roots to grow and flourish.
How can I protect my raised garden bed from pests and animals?
To protect your raised garden bed from pests and animals, start by setting up physical barriers. Fences, netting, or mesh can effectively keep out larger intruders like deer, rabbits, and groundhogs. For smaller pests, consider using fabric garden covers or pest-resistant frames to shield your plants.
You can also use natural deterrents for extra defense. Garlic or pepper sprays work well to repel animals, and planting less attractive crops around your garden bed can discourage wildlife from approaching. Scare tactics, like reflective tape or motion-activated lights, can add another layer of protection. By combining barriers with natural repellents, you create an eco-friendly and effective solution to keep your garden safe.