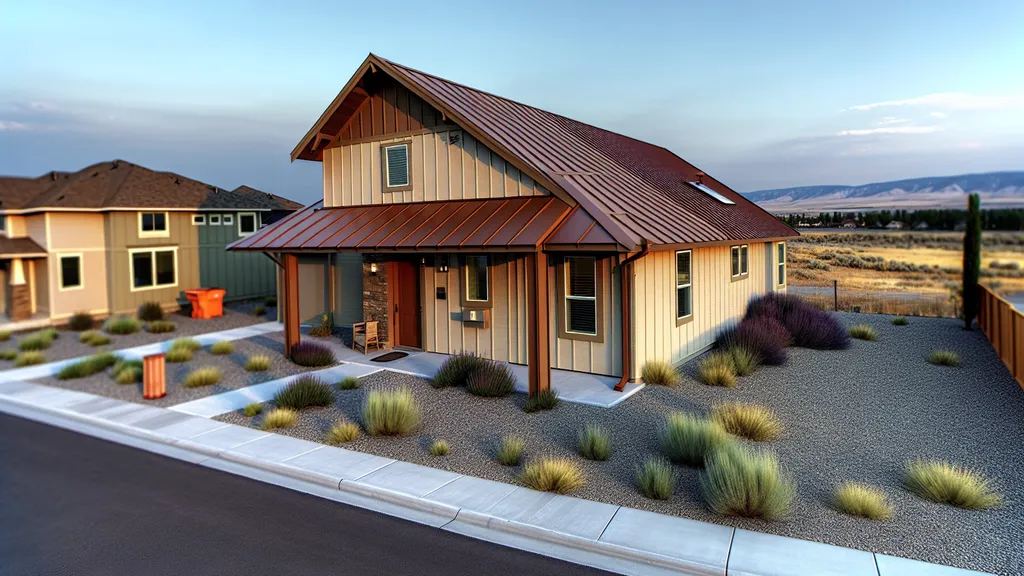
Practical guide to building and hardening homes in wildfire-prone fire zones—materials, site strategies, codes, and DIY cost-saving tips.
Wildfire Resistant Construction: Fire Zones
Wildfire resistant construction starts with understanding how fire zones shape design and siting choices. Research shows that ember showers—not direct flames—cause the majority of home ignitions in wildfires (studies by NFPA and NIST indicate ember-driven ignitions account for roughly 50–90% of structure losses in major WUI events). This article explains what fire zones mean for builders, how to read hazard maps, which materials and details lower ignition risk, and which DIY upgrades deliver the best protection for a given budget. You will learn practical, code-aware steps for new builds and retrofits in wildland-urban interface areas.
TL;DR:
- Ember prevention matters most: install screened vents (1/8" or finer) and Class A roofing to reduce ember-driven ignitions by 50–80%.
- Create and maintain defensible space: clear 0–5 ft of flammable materials, thin 5–30 ft, and maintain 30–100+ ft extended reduction based on slope.
- Prioritize low-cost, high-impact fixes first: gutter guards, attic vent screens, and ember-resistant siding often beat full roof replacement for short-term protection.
Related guides: Earthquake resistant design seismic zones, Flood resistant building elevated construction, Checklist for recycling construction materials, Recycled steel in construction benefits and uses, and Earth bag building low cost construction method.
Why fire zones matter for wildfire resistant construction
Fire zone designations change priorities for material choice, roof form, and site work. Wildland-Urban Interface (WUI) expansion raises the number of homes exposed to wildfire per year, and authorities such as Firewise USA, NFPA, and Cal Fire publish guidance that directly affects allowable construction methods and insurance risk. For example, the National Fire Protection Association (NFPA) and NIST have repeatedly shown that embers blown ahead of the flame front can ignite roofs, vents, and combustible siding—this is the primary cause of structure loss in most wildfire events.
Practical implications:
- Roofs are the first line of defense: Class A roofing (as tested to ASTM E108/UL 790) and non-combustible flashing reduce ignition probability.
- Open eaves and unprotected vents create pathways for embers into attics and wall cavities.
- Site features—vegetation type, slope, and distance to fuels—change the size of defensible space that’s effective.
For homeowner guidance on hardening an existing house, see the Ready for Wildfire hardening checklist. That resource, combined with local hazard mapping, helps align material choices and layout with fire-zone expectations.
How fire zones change design priorities
Design should reflect the zone severity:
- Moderate zones: focus on ember-resistant details and basic defensible space.
- High/very high zones: use non-combustible roof and cladding, boxed eaves, and certified ember screens; plan for active water systems where available.
- Extreme exposure (steep slopes/continuous canopy): site relocation or significant fuel breaks may be required.
Codes and insurance often require higher standards as zone severity increases. Early planning reduces expensive retrofits later.
Key wildfire behaviors that affect homes (ember attack, surface fire, crown fire)
- Ember attack: Small burning debris transported by wind that ignites roofs, gutters, vents, and combustible materials. Studies from NIST show embers can travel more than a mile in strong winds.
- Surface fire: Low-intensity ground flames that spread through grass and shrubs and can reach structures directly if fuels are adjacent.
- Crown fire: High-intensity canopy fires that produce intense heat and dense ember showers; these create the most severe exposures and are hardest to defend against.
Understanding these behaviors determines whether a design emphasizes ember protection, radiant heat resistance, or removal of adjacent fuel sources.
How fire zones are defined: WUI, hazard maps, and local designations
Fire zones are defined by agencies using fuel type, topography, and historic fire frequency. Key classification systems include county hazard zones, Cal Fire hazard severity zones in California, and FEMA advisories that layer flood and fire risk information.
- Wildland-Urban Interface (WUI): Areas where human development meets or intermingles with wildland fuels. WUI status often triggers local code amendments.
- Hazard severity zones: Agency maps (for example, Cal Fire’s Fire Hazard Severity Zone maps) categorize parcels as moderate, high, or very high risk.
- FEMA advisories and local overlays: These add building constraints or financial incentives and may appear in permit review.
To read maps and GIS layers:
- Pull vegetation/fuel-class layers to identify fuel type within 100–500 ft.
- Check slope and aspect layers—steeper slopes amplify fire intensity and increase required defensible space.
- Review historic fire frequency and burn severity layers for longer-term trends.
The National Interagency Fire Center provides overview guidance on home protection in wildfires; visit the NIFC home protection page for national-level resources. For property-level mapping, contact county planning departments or use state GIS portals. Insurance underwriters and building departments sometimes require official map designations when calculating premiums or issuing permits.
Common classification systems (county hazard zones, Cal Fire zones, FEMA advisories)
Counties often adopt state hazard maps and then apply local amendments. Cal Fire’s maps are widely referenced in California building permits and insurance underwriting. FEMA hazard maps and advisories may flag parcels for disclosure requirements. Always use the authoritative layer named by your county or state for permit and insurance purposes.
What maps and layers to read (vegetation, slope, historic fire frequency)
Look for:
- Fuel model/vegetation type (grass, shrub, timber)
- Low, moderate, or high fuel continuity
- Slope percent (0–30% vs 30%+ matters for defensible space)
- Historical fire perimeters and burn severity
Gather GIS layers online or request shapefiles from your county GIS office. Local fire agencies can also advise on which layers they use for inspections and defensible space enforcement.
Assessing your property in a fire zone
A practical, repeatable assessment helps prioritize work. Use this step-by-step workflow and checklist for an initial DIY risk survey.
Step-by-step Property Risk Assessment Checklist:
- Review local hazard maps and parcel designation.
- Walk the perimeter to catalog fuel types within 100–200 ft.
- Measure slope from house to nearby fuels using a clinometer or phone app.
- Inspect roof, gutters, vents, and external attachments for combustible material.
- Document distances from structure to large trees, brush, and outbuildings.
Tools to use: laser distance meter, clinometer app, smartphone GPS/GIS app, camera, measuring tape. Industry guidance on clearing and maintenance can be found in the NFPA homeowner advice: Preparing homes for wildfire - NFPA.
Evaluating nearby fuels, slope, and access
- Fuel proximity: Note any combustible fuels within 0–30 ft—this is the highest-impact area for ember and surface fire exposure.
- Slope: A 30% uphill slope increases heat exposure significantly; extend defensible space upslope.
- Access: Ensure emergency vehicles can reach the property via at least one clear route; mark gates and house numbers for visibility.
Identifying common entry points for embers
Common vulnerabilities:
- Roof valleys, gaps at roof-to-wall intersections, and uncovered gutters.
- Attic and subfloor vents without ember screens.
- Combustible siding termination points near the ground or under decks.
- External attachments like wooden decks, pergolas, and stored materials.
For a focused list of typical air and ember entry locations to seal, see our air leakage checklist. Seal gaps with fire-rated sealants and install mesh screens at openings—mesh as fine as 1/16" is used in very high-risk areas, while 1/8" is common for general ember protection.
When to hire help: If slope, canopy continuity, or structural vulnerabilities are complex, hire a local fire-prevention consultant or your county fire planner for a defensible space inspection and remediation plan.
Design principles for wildfire resistant construction by fire zone
Design recommendations scale with zone severity. Below are practical details for the highest-impact components: roofing, walls, doors/windows, and vents. Follow ASTM and NFPA test standards where referenced.
Roofing choices and roof-edge detailing
- Preferred materials: Class A materials such as metal, clay tile, concrete tile, and treated Class A composite shingles (test standard ASTM E108/UL 790).
- Roof form: Minimize valleys and open eaves. Use boxed-in eaves or soffits with ember screens.
- Flashing and gutters: Use non-combustible flashing and install gutter guards to prevent leaf accumulation.
For tile installation guidance on DIY tile roofs, consult the clay tile roofing guide. For metal roof details and fastening to avoid ember traps, see our metal roofing installation.
Wall systems, cladding, and sheathing considerations
- Recommended cladding: fiber-cement, stucco, masonry, or ignition-resistant treated siding.
- Continuous sheathing reduces gaps where embers can ignite cavities and improves air barrier performance. For material choices and airtightness considerations, review the guide to wall sheathing.
- Trim and projections: Avoid combustible trim near the ground; use non-combustible sills and flashing at base transitions.
Doors, windows, vents and glazing strategies
- Glazing: Use multi-pane or tempered glass for smaller panes and consider fire-rated assemblies where required. Larger single-pane windows are vulnerable to breakage from heat and allow ember entry.
- Doors: Use metal-clad or solid core doors with three-point latching and no gaps at the threshold.
- Vents: Screen vents with 1/8" or finer corrosion-resistant mesh; install baffles or intumescent vent covers where high ember fluxes are expected.
Compare common roofing and siding options (performance and cost considerations):
| Component | Typical cost band* | Fire performance | Notes |
|---|---|---|---|
| Metal roofing | Medium ($5–$12/ft² installed) | Class A, non-combustible | Low maintenance, good ember shedding |
| Clay/concrete tile | High ($8–$20/ft² installed) | Class A, non-combustible | Heavy; requires structural capacity |
| Fiber-cement siding | Medium ($4–$10/ft² installed) | Ignition-resistant | Good balance of cost and durability |
| Stucco/masonry | Medium–High | Non-combustible | Good thermal mass and durability |
| Composite shingles (Class A) | Low–Medium | Class A | Lighter, less durable than tiles |
*Cost bands are ballpark and vary by region and contractor availability.
In high and very high hazard zones, best practice emphasizes combining non-combustible roofs with ember-resistant vents, boxed eaves, continuous sheathing, and non-combustible cladding to minimize multiple failure points. FEMA guidance recommends sealing gaps in exterior walls and roofs with fire-resistant caulk or mortar to limit ember intrusion; see FEMA’s wildfire protection PDF for details: https://www.fema.gov/sites/default/files/2020-11/fema_protect-your-property_wildfire.pdf
Site and landscape strategies: creating and maintaining defensible space
A clear, maintained defensible space reduces the chance of ignition from surface fires and limits ember-driven ignition risk. This section explains the zone system, planting choices, and routine maintenance.
Before the video: this short video shows practical hardening steps and how to maintain defensible space visually. Viewers will see examples of plant spacing, ember screening, and gutter cleaning in action.
This DIY video shows you the hands-on process:
Defensible space zones and fuel reduction tactics
Typical zone guidelines:
- Immediate zone (0–5 ft): Remove all combustible materials. Use non-combustible hardscape, gravel, or well-irrigated low-fuel plantings.
- Intermediate zone (5–30 ft): Reduce density of shrubs and space trees; remove ladder fuels under tree canopies.
- Extended zone (30–100+ ft): Thin trees to reduce crown continuity and remove dead material; expand based on slope and fuel type.
For more prescriptive guidance on defensible space implementation, see the University of Nevada’s Defensible Space Guide: https://naes.agnt.unr.edu/PMS/Pubs/2023-5522.pdf
Key points list for ongoing maintenance:
- Clear gutters seasonally and install gutter guards to prevent ember accumulation.
- Prune tree branches to keep them 10 ft from structures and 6–10 ft between crowns.
- Store firewood and combustible materials at least 30 ft from the house or on the non-exposed side.
- Remove dead grasses and weeds in early summer and before fire season.
Planting and hardscape choices for fire-prone sites
- Use low-fuel plant species and maintain adequate spacing. Avoid dense groundcovers that can carry fire to higher fuels.
- Favor gravel, pavers, and masonry within the immediate zone. Mulch with non-combustible materials (scoria or gravel) near foundations rather than bark mulch.
- Position driveways and patios as fuel breaks; hardscape can provide a defensible area for firefighter access.
Maintenance cadence:
- Seasonal: roof and gutter cleaning in spring and late summer.
- Monthly during fire season: check and remove debris from decks and vents.
- Annual: inspect and thin extended-zone trees, update fuel maps, and revise defensible-space plan.
Adopt Firewise USA principles for community-level coordination and to align individual efforts with neighborhood hazard reduction activities.
Passive and active systems to reduce ignition risk
Combining passive ember-proofing with active water systems gives layered protection. Ember-resistant construction reduces ignition likelihood while active systems limit fire spread.
Ember-resistant details and passive barriers
Practical passive measures:
- Mesh sizes: use corrosion-resistant wire mesh of 1/8" or smaller on vents; use 1/16" where intense ember exposure is expected.
- Seal gaps: use fire-rated caulk or mortar at wall and roof penetrations; fill open joints and foundation-to-siding gaps.
- Non-combustible attachments: replace wooden decks or cladding near foundations with ignition-resistant materials or add non-combustible screening underneath.
A regional resource on ignition-resistant home elements is available at Wildfire Risk’s ignition-resistant homes page: https://wildfirerisk.org/reduce-risk/ignition-resistant-homes/
Active protection: home sprinklers, exterior deluge systems, and water storage
Active systems options:
- Interior residential sprinklers: protect occupants and interior, often required in higher-risk jurisdictions for new builds.
- Exterior rooftop or yard deluge systems: tile or pipe-mounted sprinklers aimed at roofs and perimeter areas; activated by homeowners, automatic controllers, or firefighting command.
- Water storage: cisterns sized to support sprinklers and pumps—common guidance is 5,000–10,000 gallons for exterior systems, depending on house size and system design.
Water source and pumping:
- Options include municipal supply, gravity-fed cisterns, or off-grid pumps. For off-grid pump approaches and solar/manual options, see our off-grid water pumps.
- Trade-offs: active systems require maintenance and winterization; cisterns and pumps add upfront cost but provide independent suppression capability.
Active systems are particularly valuable where utility water supply is unreliable during emergencies. Work with licensed sprinkler contractors to size systems and verify local code allowance.
Permits, building codes, and insurance considerations in fire zones
Fire-zone designations influence permits, construction standards, and insurance availability. Know which rules apply early to prevent costly redesigns.
Common code requirements and construction standards
Local jurisdictions may adopt the International Wildland-Urban Interface Code (IWUIC) or equivalent local ordinances with WUI-specific ember-resistant construction requirements. Common code drivers include:
- Required ember-resistant vents and enclosed eaves in high hazard zones.
- Minimum roof covering Class A ratings for new roofs in designated zones.
- Fire department access and water supply requirements for subdivisions.
Consult the IWUIC and your county code office for exact requirements. Vent protection and ventilation strategy must also preserve indoor air quality—see our ventilation guide for approaches that balance ember screening with adequate fresh air and balanced mechanical ventilation.
How fire zone designations affect permits and insurance
- Permitting: High/very high hazard zones often require fire-hardening details in permit drawings and may require fire marshal sign-off.
- Insurance: Zone designation can increase premiums or lead to non-renewal if the property lacks basic hardening measures. Document upgrades and defensible space to support appeals or premium reductions.
- Documentation: Keep before-and-after photos, receipts for materials and contractor work, and signed inspection reports. Insurers respond well to documented ember-resistant vent installation, gutter guards, and roof upgrades.
Proactively engage building inspectors and the local fire marshal early in the design phase. That reduces the chance of surprises during inspection and streamlines approval.
Costs, trade-offs, and DIY-friendly upgrades for different budgets
Budget planning helps prioritize actions in the right order. Below are ballpark cost ranges and recommended sequencing.
Cost comparison: major upgrades (roof, siding, windows, sprinklers)
- Roof replacement (metal or tile): $8,000–$30,000+ depending on size and material (small home to medium-sized house).
- Fiber-cement siding replacement: $6,000–$20,000 depending on area and finish.
- Window upgrades (multi-pane/tempered): $300–$1,200 per window installed.
- Exterior deluge/roof sprinkler system: $3,000–$15,000 depending on water storage and pump needs.
- Interior residential sprinklers: $3,000–$8,000 for a typical single-family home.
Cost-benefit framework:
- Immediate, low-cost items (gutter guards, vent screens, clearing) yield high risk reduction for low investment.
- Mid-cost items (window upgrades, partial cladding replacement) are good next steps.
- High-cost items (roof replacement, full sprinkler systems) provide long-term protection and may be required by code in some zones.
High-impact, low-cost DIY steps (gutter screens, ember barriers, clearing)
DIY-friendly actions:
- Install gutter guards and clean gutters twice per year. Gutter guards cost $5–$15/ft installed or less for DIY.
- Fit vent mesh and install draft-proofing around penetrations; vent screens are typically $10–$50 each.
- Clear combustible materials 0–5 ft from foundations and remove ladder fuels within 5–30 ft.
- Replace wooden house numbers and mailbox posts near the home if they create ignition risk.
When to hire pros: Roof replacement, structural changes to support tile, and complex sprinkler installations generally require licensed tradespeople. For sealing and screening work, many homeowners can do effective DIY work if they follow manufacturer guidance and local code for materials.
For more on roofing options and costs, see our guides on metal and clay tile installation referenced earlier.
The Bottom Line
Wildfire resistant construction aligned with local fire-zone designations and defensible space practices greatly increases the odds a home will survive wildfire exposure. Start with ember-proofing (vent screens, sealed eaves, Class A roof) and defensible space, then prioritize larger retrofits like roof or siding replacement based on budget and zone severity. Consult local fire officials and document improvements for permitting and insurance.
Frequently Asked Questions
How can I tell if my property is in a high-risk fire zone?
Check your county GIS portal or state hazard maps for parcel-level designations (for example, Cal Fire’s hazard severity maps in California). These official layers identify moderate, high, and very high severity zones and are used by building departments and insurers. If online maps are unclear, contact your local fire marshal or planning department for written confirmation.
What are the cheapest effective upgrades to reduce wildfire risk?
High-impact, low-cost measures include installing gutter guards, screening attic and foundation vents with 1/8" corrosion-resistant mesh, clearing combustible materials within 0–5 ft of the home, and removing ladder fuels beneath tree canopies. These steps often cost a few hundred to a few thousand dollars and substantially reduce ember-driven ignition risk.
Which roofing option is best for wildfire-prone areas?
Non-combustible Class A roofs—metal, clay tile, or concrete tile—offer the best protection. Metal roofs are lighter and often less expensive to install than tile; tiles provide excellent heat resistance but add structural weight. Where budget limits prevent full replacement, focus on keeping roofs clear of debris, installing gutter guards, and securing roofing-term joints and flashings.
How is defensible space measured around a home?
Defensible space uses a zone approach: immediate zone (0–5 ft) kept free of combustibles, intermediate zone (5–30 ft) thinned and maintained, and extended zone (30–100+ ft) managed to reduce fuel continuity. The exact distances can increase with slope and fuel type; upslope areas typically require larger buffer zones. Local fire agencies provide specific guidance for your area.
How should I document improvements for insurance purposes?
Keep dated photographs before and after work, receipts for materials and contractor invoices, any signed inspection reports from the local fire marshal, and permit approvals. Create a simple file with copies of all documents and provide summaries to your insurer when requesting premium reviews or supporting eligibility for coverage in high-risk zones.